Sunday, January 29, 2012

Award winning Home-brew

A few weeks ago, a lovely lady sent me an email regarding her working near the HR department within the mining department...we have had computer trouble back and forth since....with bad timing, as I never got to send you a reply...I'm sorry I haven't contacted you, and unfortunately I lost your email as we had to get a new motherboard for our computer.....Could you please send me another email if you read this......


Today's post is all about Hubby...I have to give my hubby a huge big plug..while he isn't much into all the work involved in keeping things simple, he sure does love the good food and all else that comes with the work I do. It takes a team effort to make a house-hold work. It doesn't matter who is part of that team, as long as you all work together and that includes the children, even from a young age....and you will find that within your own team, there will be different skills held by each member.....One of Hubby's many skills is making a good batch of brew.
First Prize - Bitter
While I can make fruit cordials, and Kefir fizzy, and Rhubarb Champagne...I don't have, nor do I need the skills of making beer. That's because my husband makes his own beer. Hubby has been experimenting with brew making for at least 20 years....with that comes experience! For the last few years hubby has been entering his beers in the local show with some very encouraging results.

Second Prize - Lager
Second Prize - Pale Ale
************************
Sponsors for the 
home-brew section for 
Dapto Show 2012
************************
Centre: Hubby with two of the judges
of the Homebrew Section
for Dapto Show 2012
LONGBOARD BEER
Longboard beer

********************************

Illawarra Brewing Company


What a lovely home-brew display at the Dapto Show


 ........and an even better display at home.....

Seeing the judging took place days before the show, we already knew in advance....and on helping Richard celebrate his birthday on Saturday at the garden course....Hubby gifted Richard with a 6-pack of the Prize Winning beer...which I'm sure he enjoyed....and I made him a birthday cake.

Here is a photo of the birthday cake I made for Richard...of-course it had to be garden related....lol


While we were waiting for the judging to finish and the presentations to begin....I couldn't help but wander a round the pavillion to look at the lovely dahlias which were entered.  I took many many photos..but here is just a small taste of what I saw. Aren't they lovely?


Have you ever made your own batch of brew? How did it turn out?

NOTE: Hubby is looking for some Hop Seed to have a go at growing his own hops....if you have any spare, and would like to exchange using a barter set-up...I would be ever so happy to chat with you.

Friday, January 27, 2012

Increasing your strawberry patch for FREE

If you live in a similar climate as I do...and you have a few strawberry plants...Now is the time to gather your FREE plants...If you look amongst the leaves, you will notice runners that you can turn into new plants.

It's really simple to increase your strawberry plant numbers during this time.....all you have to do is plant the runners on. If your garden bed has the space, nature will most certainly do it for you...but seeing my strawberry bed is a bunch of self-watering pots.....I feel I need to guide nature a little and give my strawberry plants some extra help along the way....Of course, saving these extra plants pays off by rewarding you with lots more free strawberry plants.....Did you know you can get roughly 20 runners off an individual strawberry plant? (I'm not sure if that is the entire life of a single plant)

There are many ways to collect your strawberry runners, but this is the method I prefer to use....I was never told how to do this, but my theory is.....the longer time the runner can be attached to the mother plant, the better the survival of the baby plant, while it is vulnerable and growing. Remember, the mother plant is usually growing in a larger amount of soil AND mulched...which limits the possibility of the new plant drying out while it is setting roots.

Consider it the umbilical chord for the baby plant.


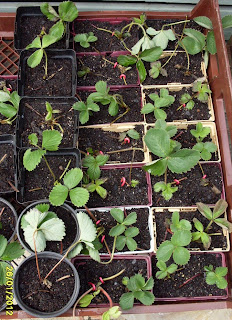
Below, you can see that I use little wire pegs to keep the plant attached to the soil, so the runner can set roots easier. The peg is just a loop of wire, sometimes I use one on each side of the plant, sometimes it just needs  one.....

Once they are well rooted, these will be planted out into a new garden bed.
There's plenty more FREE strawberry plants coming along.
Below: I'm also helping out the Barrack Heights Community Garden with their strawberry patch and I gathered these runners  last week, and bought them home to grow. Seeing they don't have the mother plant...I will be keeping an eye on them...and once they are well rooted, they will be returned to the Community Garden for a new strawberry bed in the making. 
Barrack Heights Community Garden
Strawberry runners
On Saturday at the garden course, Richard demonstrated that you can completely cut the leaves off the crown, along with most of the roots, and they will still grow.....but I had already done these this way.
I still prefer to keep them attached to the mother plant for the health of the new plant, but if/when you are gifted runners to take home....plant them however you feel works best.


In the garage we have/hoard/collect/recycle a draw of electrical wire of all different diameters and/or plastic coated, that is just another form of recycling that we do....Sometimes I strip the wire, depending on what I need it for....but for strawberry runners...no need. (see the red pegs in the picture above)


Here's some light humour for you....
If you think you have removed all the seed from your Pak Choy seed pods
and decide to use the dried pod shells for mulch.......


Be prepared for seeds to pop up anyway. (below)
don't worry; once these Pak Choy seedlings are a bit bigger
they will be moved on to another area in the garden.


Do you save your strawberry runners? 
Have you ever used your empty seed pods as mulch?

Monday, January 23, 2012

A glut of tomatoes and my first zucchini

What a fantastic response so far to my Garlic give-away....the seeds are drying slowly...but there is still time to get in on the action and be a contender for some of the seed, or maybe even the clove of garlic...You never know, and I always say..."You have to be in it to win it!"
* There's also another give-away coming soon for the celebration of my first year of blogging...but you will need to wait a few weeks to see what I have planned for that one.


So...what did I do with my first zucchini? I added it to a batch of preserved tomatoes....This is actually a recipe I made up along the way for a 'ready made tomato base'....you know...for those crazy nights...When you really just have time to brown some mince...or boil up a batch of pasta.....This will be great to have in the store cupboard....It's actually turned out so well...I plan to make more...next time maybe a bit spicier though...and with more garlic.

This all began because I had sourced a 10kg box of Roma Tomatoes for $9...I wish now I had gotten two boxes...one for this, and one for relish...but I'm sure there will be more tomato bargains in the near future.

So firstly...I quartered most of the box of tomatoes (four trays in total).....and tossed some lovely fresh garlic cloves in amongst them....(no oil, and no salt)...along with some herbs from the garden...Baked them until the natural sugars began to caramelise slightly.....(sorry, no photo for this part)

I then put it all in the crock-pot to cook slowly...due to time restraints and energy levels...I wasn't really ready to cook this up after chopping all the other vegetables....but I did chop up the following:


  • My first eight-ball zucchini....(my first zucchini of any type) which hubby said looked more like a cannon-ball due to the size....lol
  • Another long zucchini gifted to me by Lee and Alison...
  • A huge bunch of Ruby Chard (coloured spinach) stems from the garden...of all colours...Yellow, red, pink and the original......

The colour is from the ruby chard...
The beauty of this sauce is that my boys aren't that keen on the zucchini or squash varieties...but they love these sauces....


Now, seeing I had used all the spinach stems for the base I was making....I decided to blanch the spinach tops to be put in smaller blocks into the freezer.....for later use. Don't pour that lovely cooking liquor down the sink yet....but strain it, just to be sure there are no impurities left behind...then use the water as the base to the tomato recipe you are making....this is what I do anyway....no point wasting those nutrients....


Zucchini and Ruby Chard (Rainbow) Spinach
I also chopped up:

  • 1 large red capsicum
  • 1 large green capsicum
  • 1 large yellow capsicum
  • 6 carrots...which I finely shredded with my slicer......
  • 2 kg brown onions

So that all goes into the spinach water to cook up................................

I then put the tomato mixture through my Moulix to remove all the tomato and garlic skins....and seeds.


When you have finished running it all through the moulix,
pour boiling water over the pulp to release more flavour...
and run it through the moulix again.
Adding both mixes together and adding some extra spices and herbs...then allow it to cook for another hour or so...no thickener is needed, because you just allow it to reduce to the thickness you like. This photo shows it about half reduced...

Pot it all up into sterilised jars....and process in a water bath for 45 to 60 minutes....Some went in the Preserving outfit......and some into recycled jars with old lids which were sealed in a  hot oven for 40 minutes.

2 from the oven leaked, so they went aside to be used first
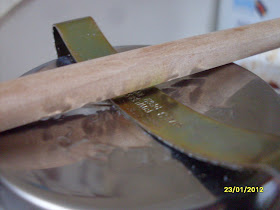
Mum gave me advice to check for a good seal...Place a pencil across the lid and clip...if there is no gap...the seal has failed.....they were all concaved...so a good seal was achieved for all of these ones.


After all this work, and attending the gardening course for January....along with other weekend events....Sunday night was the perfect night to test out this base......So tea involved the following:

  • 2 smaller jars of the tomato base
  • 3 sliced up chorizo and quickly fried to release the spicy flavour
  • half a packet of pasta....boiled on the stove
  • a big spoonful of crushed fresh garlic...from the fridge 
Combined together to make a really delicious meal.....perfect way to end the weekend...
and yes! the tomato base is perfect!


Saturday, January 14, 2012

GIVE-AWAY for 10 lucky readers....HUGE GARLIC

Well, what a year it's been already.  Welcome everyone, to 2012....I hope you all had a lovely Christmas break....I'm pleased to tell you that I am back in the blogging world, and have many blog ideas for the year.....Hubby is back home too, looking for another job. He wasn't really given a reason for the dismissal, but we think the company may have lost the contract for the work he was doing. So for now we are unemployed again and hubby is applying for mining work daily.


First up, I want to take time to say hello to all my new readers this year, both followers and lurkers (lol) I welcome each and every one of you. Don't be shy,...don't be a lurker......lol I may not always have time to reply to the comments individually. But I sure do love reading them.


Like many of you, I've been busy with family life this year..and getting back into blogging has been slow going ...until now......This post, I could not hold off....It's just toooooo exciting NOT to share.

Free bounty of Giant organic garlic


Have you ever seen a head of garlic this huge? 
Almost 500 grams.....Almost half a kilogram

Almost 500g for one head of garlic
With each monthly drive to my garden course in Jamberoo, I have had my eye on some Wild Garlic along the road....When the bright purple colour of the seed head reaches for the sky amongst the drying grasses...How can you not spot it?  I'm one of those people who when driving, can spot a fruit tree a mile away....Hubby reckons I turn into one of those bobble heads on a long drive...
Richard, my garden teacher told me he travels that road very often, but has never spotted it....He told me he drives with tunnel vision...lol...I think he will try to spot it now that I've told him where it was though. I gave him some anyway.

After researching different varieties of garlic, I think this is very similar to Elephant Garlic. With the recent floods in the last couple of years, I can only assume that it was washed down from someone's garden, as it tends to be closer to the little creeks AND Mother Nature has kindly self-seeded the garlic every year since.(just my opinion after observing what is in the soil when digging it up). It will be there for many years to come, I'm sure.
What about just one clove of garlic
weighing 154 grams? 


The garlic has a lovely strong aroma and will fill my stores year after year, now I plan to grow it too. 

I have saved the seed heads as well, which are now drying out. Richard told me that you don't need to leave them on the plant to dry out, before collecting them.....each little green jewel will dry out to become a seed.

Oh, how I love gathering seeds...especially when I end up with plenty to share out. Some will go to the students in the garden class, and some will be shared with the community gardens in the area....not to mention handing it out to friends and family.
Giant garlic seed
waiting to dry out
If you live near Noosa, you can get your own huge garlic at Super Natural Organic Garlic (SNOG) which will cost you roughly $28 per kilo . They have a lovely informative blog on how to grow your own garlic too....along with some great recipes to share.


Hmmmm lets do the math on this one.......5.6kg at $28 per kilo.....$156.80.....Now that's a huge bounty.


The give-away for 10 lucky readers....
offer finishes at the end of the month!

*All you need to do, is tell me what you would do with some of this garlic ..maybe you have a great garlic recipe to share.

*The best comment will receive a clove of the garlic to use however you wish....(maybe pop it in the ground, or use it in cooking)...

*I will also choose 9 more comments to send some seed to....This give-away is only offered to Australian residents though..and I will need to check what states I can send it to....So, sorry to those who aren't eligible...I'd still like to hear from you too.....

I've already added it to my herb mix or soup starter.....I also have it finely minced and in Olive oil in jars in the fridge.....

I can't wait to read what everyone comes up with.....