Monday, February 28, 2011

Banana Scones

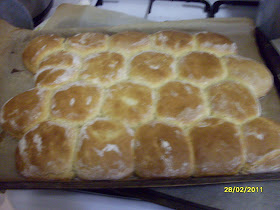
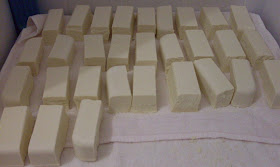
Not much else to report for today, I cut the soap this morning, and made a lovely batch of Banana scones.

BANANA SCONES
3 cups Self Raising Flour
1 1/2 cups caster sugar
125g unsalted butter
2 mashed bananas
1/2 cup milk
1/2 tspn vanilla essence

Cream butter and sugar.
In a seperate bowl, mash banana, stir in milk and vanilla.
Combine both mixtures with a wooden spoon.
Fold through the flour and lightly mix into a dough.

Press out onto a lightly floured bench to about 3/4 inch thickness.


Use an upside down drinking glass as a scone cutter. Cut rounds and place on floured tray.


This is the way I have always stacked my scone rounds on a baking sheet. I find that this way, helps each scone to rise straight.....Bake in hot oven of 200oC for 10-12 minutes.


Once cooked to a lovely golden colour, separate the scones and turn the cooked scones to the centre...leaving a gap around each scone, bake in the oven for another 4 minutes....this helps to seal each scone....this method works better with plain, savoury, and pumpkin scones, as the banana scones I found were very light...but they still turned out soooo delicious...and the aroma in the kitchen while they were baking..........well your just going to have to make them yourself so you can experience the same aroma.


I got a heap of bananas before they went up because of the floods....I have 5 bags of 1 cup of mashed banana in the freezer just waiting to be cooked up in some way.  Now please note that I did not measure the amount of mashed banana I had....and when it thawed it was very watery....Because of this, I needed more than 1 cup of extra flour.....probably closer to two....

Any way they turned out so delicious, for lunch I had left over meatloaf (2 slices), a cup of mushroom soup and 2 fresh out of the oven Banana Scones....what a lovely way of using up leftovers...

Update on mushrooms galore

Is it just 4 days, since I got these mushroom compost bags.....my how they grow so quickly.....I am very happy with my free mushrooms...


check out here, what they were like just 4 days ago....you will have to scroll down a fair way past the mushroom stems for compost

Cutting the soap

I'm up early, its pouring rain, but before rising, claps of thunder could be heard in the distance. I think we are only going to get the rain today though. This water will do my fresh garden beds well....I have new seedlings coming along nicely, ready for the freshly dug garden beds...I have never been so organised in the garden, I'm all ready for winter gardening, bring it on I say.

This morning I have already cut yesterday's soap, I feel it was a bit crumbly towards the base, when cutting it...maybe I should have cut it last night before going to bed...maybe I was a few hours late and that's why it crumbled when the knife was half way through....

Anyway, overall, it is a good soap.....the animal fat was free..I think I will have to pass some onto the butcher and barter for some more fat.


Above is the Low Allergy Body Soap made from the Rendered Animal Fat


Above shows the bucket, I will even let the left over residue dry from the bucket. The crumbs from that will be added to make my Laundry Powder or dishwasing liquid. This way I don't have to scrape a caustic bucket to get every last bit, and I have no waste.


Here is an update on the first two soaps I made.....
The Lemon Verbena soap and the Olive Oil soap.

I made these two soaps on 7 Feb, I can't believe I still have 3 weeks to go, before trying out my new soaps.....Has it only been 3 weeks since I made this?


Sunday, February 27, 2011

ICED COFFEE - HOMEMADE


Seeing my son enter the workforce, I have noticed he has a liking to iced coffee. I was amazed at the price of a single serve of iced coffee at the supermarket. "There has to be a cheaper way" I thought to myself.....

After researching on the internet, I found that many people found that the main problem making it at home was how it watered down the milk. I guessed that if you reduce the coffee syrup and make it stronger, it wouldn't water down the milk....

cost of a cheap coffee brewer - $12.00 ( or 3.5 single serves of iced coffee from the supermarket)
cost of a cheap coffee beans - $5.00

Ok so I have to be able to make at least 5 serves of iced coffee to break even....I think I can manage that...

Using the coffee machine, I brewed a full batch of coffee......after completing the brewing cycle with the same coffee beans 3 times I put the coffee on the stove to reduce.


Reduce by half to two thirds.
You can see the first batch in the tall jam jar.


Experimenting with this I found two full teaspoons to be a good amount for a glass of milk...add sweetener if you prefer.

Knowing this was yummy, and the boys had not tried it yet, I knew it wouldn't last long, so another batch was brewed....all very easy really. Brew a batch of coffee, repeat twice....Reduce on the stove, then refridgerate between uses.  

Here is the final product...using two teaspoons of coffee syrup that I made.... everyone had a glass with tea tonight, and there were empty glasses all 'round. DS16 said it's just like the one in the shops.

A busy weekend with Mushroom Soup

We've had a rather busy weekend, with lots of things to be done....I have made the Low Allergy Soap after rendering a batch of animal fat. It turned out so creamy looking with the best trace I have ever had (even though I have only ever made 4 soaps). I also made CREAM OF MUSHROOM SOUP, and served it up for lunch today, the soup was sooo delicious and made up from the free  mushrooms, spring onions and parsley from the garden, milk, cream and salt n pepper to taste. Only the best mushroom soup ever tasted, None of that packet stuff more us anymore. My only regret was that we didn't have homemade bread with it.


I had forgotten to get the bread machine on and going....I thought of it a few times throughout the day, but well, other things took over, and yep! I never did get that  bread machine going today, Oh well, tomorrow is another day....

Hubby got both batches of beer done, and he managed to fix the gate. I plan to sit in front of the tv tonight and grate my homemade soap, this is used as one of the engredients for my Laundry Powder....It is soo good...

No baking today, no muffins yet. We had meatloaf and veges for tea. The meatloaf was from when I made up such a big batch, that it made two.....this one came out of the freezer.  Come to think of it, as meatloaf goes, this was a pretty lah-dee-dah meatloaf, because it was based on Turkey and Pork...I had gotten sausages marked down really cheap and just squeezed the meat out of the casings..I still added my grated veges, herbs and spices, and other bits and pieces. and it turned out really yummy....

It's passed 8pm now, I still have to make sandwiches for DH and DS19 for work tomorrow. I hope I get that soap grated, and I may just get the bread machine set for the morning.....the mushroom soup is going in the freezer in batches tonight.

MAKING Low Allergy Body Soap

LOW ALLERGY BODY SOAP

Engredients

500 grams of caustic soda
1 ½ litres of rain water (or distilled water)
1.5 kg  rendered animal fat 
1.5 kg of olive oil. (Please measure by weight.)
Directions
With great care and wearing the rubber gloves and some eye protection, add the caustic soda to the water in a large plastic bucket....and stir until dissolved. Make sure you are in a well ventilated area and take extra care not to breath in the fumes. There will be a chemical reaction with will cause the water and caustic soda to heat up. This liquid will not only get hot it will now be capable of burning you like an acid so be very careful. Set aside to cool till lukewarm.
WARNING - Do not add water to caustic soda, you must add caustic soda to water - in that order.
In another pot heat the fat and olive oil until it is all liquid and add this to the bucket of caustic solution. Stir for 5 minutes. At this stage you may add a small amount of essential oil to give the soap a fragrance.  As I wanted a low allergy soap, I stayed pure to the recipe, not adding any essential oil to perfume the soap.   Using a stick mixer, mix until you reach trace, then pour into shallow containers that you have sprayed with the cooking spray or olive oil. (It took me 9 minutes to make trace, and this will vary according to the temperatures of your oils.)

After pouring both oils into the caustic solution.


You can see this has reached trace, see how it is doubling up on itself towards the left of the bucket.

Keep trays of soap in a warm place for a day.


The following day, turn your soap out onto a towel, wearing your rubber gloves, as the mix is still caustic. You will have to come back tomorrow, to see it cut.
Cut into bars. Let the soap rest and dry for 6 weeks before using.

RENDERING ANIMAL FAT FOR OILS - Part 2

On Friday I picked up the fat from the butcher, bartering with him, well I gave him a bottle of tomato sauce, a jar of pickles, and a jar of tomato relish.

I was prepared for .50c a kilo, for the fat as previously discussed. Upon handing over my goodies, he said, NO Charge for the fat!!! Brilliant...A butcher I will go to again and again...

So I brought home the fat and put it in the fridge...Over Saturday and Sunday I rendered the fat and turned it into oil for my soap, using it immediately to make the Low Allergy Soap.


First you have to remove any meat and blood spots that remain on the fat.

I then cut the fat into smaller diced pieces and added to the Whizzer.

Mincing the fat in the whizzer.

Melt the fat in a large pot over the stove....it must be on the smaller element on low....

(I once used the largest element and the fat started to smoke, even though it was on low. To save that batch I quickly put the pot of smoky oil in a sink of cold water to reduce the heat of the oil as quick as possible....You have to do this as soon as it smokes....and I can not recommend that it will always be saved. I was just lucky and acted quickly).

After straining the liquid fat, pour it into manageable sized vessels....and leave to set overnight on the bench. You will see that the fat in this jug has set and there is a small amount of waste on the bottom of the jug.

Scoop out the fat away from the waste and return to the stove.....When this was melted again, it formed a skin on the top...Strain it again, if you get this skin on top....you will now have a usable oil for soap making.

Seeing the oil was already melted, I started to make the LOW ALLERGY SOAP.

Saturday, February 26, 2011

2 markets today

Today after dropping my DS16 off at Tafe, we planned a trip to Kiama, to the local Farmer's Market....we had never been down there, so we though we would go for a drive and check it out....There were lots of fresh fruit and vegetables to be bought....and of a high quality too.
 
DH kept looking out to sea, checking out the ocean....In the distance you could see a light craft bobbing up and down. This tells me it's starting to get a bit rough out there...We are getting itchy feet and need to get back on the water soon. I love going fishing.....
 
As we had many jobs to complete today, we decided to go back home to get stuck in, so if the weather is nice, we may go fishing tomorrow. On the way back home, noticing it was still early, we decided to go to Warrawong markets as well. Lucky we did, because on the way out, I found this huge batch of green tomatoes....That was all the stallholder had left. I asked, "How much?" and he replied "Ten dollars a box.", I said back to him, "How about $15 for the two?" and that's how I got them home...I am yet to weigh them, but they are pretty heavy... I haven't done Green Tomato Pickles for a few years now, so it will be good to have them in the stockpile. Look for the post in a couple of days..

I won't get time to cook these up over the weekend, but I will do them during the week some time.


Things that need to get done this weekend.......
 
  • Repair the front gate.
  • Make 2 batches of home brew
  • Pack away dehydrated mushrooms
  • Cut up animal fat and start rendering
  • Check that I have all engredients to make soap from animal fat
  • Make soap
  • Make Laundry Powder
  • Make mushroom soup and freeze in batches 
  • Batch of Pumpkin scones
  • Batch of Pumpkin Wholemeal muffins
  • Make 2 loaves of bread.

 I also found this cane basket, that needed rescueing.....It is in a state of repair, but I like the idea of it having been around the block a few times.....it has a history, and now it is going to have a history with me as well.


Dehydrated Button Mushrooms

Here is the final product, jars of Dehydrated Button Mushrooms....see here how I got them all...

From all those free button mushrooms.....I got the two jars on the left.....
This is now my dried mushroom stockpile.

Thursday, February 24, 2011

MUSHROOMS GALORE

A big trip into town to the mushroom farm proved to be far more than I expected...Wanting the mushroom compost for the garden, but planning to harvest what mushrooms are left in the spores...I decided on 15 bags.....at $3 each, that's not bad....very cheap really seeing you can get a crop off them first.
I spotted a huge bag, and commented on how big it was, and how many mushrooms must be in it....The gentleman told me. "Oh no, thats just stems, do you want a bag, we give it away for compost, it breaks down within about two weeks", not wanting to miss a great opportunity I said yes immediately.....

Now when the fine young gentleman loaded up the trailer for me with the compost bags, which I had paid for....he then went and got two of these huge bags of stems....he then told me, "There's two more out there, do you want them?"   Is the sun hot? of course I wanted them.....

When I got them home and opened them up....I seen there were actually mushrooms mixed in with the stems....Too rough to sell, I suppose they just throw 'em out......

I got mum into gear to help sort the stems and mushrooms....Out of the four bags, I still have 1 to sort through.....

But here are the photos I took of our production line.....The lady is my mum


I still have one bag to sort through....and I got all these so far......they cleaned up well with a dunk in the water....I plan on dehydrating this lot..
Then there are the mushrooms I will harvest from the bags..........I will take a photo of them tomorrow......I am stiff and sore as I HAD to finish unloading the trailer of soil first before I could get this lot....I am glad I did...but Ohhhh I am aching......I will have to pick up the animal fat from the butchers tomorrow....after I sort out that other bag.
*****************************************************************************
Saturday 26 Feb 2011
So here is an update to the mushrooms galore...I have finally sorted through the stems, that was a huge bounty....and thankfully, they are shrinking down to a fair size....the dehydrator may be able to get a rest for a while shortly....

I put all the stems into the compost bin, and as the gentleman said to, I have also covered them with dirt, because as they rot and break down, they are going to smell.....so they are covered; but not before taking a few more photos.


 One of the bags of mushroom compost, being moved to under the house. Cost $3.00


I hope I have enspired you to try growing mushrooms from your muchroom compost.....................
As the mushrooms grow, I shall keep this post going with updates....
so check back in a few days....and thanks for reading my blog.

Wednesday, February 23, 2011

RENDERING ANIMAL FAT FOR OILS

It has come to my attention, that canola oil is not as healthy as I thought. There are many pesticides and growth hormones being introduced to the plant to provide better production.

I am slowly working towards a healthier future by eliminating as many chemicals out of our diet as I can.

I have seen that people are turning to the old traditions and rendering their own animal fat. I thought I would give it a try.

From 3 1/2 kg Pork Belly Fat I got this amount, although I haven't weighed it yet, I plan to use this lot for making soap.


This is once it has set, I will store this in the freezer until such time as I make my soap.
I am gathering some more animal fat on Friday from two more butchers. So I guess more rendering is in store for me on the weekend.

 In the future I will experiment with using it for frying foods as well.

Harvesting Thyme

My Thyme had become very woody, the plant was about 4 years old, and was very poorly. I decided it had to be replaced. On cutting the Thyme, I found there was more old wood, than there was Thyme. My decision to replace the plant proved correct.

I have chosen some leaf to dry, and some to freeze fresh.

When drying your herbs, hang them in bunches in a brown paper bag, this way, any herb that dries will be collected. 

Label your paper bags clearly, as sometimes you will have many hanging.


Once these are fully dried I shall remove the leaves from their stems, and place in an airtight container.

SAVING SEEDS

It has been a busy day in the garden today, I finally got around to harvesting all the free seeds. I got Celery, 2 types of pick your own lettuce and 7 year beans..

Once a plant has gone to seed, you need to wait for the seed pods to dry on the plant...this way you know that the seed is fully grown. Pick the stems and over a large bowl, crumble the seed pods in your hands....collectiong the seeds as they fall in the bowl.

Once you have your harvested seeds, leave them for a few days, in a cool covered space  like the garage; to allow any lurking moisture to be fully evaporated.  There can be no moisture left in the seeds when you store them, or they will grow mouldy.

This time to dry fully also allows any critters to crawl away and find a new home. You will be surprised at how many different critters are taking up home in your seeds. 


Once the seeds are fully dried, store in a labelled container...I prefer glass jars if there is plenty of seed. Label the jar clearly with the seeds title and the month and year you harvested the seeds.

Store you seeds either in a cool dark space.

Remember, any seeds you save this year, you won't have to pay for next year....

Tuesday, February 22, 2011

Low Allergy Body Soap

Low Allergy "Body" Soap -
You can use this soft 'moist' soap
as a general use soap in the kitchen, workshop,and bathroom.
You will need the following items.
A large container for mixing the soap made of enamel, glass, stainless steal or earthen ware
A wooden spoon just for soap making
Soap moulds. I have used wooden trays, plastic containers, ice cream containers, all shapes and sizes of small containers such as margarine containers.
Rubber gloves
Eye protection
Ingredients
500 grams of caustic soda
1 ½ litres of rain water (or distilled water)
1.5 kg of olive oil. (Please measure by weight.)
Directions
With great care and wearing the rubber gloves and some eye protection, add the caustic soda to the water in a large (18 litre) container and stir until dissolved. There will be a chemical reaction with will cause the water and caustic soda to heat up. This liquid will not only get hot it will now be capable of burning you like an acid so be very careful. Set aside to cool till lukewarm.
WARNING - Do not add water to caustic soda, you must add caustic soda to water - in that order.
In another pot heat the fat and olive oil until it is all liquid and add to the caustic solution. Stir for 5 minutes. At this stage you may add a small amount of essential oil to give the soap a fragrance. Pour into shallow containers lines with cotton material. Keep in a warm place for a day. Cut into bars. Let the soap rest for 6 weeks before using.


Genealogy - Web sites

Scroll down and on the right and side you will see a list of carefully selected web sites that I often use while researching my family tree.

You can use them too, why not start recording your history today?

Am I too frugal?

 I recently realised that my Loofah vine was not going to produce as we lost all the flowers with bad weather,......What a waste to have cared for that plant and then nothing...Not wanting it to beat me...I went to the local library and sourced some basket weaving books....after taking some notes....this is what I came up with..


Does anyone know if Loofah Vine dries crispy, or will I have a basket once its dried....????

If not, it was worth a try..lol....I won't be giving up my day job for basketry..heheh

Some comments left at the Down to Earth Forum

"Nelly, I just love your attitude! I haven't tried weaving loofa vine but I have wisteria vine and it worked very well, even when it was dry. I hope for the same with your loofa basket. Cabbage tree leaves are very good for baskets too.
With your loofas next year, sow the seeds inside in September so they're ready to plant out when the frosts have gone (if you get them). I've found, the earlier you plant in the season, the more success you have with them.
"

"Bad luck NellyMary - but you have turned lemons into lemonade . Years ago I made some little rustic nests & baskets with grasses etc but can't remember now what I used. My daughter made some fabulous baskets more recently using great bundles of dried grasses/weeds etc - she kind of bunched some together in a long bundle (if that makes sense !) & wrapped them with strips of old fabrics - not so much as to totally cover the grasses, but enough to hold them together...kept adding grasses & kept wrapping. I think she formed it into basket shape as she went, using a large needle & strong thread to hold the layers together. The fabric intertwined with the dried grasses looked great. "
 
 
I have finished pulling down the Loofah vines, better luck next season hey?
I made a wreath out of the rest of the vines....


I like the wreath best, I would have preferred Loofah, but at least I have something to show for my efforts.