WELCOME to my BLOG

Hi there!

I’m slowly working towards some simplicity within the home, but hey! It’s a lot of hard work!

I love having a go at growing my own veges and always use herbs fresh from my garden. I try to plant from seed whenever I can and have learnt to save and share my own seed for the following year. I make Award Winning preserves and pickles; and my husband brews Award Winning boutique beers as well. I love to stockpile and try to limit quick trips to the shops. I dabble in bread making and enjoy making my own stocks too.

I enjoy feeding my family good hearty meals, nothing like those tiny restaurant stacks you have to look for on the plate. My husband maintains our vehicles and machinery and we both enjoy fabricating on a small scale mostly relying on metal & timber recyclers for any materials needed.


While I don’t always have time to reply to comments, I love reading them. I hope you enjoy your stay and I hope you learn something new because I love sharing what I learn, and I'm always looking for another new skill myself.

Cheers!

Wednesday, August 17, 2011

New growth everywhere you look


With spring, comes new growth...I am talking about the garden, but there is new growth all around....I am growing too.....as a mother.....the role I play, the guidance my children seek......soon I will have a daughter-in-law living with us...(no marriage plans in the near future, so don't ask)...but yes, she will be moving in at the end of the year to continue her studies locally and then going on to uni, which is not offered where she lives now.....Us mum's don't always get it right, but I think if we are honest enough with our own children when new situations appear....there shouldn't be a break-down in communication. If only we were handed a book when we first become pregnant....I'm sure you will all agree with me on that one....

What our children don't realise; (and I have told them this a few times)....is if it is the first time they are experiencing something, then it is most likely that it is OUR (the parents) first time in dealing with 'it' too, especially if the child is your first. Growing up is hard enough...all that responsibility....It can be a challenging but very educational time for young adults. I just wish they weren't in such a hurry to get there, but of-course I will always be there to guide them and offer friendly advice......I am growing as a parent, WITH my boys.

Growth in the garden, everywhere you look.........

Ok, now back to the growth in the garden......Walking around the garden yesterday in the sunshine...I had been preparing a few more garden bed tubs that I got a while back....I have potatoes in one already...and will be planting in another once my seedlings come up....

This Saturday I also begin the monthly course with Richard the Practical Gardener...the course runs for a full 12 months...so I will learn heaps.

The front garden....which I built...I harvest from this every day. There is parsley of two varieties, kale, sorrel, cilantro, marjoram, thyme, aloe, lettuce leaf, garlic, spinach, spring onion, leek, flowers..just to name a few.

I harvest from this bed every day...

The berries bed are showing tiny signs of life

Cabbages, Broccoli

Fruit Salad Sage


Rocket beginning to seed

My very first Daffodil...we have three now.

I love this photo
In the centre is my 'Pick as you grow lettuce'
I grew this from seed, and have been harvesting from it for months

Kale
Mitzuna Salad leaf

Baby Bok Choy, bolting far too early

Peppermint amongst the Ferny Azola

Potatoes were planted 16 May, waiting to flower....
I also have another larger tub with newly planted seed potato.


Lime

 Miniature Seedless Valencia Orange

Passionfruit, ready to be planted into it's new bed.

Miniature Macadamia nut tree

Bay Laurel

Mint and Lemon Balm
cut back a few weeks ago to be rid of old growth.
My Elderflower has lots of new growth beneath the main stem...not sure what to do with them yet, maybe I will get some extra trees....If anyone can guide me with this I would love to hear how.


The same Elderflower
Source
Above is a photo of a Miniature Shatoot Mulberry, nicely established....
I hope mine (below) grows this wonderfully.
a Miniature Mulberry, red shahtoot.
this grows lovely long berries about 10 cm long...

This is a lovely flower...I'm not sure what it is called,
but I love it when it is out in flower...
It belonged to my Nan.
Free tomato plants
beneath the Locut and Fig trees
The Ice-cream bean tree
My poor battered Miniature Banana tree
is even showing promise with new growth

Lemon/Lime tree with new buds appearing.
Thanks for having a look around my garden, I also have many seeds planted in seedling trays at the moment, but they are yet to pop through the soil.....
Sorry this was such a long post...but there is a lot going on around here........
What's happening in your garden?

Monday, August 15, 2011

Mandarins galore & Stockpiling Brocoli

First of all, I need to apologise to each and every person who has been following and/or reading my blog....I have been quite swamped these last few weeks, and to say I haven't had time to blog; is an understatement......
Some of you will already know that I am caring for my elderly mother....at the moment, Mum has a torn cartilage in her knee and is waiting to be operated on in September....it is a day only operation, so she will be in and out in the one day....once she starts to get over the operation, at least she will be mobile again......
I also have my DS19 who has lost his licence due to a lack of points, so I need to get up at around 5am every morning now to take him to the train station....I get back home and I have had 20 minutes before taking DS16 off to Work Experience......so I am back home from getting them both on their way by around 6.30am.....All in a days work........a very tiring and long day.
This week, is just train station...ad DS16 is back at school resuming studies for the week, but the following week, he will be on Work Experience again at another location.

Back to blogging....I knocked on a ladies door about ten days ago....Oh My! Has it been that long, she will be thinking I am not coming back....I had been eyeing off her lovely huge mandarin tree for a while now...and it soon got the better of me, and I approached her to ask if I could barter some fruit from her in exchange for some baking.....so this is what I have done with the mandarins so far............

Mandarin Kefir drink


For this amount of Kefir,
I used 2 cups of Mandarin juice
It could have been stronger, but it was lovely just the same.
*******************************

Mandarin Jelly from "Wonderful ways to prepare PRESERVES by Jo Ann SHIRLEY page 52"

1 1/2kg (3lb) mandarins
1 lemon
15g (1/2 oz) citric acid
11 cups (2 3/4 litres) water
1 3/4 kg (3 1/2lb) sugar
1. Chop the mandarins and the lemon into small bits, peel, pith and all.
2. Mix together the mandarins, lemon, citric acid and water in a large bowl and allow to soak overnight.
3. Transfer to a large saucepan and simmer for about 1 1/2 hours or until the lemon rind is tender.
4. Pour the mixture into a jelly bag and allow to drip for at least 12 hours.
5. Pour the juice into a large saucepan and add the sugar.
6. Heat gently, stirring constantly, until the sugar is dissolved.
7. Bring to the boil and boil rapidly until the jelly has reached setting point.
8. Pour into warm sterilised jars and seal when cold.


 Today I will strain the pulp and water mix, then tomorrow I will finish the recipe.


*******************************
Mandarin Cake


While the whizzer is dirty with mulched Mandarin and lemon...I decided to just give it a quick rinse...then make Rhonda's Whole Orange Cake


INGREDIENTS

1 whole orange   
3 eggs
180 g melted butter (6.3 oz)
1 cup white sugar
1½ cups self raising flour OR 1½ plain  (all purpose) flour with 1½ teaspoons baking powder sifted in


I weighed an orange, then used that weight in mandarins.....I also doubled the recipe, which I usually do, seeing the oven is on and there is space......I thought it would be  great way to use up all the little mandarins that are fiddly to peel.....*see note


There are five of the mini bar cakes missing, as we had these for dessert.
Today I will deliver the large cake to the lovely lady that gifted me the mandarins
Then tomorrow I will give her a few jars of the Mandarin Jelly
 *******************************
 Mandarin Icing
* Please take note of the amount of rind you use....I found because I used lots of little mandarins, I had more rind....this made the cake slightly bitter or tangy.......so I decided to ice the cakes...adding a bit more sweet to the cakes paid off. I don't usually ice my cakes, but I think this called for it to be done.....Next time I will roughly guess the amount of rind in an orange, and substitute that same amount in Mandarin Rind.

Add a nob of butter to help make the icing mixture set.
Use mandarin juice to flavour the icing

If it is too thick to spread easily on a cake...........

Add a little more juice.

*******************************
Broccoli for the freezer
I really admire those of you who can grow your own veg and have the space to grow enough to put up in the freezer....But for me, as I don't have the space in my garden to grow a lot of Broccoli.....I grab it when it is at a great cheap price....This time it was .99cents per kilogram....What a bargain!


I'm trying a new method of draining the broccoli....after blanching in boiling water for 2 minutes...I immersed the broccoli in cold water, changing the water twice with each batch...If you add too much broccoli into the boiling water, it will take longer to come back to the boil, exposing the broccoli to the heat  for longer than needed. Stopping the cooking process quickly in cold water, keeps the lovely green colour that broccoli has.


I love eating the stem of broccoli while preparing the dinner veg, (This is what a like to call a cook's treat, or snack on the go)......as there was far too many stems to munch in one sitting, I decided to give Lacto Fermenting a go...this way, they can be added to a salad plate or at least snacked on straight from the fridge.......

For this amount, I added 1 tablespoon of salt

Add the salted broccoli to a clean sterilised jar, then top with boiled cooled water
Loosely cover with a lid, and leave on the bench at room

Add the salted broccoli stems to a clean sterilised jar, then top with cooled boiled water.
Loosely cover with a jar lid (not shown), and leave at room temperature for 3 to 5 days....tasting every 12 hours or so after day 3.

I'll let you know how it goes........


7 bags of Broccoli for the freezer, some for dinner that night, and the lacto fermented stems....
Not bad for around $4.....

Oh, and the water I used to blanch all that broccoli.....I added some chicken carcasses to it, to make my chicken and veg stock for the week, which I will also be straining today.

Overall, I think I had a pretty productive Sunday. Hope to see you all back....please leave a comment on my blog, I would love to hear from you all.

Friday, August 5, 2011

My first Sour Dough....Yipppeeeee!

You may have noticed I have a bright blue button on my blog...it links to a blog by a lovely lady who I have been corresponding with since I joined the Down to Earth Forum.......
Her name is Wendy.....Wendy has been guiding me through this sourdough adventure.....and she even sent me some of her own sourdough baby.....What a lovely offering.

So under Wendy's instruction.....here goes....this is what I have done so far........
After my sourdough baby's big trip across the border...well it needed some time to recover.....so after two days sitting nice and quiet...I moved it into bigger pj's as I fed it 3/4 cup of flour and the same in tank water.

Then the following two days, I did the same but fed it 1 cup of water and 1 cup of flour....It's growing up, so it needs a bigger feed...lol.


After the first feed

Bubbles, bubbles......


so about a week after the birth of my baby sourdough.....
I made the sponge for my first loaf of sourdough......
using:
2 cups of sourdough starter
2 cups of flour
2 cups of rain water

Mixed well, then left it overnight....(best to do this in the morning)


The evening of the same day.......I made my dough....
add the 'sponge' to a larger bowl....
add the following...
2 tspns of sugar
2 tspns of salt
3 tablespoons of oil
2 cups of flour

Kneed the dough for 15 minutes, it will be rather sticky to start with....and I worked in an extra 1 1/2 cups of flour (Wendy said about 1...so It's all good from here)
Then into an oiled bowl....and leave overnight....
 The following morning....Look how much it has increased in size...Amazing!
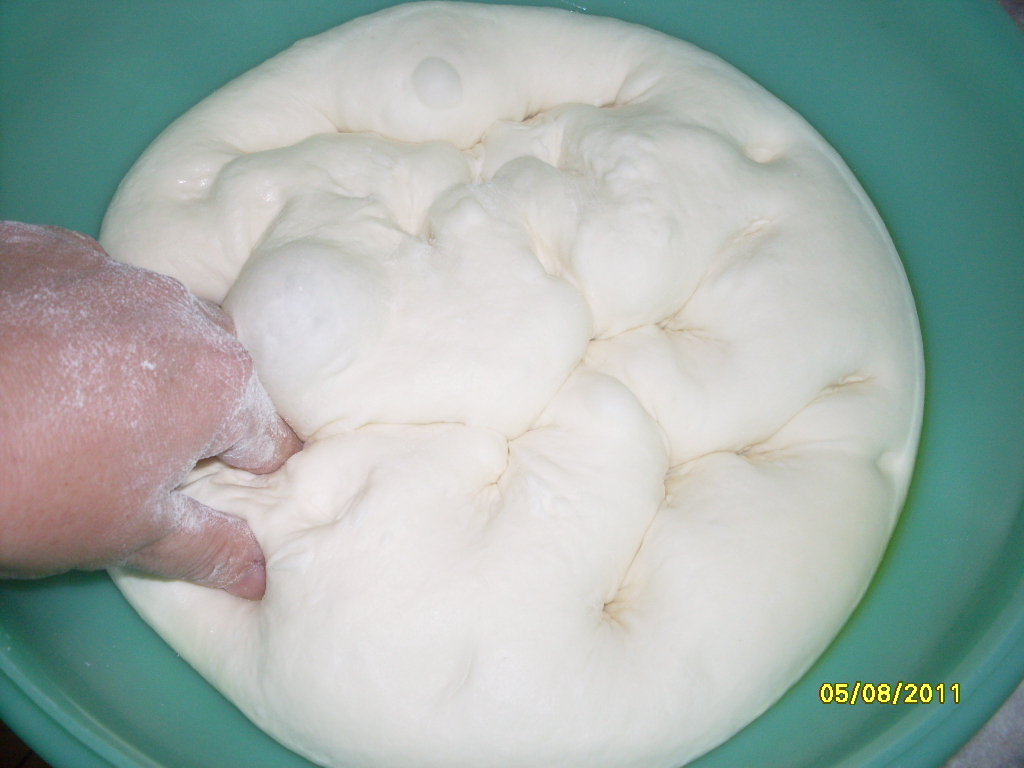
 Now gently punch it down....see the large air pockets in the dough....You don't want to disturb these too much...there's a huge one touching my fingers.
 Shape the dough, and place on your chosen baking tray....I thought this pizza tray would be good, but the heat didn't get through as well as I expected...so I will think of a different base for the next loaf....
Now that I have a loaf on the go, nearly in the oven....I have made another 'sponge'...using another 2 cups of sourdough starter....and the process begins again.......It's so exciting........
Don't forget to start feeding your sourdough starter again.......I've given it 1 cup each of water and flour..and I will do the same tomorrow.......
Ok...I'm rather inpatient sometimes...and as it was a lovely day...I figured I could speed up the process of the second prove.....by sitting it in my car.....ohhhh it was sooo toasty and warm in there.......

Look how much my dough has risen......Yep even more exciting now.....I can't wait to taste it....

By now my oven is preheated to much hotter than I normally have......and I have cut slits into the loaf...
 placed it in the oven on very high for 15 minutes....then turned the oven down to 190c...for another 30 minutes......

LOOK! OMG......Yep I'm yelling to tell the world that I made my first sour dough....and I owe it all to Wendy.......THANKS WENDY!!!!!!

My family were amazed at the huge size of the loaf....and couldn't wait to try it.....OMG it's better than any sourdough loaf I have ever tasted....I hesitate to think how much this would cost in the stores.....


Making a sourdough loaf isn't really that hard, you just need to be patient.......it's so worth the wait.....
I can't wait to try out other recipes using the sourdough starter....Wendy, If you're reading this....I'd love that pancake recipe you mentioned......
Please check out Wendy's blog, she is an amazing writer....Wendy was thoughtful enough to send Mum and myself a lovely 'Calendula Hand & Body Lotion'.....Wendy sells this lotion and other wonderful soaps and products through her shop at 'Find My Hearth'....

After reading about my paving, she thought my hands could do with some extra care.....Thank-you so much Wendy...Mum was chuffed to know that you thought of her as well.....

I'm so pleased that I have started this sourdough adventure.....Thanks Wendy...Bless Ya!

Hope everyone has a lovely weekend....take care, I hope to see you back here early in the week.

On my mind...Sour Cream 4 ways


I've been experimenting again....isn't that what the kitchen is for....It's like one big laboratory in here sometimes...actually I've even moved some of my cultures into the lounge-room on top of the TV cabinet...as it is most often warmer in there......hubby is not real pleased, and when mum comes in, she enjoys seeing what is up there....

Christine over at Slowlivingessentials recently made sour cream, and it got me thinking.......

So here is my new experiment, making sour cream 4 ways......if you know of another way, please let me know in the comments below.

Sour Cream #1

2 cups fresh milk
1 cup fresh cream
1/4 cup freshly strained Kefir Milk
1/2 teaspoon salt

Mix the milk and cream together well, add Kefir Milk and combine. Stand for 12 to 24 hours (I did mine for 30 hours as I was busy doing other things).
Strain through cotton cloth for 24 hours
Then refrigerate in sealed container for up to 1 month.
If intending to keep for the month, stir occasionally.

After 30 hours, stir contents

then strain through cotton cloth,
(muslin would not be fine enough)

Immediately you can see the whey separating
the following morning there is about 1 cup of whey.
After straining overnight

This is by far the best way to make sour cream
(This worked well, with a lovely flavour)And the yield is better too.
Sour Cream #2

1 cup of fresh cream
2 tablespoons of freshly strained Kefir Milk

Add Kefir milk to fresh cream, cover with muslin and allow to sit at room temperature for 24 hours.....

(This worked well, with a lovely flavour)

Sour Cream # 3


1 cup of fresh cream
1 tablespoon of store bought or established sour cream. (I used store bought)

Stir the sour cream into the fresh cream, and leave at room temperature to sit and mature.....


This one is still sitting on the bench, after 35 hours; it is beginning to have a sour aroma.


Sour Cream # 4
I also made sour cream using buttermilk not so long ago...and you can check that out here....


This was a nice flavour, but not immediately...It was lovely after keeping in the fridge for a few extra days, and it thickened up nicely once chilled. There is a bit of mucking around heating the cream...and because I now know quicker ways to make sour cream, I won't be using this method again.

***********************************
Now I just need some good recipes for using up some of this lovely sour cream.....
for flavour, they all rated well
for time, I would use #2
for yield though, I am using #1.


So after doing this experiment....I think I will be using #1 to make my sour cream in the future....
Do you know of any other ways to make sour cream? 
If so, please let me know via the comments below.


Saturday, July 30, 2011

Kefir fizzy for the weekend

I recently wrote about my adventure with Kefir Water....and making my fizzy drinks.....
Well, I think I've done it! Yep, I think I have finally mastered a few techniques that will keep me in good supply of fizzy drink. I like my soda...I can't help it...I like the bubbles...lol

Experimenting with Kefir grains 

Straining the Apple & Blackcurrant Juice
which I added Kefir grains to for 48 hours.

Orange from the juice and rind of 1 orange
Quince from 1 tablespoon of Quince jam added
Passionfruit from some really old Passionfruit jam
Apple & Black Currant from Juice with grains added
Cherry from some preserved cherries

Lots of Kefir grains after straining

These ice-cube trays fit a good tablespoon of Kefir grains
Storing Kefir grains in the freezer.
(You can also dehydrate them, which I will do next time I dry apples)
All of the flavours were lovely and mild..don't expect the same strength of a store bought soda as *they are laden with lots of chemicals for colour, sweetener and flavour......*They can't be good for you.

With the orange Kefir; I won't use the rind of the orange again as I needed to add too much sugar to sweeten it, and this kind of defeats the purpose of all those good pro-biotics. So I think I will be able to cut out most of the sugar in the orange drink if I only use the juice next time.

I have one jar of preserved cherries left from the back of the cupboard...I'm so glad I found a use for them, I think they lost their prime for ice-cream a few years back.

I'm so happy I have worked out the Water Kefir...I wonder what flavour will be next?

Friday, July 29, 2011

On my mind......Nan's Apple Pies

This is a Friday photo feature that anyone with a blog can join. It opens the door to us sharing our lives through these photos and gives us all a new way to discover each other, and maybe form new friendships. Your photo should show something at home that you're thinking about TODAY. If you're in another country you should join in when you read this, even if it's still Thursday.

To take part, all you have to do is post a photo on your own blog, write a short caption explaining it, and link it back to here. Please write a new post, don't link to an older one. When your photo is published, come back and add a comment below, with a link to your blog photo so we can all find you. Please visit all the blogs that appeal to you and leave a comment. Slow down, take the time to cruise around and enjoy your cyber visits.

On my mind...is my Nan's apple pies.....Nan used to make Apple Pies for the Red Cross stalls, which she was a lifetime member....Not only were pies donated to the stall, but any crocheted jug covers, hand-sewn aprons, pot holders, jams, pickles, and other things, what ever she had a surplus of at the time.....

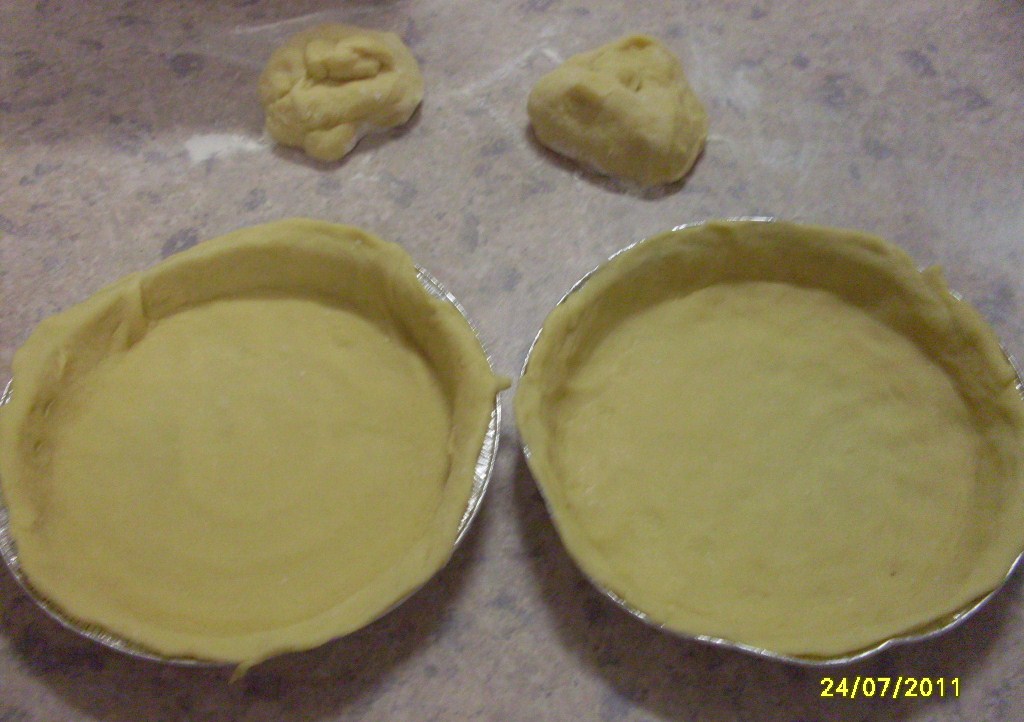
I've recently had a go at making Nan's pastry...and it worked perfectly....she is right you know...4 tops and 4 bottoms....that's how many pies can be made with the pastry recipe...as far as I can recall; Nan got this recipe from her mother...so it's a good one for many more reasons....

I halved the pastry recipe for this amount of apples.


Old apples from Mum's fridge

added 1/2 cup water, and teaspoon of sugar

2 tops and 2 bottoms


They didn't make it to the freezer...
I'm going to have to stop making all this yummy food...Oh but wait...I'm about to go and pick up 2L of fresh local cream from South Coast Dairy.

Please join in on the On my mind.......
leave a link back to your blog here in my comments.....
Related Posts Plugin for WordPress, Blogger...