Welcome to all! I have had a flush of followers come to my blog in the last week or more, and I although I don't usually have time to welcome you all individually, I do like to say hi....without followers I wouldn't receive feedback...and I love reading and replying to comments.....
Ahoney77 Remembrances Mel Bettie Housewife pattypan.2 minicrochetmad
OurGangof7 Wattle - Weedoo Nicole harduphester sue caissy
Please feel free to comment on any of my posts....I love reading and replying to them all......Thanks for following my blog......If you have a blog, I have probably checked it out by now and become a follower to yours too....I try to keep up with all the blogs and see what everyone is up to...I love the inspiration we all share whether giving or receiving....it's all good.
I've set up a lovely post for tomorrow....it is very close to my heart and shows you where I get a lot of my inspiration from......so come back and have a good read...It is rather long and I did try to shorten it, but you'll see what I mean when you have a read....
I'll be away for almost a week from blog writing, with hardly any computer contact over this time. So I will be looking forward to reading your comments when I come back. This will give you all time to have a good look around....try some of the things I get up to...and do some experimenting of your own......
See you when I get back.

Tuesday, July 19, 2011

Sunday, July 17, 2011
Kefir Scones & Sweet Egg & Bacon Pie
Well, the weekend is almost over...I've just had the boys pack away the dishes I washed after dinner.....I hope everyone had a great weekend...and achieved what they wanted to achieve.....I had big plans on finishing the paving, but alas the weather turned bad...and we had rain all weekend......Oh well, there's always something else to do around here anyway......
After today's clutter clean up....and knowing that dinner would be a bit late tonight...I decided to make a batch of scones...kind of as a snack to hold everyone over until dinner was ready.....
As I have been experimenting with Kefir milk....I thought I may as well give Kefir Scones a try.....and not having a recipe...I just substituted standard milk for Kefir milk in my recipe for plain scones.....
It goes like this....
Kefir Scones...
4 cups of Self Raising Flour
2 tablespoons of butter or margarine
1/2 teaspoon of salt
1 1/2 - 2 cups of Kefir Milk...(start with 1 1/2 cups, adding more if needed.)
Set your oven to 200 degrees Celsius.....
Rub butter into flour and salt until a breadcrumb like consistency....
Using a wide-bladed knife...mix milk quickly into flour...and don't over mix.
Roll out and cut into scones....Glaze with extra milk
Place in oven until golden...usually 10 minutes
I found Nan's old recipe for pastry the other day....and it's been playing on my mind now for a while...wondering if I could make it the way she did....I gave it a go....with an Egg & Bacon Pie.
I decided not to get any meat out of the freezer for dinner....we already had a 1kg bag of 'budget bacon' defrosted from yesterday that I hadn't used....and I had over 2 dozen eggs from the local egg farm......
so I decided to make an 'Egg and Bacon Pie'.......I did wonder how it would go, using no recipe, a sweet pastry...and not much else.....
Here is Nan's Pastry recipe...according to her writing....it makes enough pastry to do 4 tops and 4 bottoms....I assume she is talking about 'Apple Pies'.....a master at them Apple Pies; my Nan was.
Sweet Pastry for 4 tops & 4 bottoms
So after rubbing the butter into the flours...I stirred the sugar through...then added a bit of water to the beaten egg and poured that over the mix....treating it like a scone mix...I blended it all together quickly...adding a little more water as needed.....wrapped it in cling wrap.....and popped it in the fridge......
Sweet Egg & Bacon Pie
For this huge baking dish...I used the following.......this will easily do us two meals...for five hungry adults.
18 eggs...well beaten
1 grated carrot
1 kg of budget bacon...rind removed then fried to remove remaining fat.
2 cups of frozen spinach....defrosted and chopped well...(put in hot water to defrost)
1 cup of home-made feta cheese ....crumbled
fresh chopped herbs......from the garden if you can
salt and pepper
Remove the pastry from the fridge after preparing all the fillings.....cut almost in half....the bigger half being for the base......
Roll out the larger piece of pastry and using the rolling pin; roll the pastry onto a very large well greased baking dish .....
Pour filling ingredients on top of pastry...
Roll out the smaller piece of pastry cut into strips....placing on top of filling....
Use an egg wash or Kefir Milk to glaze the pastry strips.....
In a moderate oven...bake until set....rotating every ten minutes or so....
If it wobbles in the centre; it's a sure sign it isn't cooked yet.


Eggs $5.10
The budget bacon was a bargain at $5.00 for 1kg.
1 carrot .50c at a guess
No immediate cost for the following, as I already had them in stock...
After today's clutter clean up....and knowing that dinner would be a bit late tonight...I decided to make a batch of scones...kind of as a snack to hold everyone over until dinner was ready.....
As I have been experimenting with Kefir milk....I thought I may as well give Kefir Scones a try.....and not having a recipe...I just substituted standard milk for Kefir milk in my recipe for plain scones.....
It goes like this....
Kefir Scones...
4 cups of Self Raising Flour
2 tablespoons of butter or margarine
1/2 teaspoon of salt
1 1/2 - 2 cups of Kefir Milk...(start with 1 1/2 cups, adding more if needed.)
Set your oven to 200 degrees Celsius.....
Rub butter into flour and salt until a breadcrumb like consistency....
Using a wide-bladed knife...mix milk quickly into flour...and don't over mix.
Roll out and cut into scones....Glaze with extra milk
Place in oven until golden...usually 10 minutes
 |
| Always lay your scones like this... They will help each other rise.... |
 |
| Kefir Scones...Yum! |
I decided not to get any meat out of the freezer for dinner....we already had a 1kg bag of 'budget bacon' defrosted from yesterday that I hadn't used....and I had over 2 dozen eggs from the local egg farm......
so I decided to make an 'Egg and Bacon Pie'.......I did wonder how it would go, using no recipe, a sweet pastry...and not much else.....
Here is Nan's Pastry recipe...according to her writing....it makes enough pastry to do 4 tops and 4 bottoms....I assume she is talking about 'Apple Pies'.....a master at them Apple Pies; my Nan was.
Sweet Pastry for 4 tops & 4 bottoms
Here's the recipe as it is written on a little bit of paper......
1 full cup Plain Flour
2 full cups Self Raising Flour
1/4 lb marg
1 egg beaten well
1/2 cup sugar
add water to mix well, then roll out
(that's it)
So after rubbing the butter into the flours...I stirred the sugar through...then added a bit of water to the beaten egg and poured that over the mix....treating it like a scone mix...I blended it all together quickly...adding a little more water as needed.....wrapped it in cling wrap.....and popped it in the fridge......
Sweet Egg & Bacon Pie
For this huge baking dish...I used the following.......this will easily do us two meals...for five hungry adults.
18 eggs...well beaten
1 grated carrot
1 kg of budget bacon...rind removed then fried to remove remaining fat.
2 cups of frozen spinach....defrosted and chopped well...(put in hot water to defrost)
1 cup of home-made feta cheese ....crumbled
fresh chopped herbs......from the garden if you can
salt and pepper
Remove the pastry from the fridge after preparing all the fillings.....cut almost in half....the bigger half being for the base......
Roll out the larger piece of pastry and using the rolling pin; roll the pastry onto a very large well greased baking dish .....
Pour filling ingredients on top of pastry...
Roll out the smaller piece of pastry cut into strips....placing on top of filling....
Use an egg wash or Kefir Milk to glaze the pastry strips.....
In a moderate oven...bake until set....rotating every ten minutes or so....
If it wobbles in the centre; it's a sure sign it isn't cooked yet.
 |
| Sweet Egg and Bacon Pie |

I learn't a lot making these dishes today....I learn't that I CAN make Nan's pastry....so bring on the apples!
Best of all, I learn't that sweet pastry is OK to use on a savoury pie if you want to make your Nan's pastry recipe....

The eggs cost me $8.50 for the 2 1/2 dozen tray from the local egg farm...so $3.40 a dozen.....
Eggs $5.10
The budget bacon was a bargain at $5.00 for 1kg.
1 carrot .50c at a guess
No immediate cost for the following, as I already had them in stock...
- The frozen spinach was from the garden when I had heaps....
- Home-made feta ...I already had made in the fridge..so no immediate cost
- Flour and sugar....in my stockpile
- chopped herbs from the garden
- salt and pepper...in my cupboard
Total cost for the pie, not including
what I had in stock....$11.59
I think that's a pretty good meal,
considering it will serve
us 5 hungry adults...two big meals.
Friday, July 15, 2011
On my mind...more Paving
This is a Friday photo feature that anyone with a blog can join. It opens the door to us sharing our lives through these photos and gives us all a new way to discover each other, and maybe form new friendships. Your photo should show something at home that you're thinking about TODAY. If you're in another country you should join in when you read this, even if it's still Thursday.
To take part, all you have to do is post a photo on your own blog, write a short caption explaining it, and link it back to here. Please write a new post, don't link to an older one. When your photo is published, come back and add a comment below, with a link to your blog photo so we can all find you. Please visit all the blogs that appeal to you and leave a comment. Slow down, take the time to cruise around and enjoy your cyber visits.
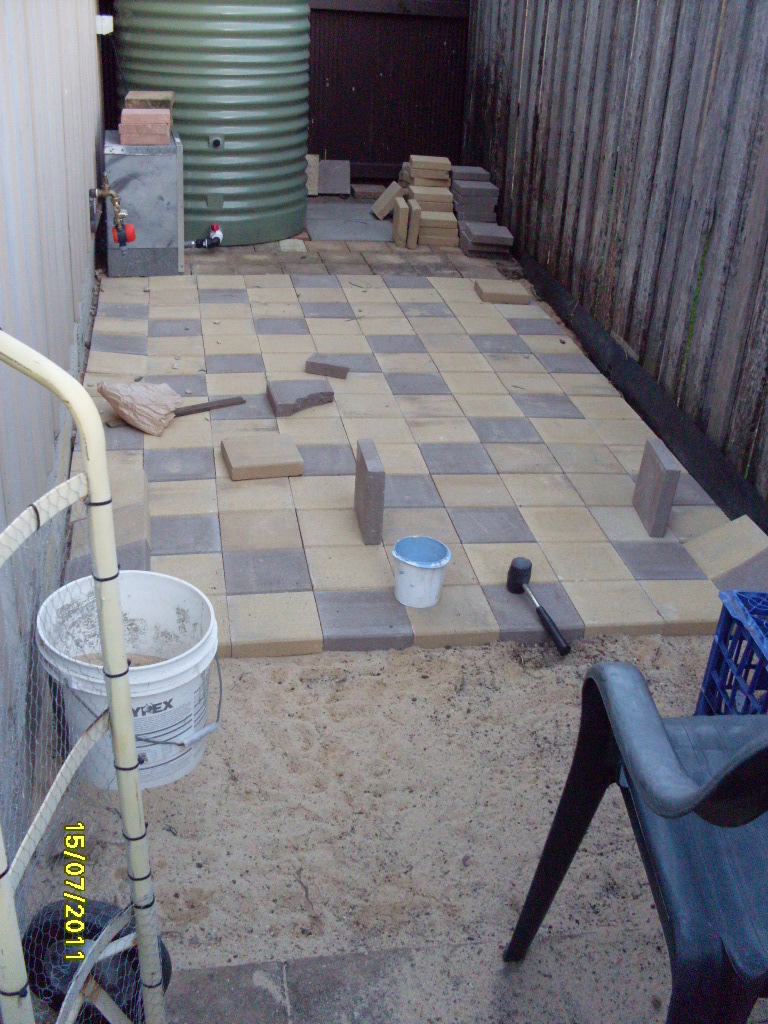 |
| Behind the shed |
I've been promising Mum an area for her to put her garden pots since we moved into this house over 6 years ago....I have weeded it how many times I dare not count.....I even had shelves in there for a time with a gravel base....I've tried different set ups in there...and now I have taken the plunge and began paving it.....
After paving almost the entire back yard when we first moved in....I vowed I would probably never pave again....It's hard work!...Harder now that I am 6 years older than when I last done paving...Harder now that I have health issues involving my bones.....
But it will all be worth it once it is finished.....I will have a safe, flat surface for mum to potter around in.....
Once the paving is finished...I plan on doing the following:
Adding a potting table so she can sit and plant till her heart's content...Mum loves lending a hand when she can, although she can't walk around much...once I get her there, she can sit down and pot away.....
Adding a few garden beds for her, which I picked up at Bunnings...amazingly heavy duty 220L tubs for $59.95...I think I can fit three of these down the side along the back fence....these are heaps cheaper than the colour-bond veg gardens getting around....I can buy three tubs for the price of one...and I get heaps more garden space...so all around I win.
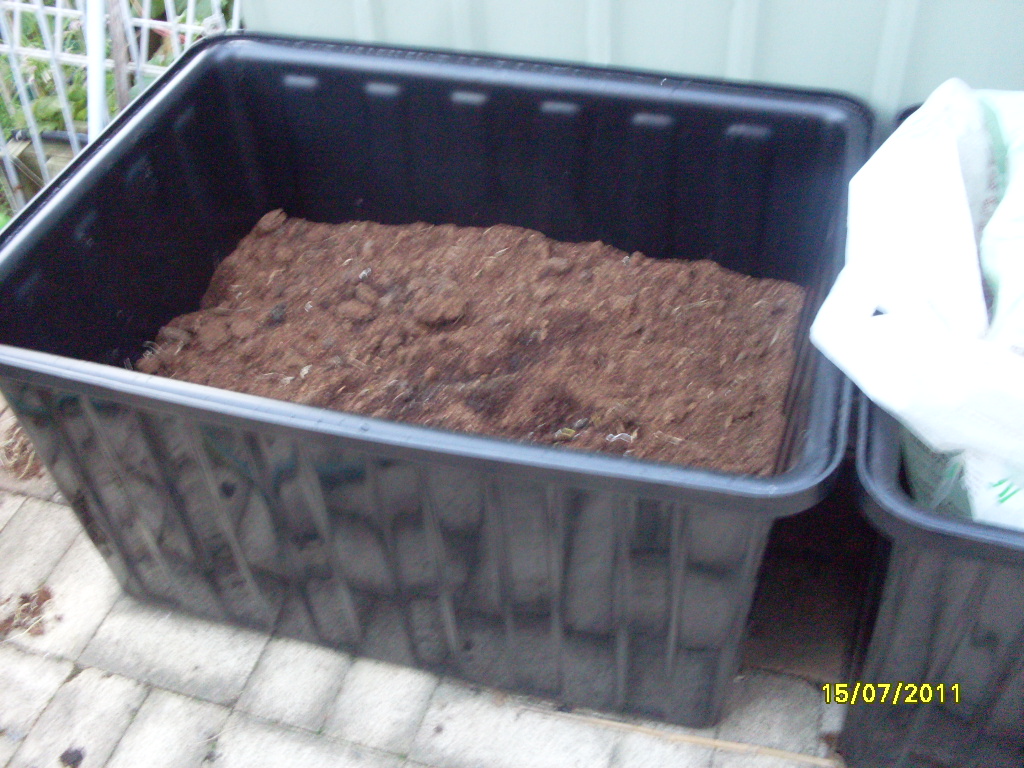 |
| This tub is staying where it is.... I planted out 9 potatoes in it yesterday as the greenery shows its head through, I will continue to cover it slightly to produce more potato layers. |
Please join in on this Friday feature....
Monday, July 11, 2011
Introducing Richard the Practical Gardener
I just received an email from Richard Moran...Richard around the Illawarra is known as the Practical Gardener and also has his own DVD published....If you go to his website..you can purchase his DVD called "Practical Gardening with Richard Moran".

Back to the email I received...Richard works at Wollongong Wholesale Nursery Albion Park on Sundays and Mondays... and you can also purchase his DVD there. I have had the pleasure of meeting Richard and he is a lovely man full of information ready to be shared.
Richard is starting a monthly practical gardening class over 12 months....as I don't seem to be able to attach the Word doc. here is a paste of the attachment I received in my email.........Thanks Richard!
If you are a local to the Illawarra, I would strongly recommend you contact Richard as soon as possible.....I think places in the course will go quickly....
I've already got my name down....If your going; I'll see you there.

Back to the email I received...Richard works at Wollongong Wholesale Nursery Albion Park on Sundays and Mondays... and you can also purchase his DVD there. I have had the pleasure of meeting Richard and he is a lovely man full of information ready to be shared.
Richard is starting a monthly practical gardening class over 12 months....as I don't seem to be able to attach the Word doc. here is a paste of the attachment I received in my email.........Thanks Richard!
****************************************************************
Need some Practical Gardening Skills
from a qualified horticulturist?
Then don’t miss out on the opportunity of a life time for you and your friends. Reserve your spot once a month on a Saturday afternoon where you can learn all the practical gardening skills you need to have a great time in your garden; starting in August with what to do in September, then September for October and so on.
Skills to learn
- Planting what and where? Plus that vegetable bed.
- Fertilizing when and how to make your own green manures and compost.
- Propagating how? seeds, cuttings, division, grafting and more.
- Improving your soil type and bed preparation.
- Learning special skills, like espaliering trees, this will change every month.
- There will be plant of the month which will be available to purchase on the day
- And much much more.
This course will run for twelve months and by the time you have finished the classes you will have the opportunity of a twelve month garden diary for your garden, how great would that be? Cost is just $25 per class plus $5 per month for your email copy of what to do this month if you require this. You don’t have to come to all the classes but you wouldn't want to miss out on a great afternoon with your new friends; so I will email you your monthly planner by email for just $5 each time only registered people can receive this.
Classes will be 4hrs including afternoon tea , with hands on things for all to do, as well as Free gifts each month eg seeds and a plant.
Venue Jamberoo Hall dates and hall to be confirmed
Classes $25 per month plus $5 to email copy of planner for that month.
So ring Richard (PRACTICAL GARDENER) on 0414573796 or email him at richardpracticalgardener@gmail.com for you spot in the course.
Limited seats so be quick as these classes will fill up fast
If you are a local to the Illawarra, I would strongly recommend you contact Richard as soon as possible.....I think places in the course will go quickly....
I've already got my name down....If your going; I'll see you there.
Saturday, July 9, 2011
Steamed Fruit & Nut Rolls -DIY
I think this is the third time I have posted about these...Back when I started this blog, I posted the recipe...but hadn't made them for a while...so no photos...
To my new followers:
Lisa, Deb Cameron, the Mrs, Quinn and Mrs Linee...Welcome to my blog! Happy reading...
For those who know me and have been following my blog...it's usually pretty crazy around this neck of the woods..for there is always something going on....
On Wednesday, I invited you to a bake-a-long and explained how to gather your tins...and yesterday I had them On My Mind... and told you that I would be making them..today...so yeah, I guess they have been on my mind a bit....
Getting an early start yesterday, I thought maybe I would have enough energy to see them through....but nope...too much in the garden AGAIN..(Wait 'till you see what I've been upto)......I had a head-start and thought I would have enough energy to make them yesterday, and so I done the soak....(which I later put in the fridge to begin again today)

Now gather all the fruits and nuts that you would like to include...and as you count the cups...keep a record......The smaller fruits will go straight into the bowl...The larger fruits and nuts will need to be chopped, but I just put them in the whizzer separately...
All up; if you are making 1 batch..you will need 6 cups of mixed fruit and nuts.
As I am making 2 batches, I will need 12 cups of mixed fruit and nuts.

 3. Once you have all the fruit and nuts gathered and prepared....
add 2 cups to each bag.....
6. Cook in boiler using enough water to half cover the tins. Cover and boil slowly for 1 ½ hours. When cooked take out of boiler and remove cake from tin, place on another rack to cool. Cut into slices and enjoy.


These are my hints on making a big batch...I hope they help you...I have tried to get this down to a fine art...and cut a lot of time off the preparation......After you make these...and you EAT these....I know you will be making more......so you may as well prepare 6 bags.
If you do decide to make them, I'd love to hear about it....come back and tell me how you went.
Here's hoping everyone has a wonderful weekend, filled with lots of fun and laughter...because laughter is the best medicine of all.......take care...I'll be back soon. (more than likely Monday..lol)
To my new followers:
Lisa, Deb Cameron, the Mrs, Quinn and Mrs Linee...Welcome to my blog! Happy reading...
For those who know me and have been following my blog...it's usually pretty crazy around this neck of the woods..for there is always something going on....
On Wednesday, I invited you to a bake-a-long and explained how to gather your tins...and yesterday I had them On My Mind... and told you that I would be making them..today...so yeah, I guess they have been on my mind a bit....
Getting an early start yesterday, I thought maybe I would have enough energy to see them through....but nope...too much in the garden AGAIN..(Wait 'till you see what I've been upto)......I had a head-start and thought I would have enough energy to make them yesterday, and so I done the soak....(which I later put in the fridge to begin again today)
1. In 3 separate bowls put………..
2 cups all bran (home brand is fine)
Soak in 2 cups milk
2 dessert spoons golden syrup.
Soak for at least 2 hours or overnight

2. While the mixture is soaking I then prepare the other ingredients for later use….
Into 3 separate medium freezer bags just to save washing more dishes…You will see that I have 6 bags...this is because I plan to make another batch, so it stands to reason that you would prepare for both batches...it saves so much time...and only one mess
Add and mix the following into each freezer bag…….
1 cup sugar
2 cups plain flour
2 level tspns bi carb soda
1 tspn mixed spice
1 tspn ground ginger
2 cups of dried fruit or nuts or both (as long as its 2 cups chopped). This part is done next
Now gather all the fruits and nuts that you would like to include...and as you count the cups...keep a record......The smaller fruits will go straight into the bowl...The larger fruits and nuts will need to be chopped, but I just put them in the whizzer separately...
All up; if you are making 1 batch..you will need 6 cups of mixed fruit and nuts.
As I am making 2 batches, I will need 12 cups of mixed fruit and nuts.


add 2 cups to each bag.....
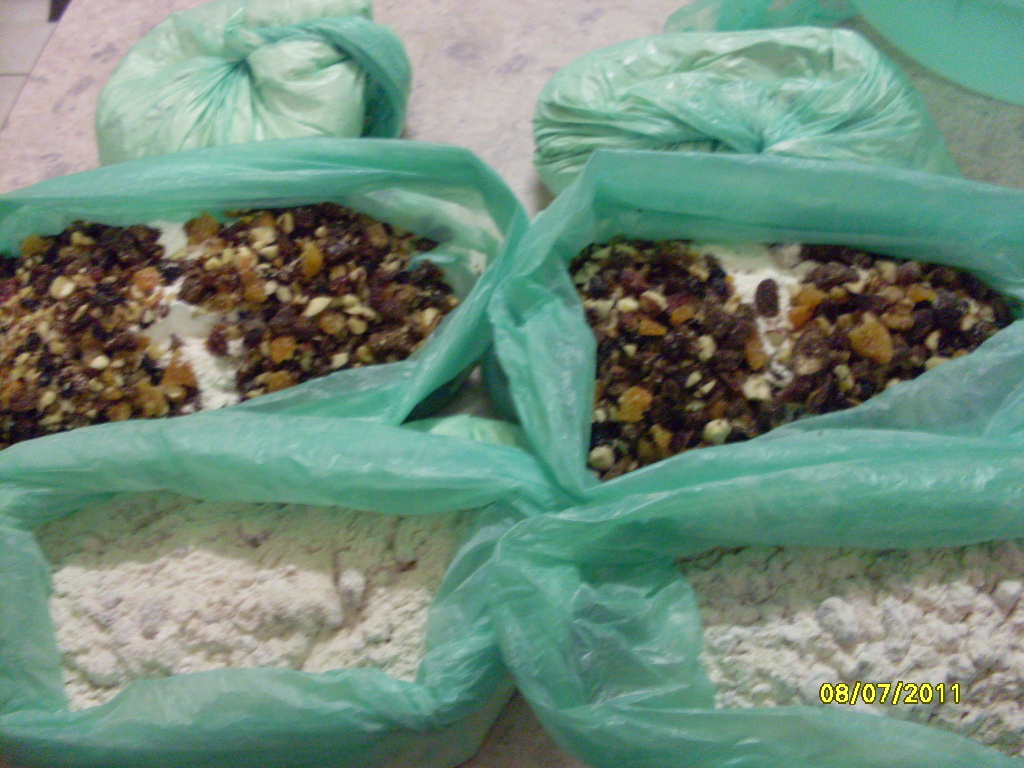 |
| Centre: 2 cups of mixed fruit and nuts added to dry mix |
3.5 Now take one dry mix and add it to one soaked mix and mix until all is combined.
Spray the tins and the foil lid.
Divide the mixture into the 3 tins (see note)
4. Repeat step 3.5 until all 3 mixtures are used and placed in tins....Notice, besides the 'soak mix'; I have only dirtied one bowl and the whizzer.
 |
5.. Cover with double foil and string. Don't forget to spray the foil lid. I tie string around the top of the tin then across the top to create a handle for removing them from the hot boiler later.


These are my hints on making a big batch...I hope they help you...I have tried to get this down to a fine art...and cut a lot of time off the preparation......After you make these...and you EAT these....I know you will be making more......so you may as well prepare 6 bags.
If you do decide to make them, I'd love to hear about it....come back and tell me how you went.
Here's hoping everyone has a wonderful weekend, filled with lots of fun and laughter...because laughter is the best medicine of all.......take care...I'll be back soon. (more than likely Monday..lol)
Friday, July 8, 2011
On my mind...steamed puddings I am making today
This is a Friday photo feature that anyone with a blog can join. It opens the door to us sharing our lives through these photos and gives us all a new way to discover each other, and maybe form new friendships. Your photo should show something at home that you're thinking about TODAY. If you're in another country you should join in when you read this, even if it's still Thursday.
To take part, all you have to do is post a photo on your own blog, write a short caption explaining it, and link it back to here. Please write a new post, don't link to an older one. When your photo is published, come back and add a comment below, with a link to your blog photo so we can all find you. Please visit all the blogs that appeal to you and leave a comment. Slow down, take the time to cruise around and enjoy your cyber visits.
Yesterday I posted a lot of information on how to make my Nan's steamed puddings...they are called Fruit & Nut Rolls, you may even know them as Date Loaves or Fruit & Nut logs. We even know them as KB Rolls in the family..because Nan once had the old steel cans from KB Beer...Now that is going back a while...lol
Many years ago..they were baked in those old Willow Log tins...they are very pricey though...so click on here to see my hints and suggestions on how to make these lovely steamed puddings. Come back later in the day to see the step by step photos.
 |
| Gathering the tins to make Steamed Puddings in bulk. |
Thursday, July 7, 2011
Kefir Grains
Yesterday I wrote that I had received two batches of Kefir grains...One milk, and one Water.....I'm on a journey of trying new healthier choices in my diet to improve my pain levels...and hopefully reduce the amount of painkillers I need to take to function on a daily basis......
Lisa, I am looking after your babies....when they arrived. I rinsed them straight away..I even drank the rinsing water and milk...they were both yummy...and if that was anything to go by...I'm in for a treat...The packaging was great too, No Leaks! Yay! But I wonder how much longer they would have lasted, as the base of each container was beginning to bulge....lol.....for a little container...they had a lot of punch...
For the Milk Kefir...after rinsing...I added the grains into a jar with 1 cup of milk....placed a larger than needed lid on top...I'm still not sure if I want fizzy milk...lol.....

For the Water Kefir...I rinsed the grains...with tank water....then set them aside....then added them To a large glass jar, I added the following:
2 cups of tank water
half a tablespoon of sultanas
1 1/2 tablespoons of black sugar...which is raw Cane Sugar...It was recommended by Lisa to use Rapudura Unrefined Cane Sugar...but as my local health food shop was out of that, the gentleman recommended the Raw Cane Sugar...which is apparently even less refined that the Rapudura sugar....
2 cups of water..
I need to gather some clip lock jars to brew these in....
Waking up this morning...and after 12 hours of fermenting...I had bubbles!...Yay!

For tomorrow, I now have two Pro-biotic drinks to enjoy while making my Fruit & Nut Loaves....I will enjoy the Milk Kefir with some crushed Strawberries...It will make a lovely breakfast....
Later on while making the nut loaves...I will enjoy sitting down to this new flavour....
Thanks heaps Lisa...I'm looking forward to experimenting with ginger, pineapple and other flavours...It's all so exciting...I hope I can get it fizzy enough to replace the "dreadful sugar-free soft-drink habit" I have....
After having fun with these..and chasing everyone around to convince them to try these new concoctions I have..I made the next ones....
This time I added a slice of lemon and half a dried fig...instead of the sultanans....I can't wait to see what flavour I get this time....

Lisa, I am looking after your babies....when they arrived. I rinsed them straight away..I even drank the rinsing water and milk...they were both yummy...and if that was anything to go by...I'm in for a treat...The packaging was great too, No Leaks! Yay! But I wonder how much longer they would have lasted, as the base of each container was beginning to bulge....lol.....for a little container...they had a lot of punch...
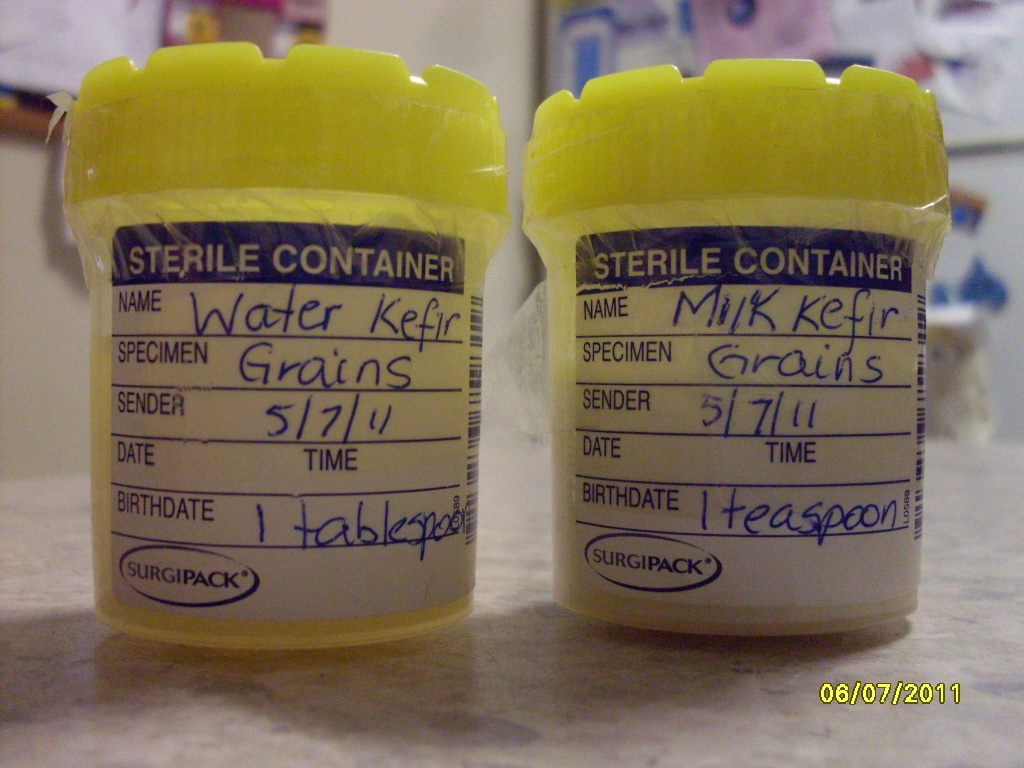 |
| Can you see them rocking? |
For the Milk Kefir...after rinsing...I added the grains into a jar with 1 cup of milk....placed a larger than needed lid on top...I'm still not sure if I want fizzy milk...lol.....

 |
| After 24 hours...some of the grains are floating.. |
 |
| L to R: My first Milk Kefir drink, 1 cup of milk for the next batch, the strained and rinsed Kefir grains. |
For the Water Kefir...I rinsed the grains...with tank water....then set them aside....then added them To a large glass jar, I added the following:
2 cups of tank water
half a tablespoon of sultanas
1 1/2 tablespoons of black sugar...which is raw Cane Sugar...It was recommended by Lisa to use Rapudura Unrefined Cane Sugar...but as my local health food shop was out of that, the gentleman recommended the Raw Cane Sugar...which is apparently even less refined that the Rapudura sugar....
2 cups of water..
I need to gather some clip lock jars to brew these in....
 |
| After rinsing the first time. |
 |
| All mixed up...Now we wait! |
Waking up this morning...and after 12 hours of fermenting...I had bubbles!...Yay!

For tomorrow, I now have two Pro-biotic drinks to enjoy while making my Fruit & Nut Loaves....I will enjoy the Milk Kefir with some crushed Strawberries...It will make a lovely breakfast....
Later on while making the nut loaves...I will enjoy sitting down to this new flavour....
Thanks heaps Lisa...I'm looking forward to experimenting with ginger, pineapple and other flavours...It's all so exciting...I hope I can get it fizzy enough to replace the "dreadful sugar-free soft-drink habit" I have....
 |
| Tomorrow's new flavours for my palet. |
This time I added a slice of lemon and half a dried fig...instead of the sultanans....I can't wait to see what flavour I get this time....

Wednesday, July 6, 2011
Two top blogs get my vote!
I've had an exciting day thanks to the men that deliver my mail...
First of all...Welcome to my new followers..."4 in the herd" and "duchess declutter" and Vic"....thank-you for reading my blog.
Since finding this amazing blog world back in February this year..I have come to meet some very friendly people...and all sharing their knowledge too, which is fantastic....Not only do we get to hear what works but what doesn't work or hasn't worked in the past....I love reading blogs, but it takes up so much time...I find myself becoming distracted easily. Being part of the blogging world opens up a whole world of possibilities for anyone who wants to take them on. But you must discipline yourself to how long you spend blog surfing.
Back to my mail......Today, I received in the mail...from Sherrie at Simpleliving two lovely handmade enviro bags. Sherrie posted a give-away to celebrate her blog's 1st anniversary...which I am pleased to say; I won!
Sherrie also sells these bags on her blog...she has an amazing gift for sewing, with her French seams and perfectly straight sewing; displaying just some of her natural talents.
I highly recommend you check out Simpleliving......it is a fantastic blog. While you're there, buy an enviro bag...they are affordable, they help the planet, and most of all, they are beautifully hand crafted by a lovely lady.

I also received in the mail today, a fresh batch of Milk Kefir Grains..and a fresh batch of Water or Sugar Kefir Grains from Lisa at Sewing the Seeds of Change. Lisa writes about her Kefir and I am very thankful for her sending me some to try. That will need to be another post though..(coming soon).
Lisa's blog is fantastic as well. Check out her post about making Nut Milk and a yummy looking recipe for pickled onions..but like Sherrie, Lisa has loads of interesting posts on her blog....
You will need to come back and check out what I do with the Kefir Grains....stay tuned..............
First of all...Welcome to my new followers..."4 in the herd" and "duchess declutter" and Vic"....thank-you for reading my blog.
Since finding this amazing blog world back in February this year..I have come to meet some very friendly people...and all sharing their knowledge too, which is fantastic....Not only do we get to hear what works but what doesn't work or hasn't worked in the past....I love reading blogs, but it takes up so much time...I find myself becoming distracted easily. Being part of the blogging world opens up a whole world of possibilities for anyone who wants to take them on. But you must discipline yourself to how long you spend blog surfing.
Back to my mail......Today, I received in the mail...from Sherrie at Simpleliving two lovely handmade enviro bags. Sherrie posted a give-away to celebrate her blog's 1st anniversary...which I am pleased to say; I won!
Sherrie also sells these bags on her blog...she has an amazing gift for sewing, with her French seams and perfectly straight sewing; displaying just some of her natural talents.
I highly recommend you check out Simpleliving......it is a fantastic blog. While you're there, buy an enviro bag...they are affordable, they help the planet, and most of all, they are beautifully hand crafted by a lovely lady.

I also received in the mail today, a fresh batch of Milk Kefir Grains..and a fresh batch of Water or Sugar Kefir Grains from Lisa at Sewing the Seeds of Change. Lisa writes about her Kefir and I am very thankful for her sending me some to try. That will need to be another post though..(coming soon).
Lisa's blog is fantastic as well. Check out her post about making Nut Milk and a yummy looking recipe for pickled onions..but like Sherrie, Lisa has loads of interesting posts on her blog....
 |
| Thanks Lisa |
 |
| Water kefir grains after straining |
 |
| Milk Kefir Grains after straining |
Steamed Fruit & Nut Rolls -Part 2
Steamed Fruit & Nut Bake-a-long
Grabbing the Christmas bug off Rose and her Christmas Cake bake-a-long....I am planning on making my Steamed Fruit n Nut Rolls soon....and thought others might like to make them too.....This is a lovely old skill that I learn't from watching my Nan....Steamed puddings are easy to prepare and not nearly as hard as you may think.....Anyone can join in at any time; as soon as they gather their tins, a mesh trivet and the ingredients.
These are lovely to have on hand, in the freezer for when visiting friends or family....especially leading up to Christmas, if visitors arrive you can pull one out to defrost, while you are chatting and catching up. My Nan made these rolls for over 50 years for the Red Cross fundraising stalls. There are no eggs and no butter, plus they are an excellent source of fibre so try not to eat the whole roll.
Depending on the season and the climate I recommend to either.......
SERVE SLICED COLD WITH BUTTER OR MARGERINE or
SERVE SLICED HOT WITH CREAM, ICECREAM OR CUSTARD
For a pdf version of the recipe and the labels head over to the DTE forum...(the fourth paragraph).....
Once you open the Labels pdf....
You can copy and paste the labels over to a Word document...which will enable you to adjust the ingredients list to suit the fruits and nuts you use.
This triple recipe fills the 8 tins nicely...reaching right to the top of the tin...that’s why you have to spray the foil lid. While I have everything out...I sometimes make two triple batches...so for my efforts, I end up with 16 rolls in the freezer. A great accomplishment for the day!
I use 8 tins...because that is what fits in my boiler...My Nan had a larger boiler...which held 9 tins...hence dividing the three mixtures equally....the ones I use are 850mls...you can get them from Berri Apricot Nectar...or Goulburn Valley Pear Juice....or Golden Circle Pineapple Juice...these are the cans I know anyway....the third photo is the cans my Nan used to use....the old steel beer cans.

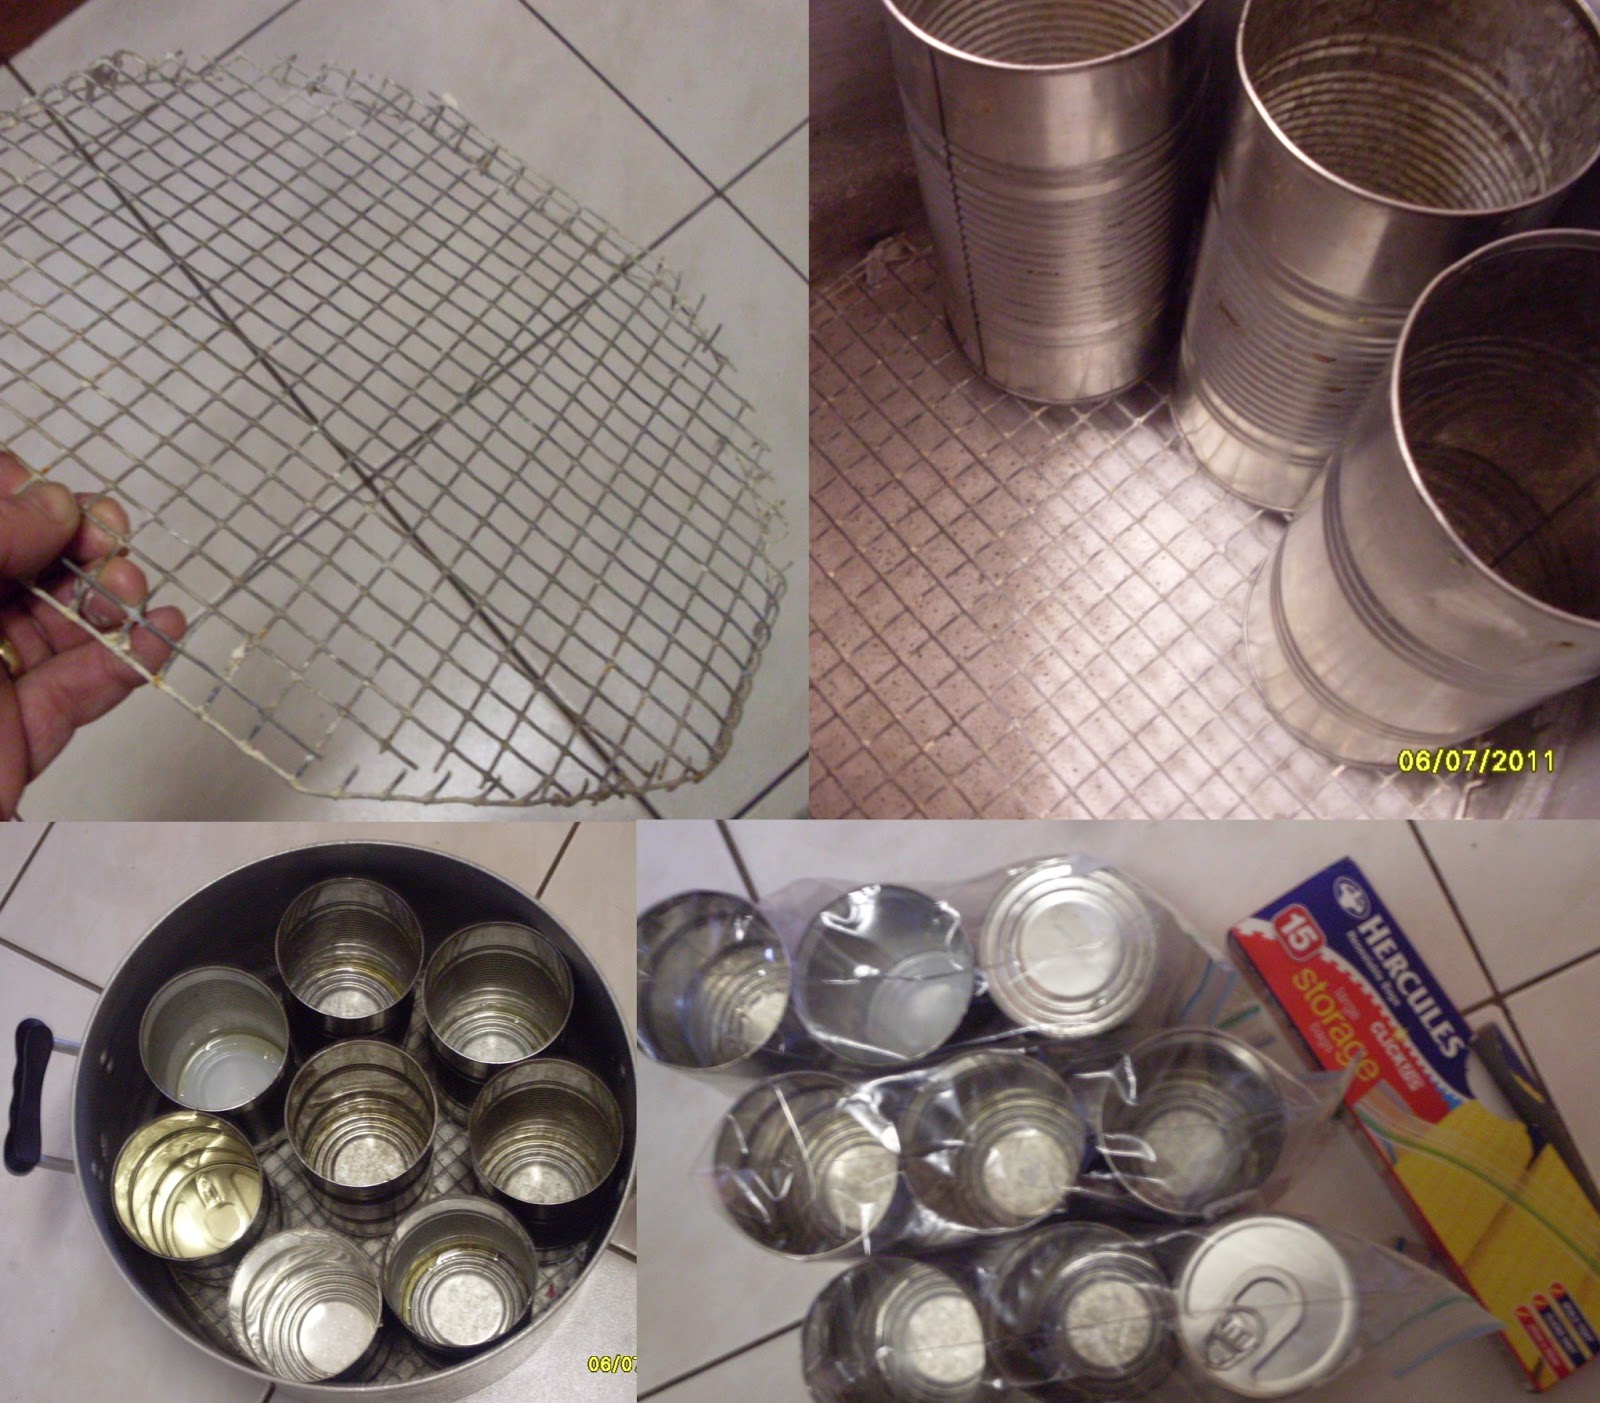 |
| Make a mesh trivet to suit the inside base of your boiler. Once the tins are clean and dry, store them in a sealed bag. |
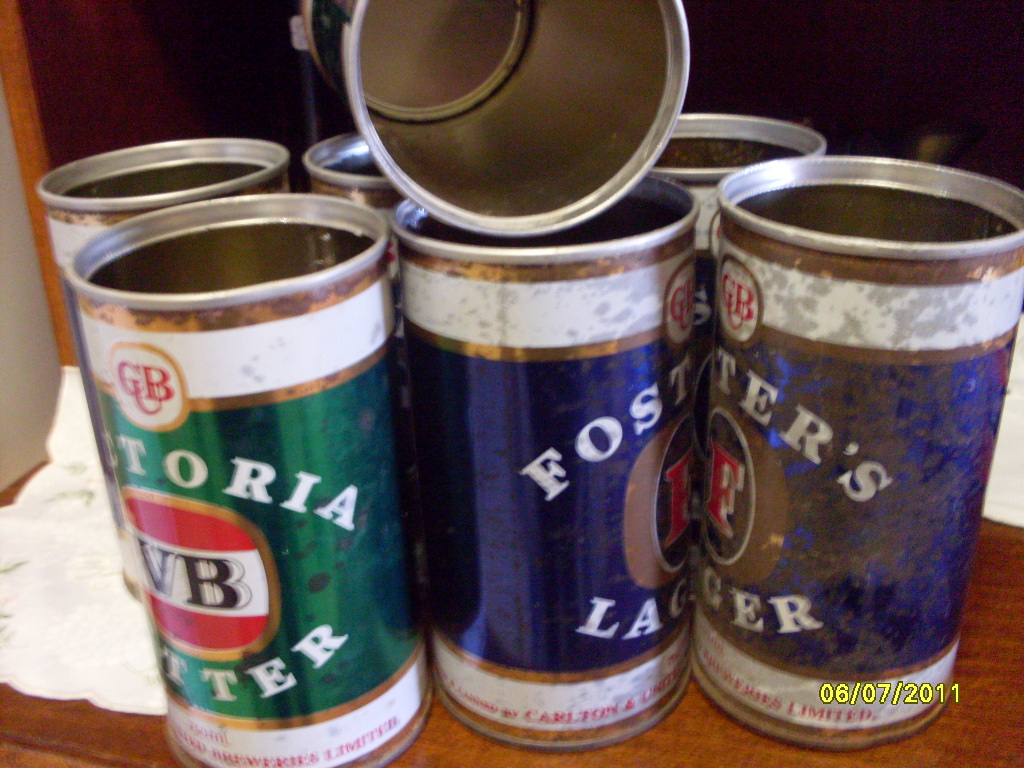 |
| A set of my Nan's old steel beer cans that she used to make these rolls. |
You could also check the sizes in other foods...You also need a sturdy mesh plate or cake rack for the tins to sit on in the base of the boiler.
Allow the rolls to cool fully then wrap them in plastic wrap, adding the label between two layers of the wrap..... place a ribbon around them, before storing in the freezer. Hand them out towards Christmas for your family and friends to enjoy.
Its handy to know you always have something on hand for unexpected visitors...they defrost rather quickly....or if a neighbour is having a hectic time for whatever reason, you could always give them one to say your thinking of them..
STEAMED FRUIT & NUT ROLLS - THE RECIPE
I always triple the recipe. In 3 separate bowls prepare each recipe. Three batches fill all the tins in the boiler. I have to divide the triple recipe into 8 tins not 9 because of the size of my boiler.
1. In 3 separate bowls put………..
2 cups all bran (home brand is fine)
Soak in 2 cups milk
2 dessert spoons golden syrup.
Soak for at least 2 hours or overnight
2. While the mixture is soaking I then prepare the other ingredients for later use….
Into 3 separate medium freezer bags just to save washing more dishes…….
Add and mix the following into each freezer bag…….
1 cup sugar
2 cups plain flour
2 level tspns bi carb soda
1 tspn mixed spice
2 cups of chopped, dried fruit and/or nuts of your choice. chopped).
1 tspn ground ginger
I love using apricots, dried apple, dates, cranberries, sultanas, macadamia nuts, walnuts, almonds. I don’t recommend dried banana chips. I also inspect and remove any dried stems left on the sultanas and raisins. Really, you can use whatever you have on hand.
3. Now take one dry mix and add it to one soaked mix and mix until all is combined.
Spray the tins and the foil lid.
Divide the mixture into the 3 tins
4. Repeat step 3 until all 3 mixtures are used and placed in tins.
5. Cover with double foil and string. I tie string around the top of the tin then across the top to create a handle for removing them from the hot boiler later.
6. Cook in boiler using enough water to half cover the tins. Cover and boil slowly for 1 ½ hours. When cooked take out of boiler and remove cake from tin, place on another rack to cool. Cut into slices and enjoy.
So! Who would like to join me in making these lovely steamed rolls?
Monday, July 4, 2011
Combination stock
I'm planning on making some lollies for my 4 legged girls...Rusty and Cindy....Rhonda has a great recipe for dog biscuits over at Down to Earth.....
I usually just make Chicken stock every weekend which provides me with soup for the week....but as I want some stock for the girls treats; I decided to go all out, buying chicken carcasses...and beef bones.
When I make a stock, I usually put some herbs in from the garden as well....and some veg too....It all adds to the lovely flavour of a stock. There is no hard and fast rules to making a stock...although some would have you believe otherwise.....I always just use what I have on hand....especially if I have any older veg or am preparing veg for dinner....I will always add the peelings too....Yep! the peelings...they will eventually go in my bokashi bucket...but I'm getting as much goodness from them as I can first.
While starting this stock, I always prepare the veg for that night's meal....this makes one mess to clean up..and they will be fine sitting in the steamer until I'm ready to turn it on.
After your stock has been simmering for a few hours, remove the bulkier items from the liquid, then using a cloth over your strainer, strain the liquid, being careful not to disturb the sediment.....
If you would like to remove the fat's in the stock, (although I don't, unless it is really oily)
store it in the fridge overnight, this will allow the fat to settle on the top of the stock. simply scrape the top fatty layer off your stock and it is ready to use.
I usually just make Chicken stock every weekend which provides me with soup for the week....but as I want some stock for the girls treats; I decided to go all out, buying chicken carcasses...and beef bones.
When I make a stock, I usually put some herbs in from the garden as well....and some veg too....It all adds to the lovely flavour of a stock. There is no hard and fast rules to making a stock...although some would have you believe otherwise.....I always just use what I have on hand....especially if I have any older veg or am preparing veg for dinner....I will always add the peelings too....Yep! the peelings...they will eventually go in my bokashi bucket...but I'm getting as much goodness from them as I can first.
 |
| Cilantro, Parsley, Purple basil (stems), garlic chives & Rosemary. Instead of throwing those old stems of herbs in the compost use them in your stock first, there is plenty of flavour in the stem of a herb. |
 |
| Chicken Carcasses $1.25 per kilogram.....$1.90 Beef Bones $2.99 per kilogram......$4.60 |
 |
| Bundle up your herbs with an elastic band also both ends of the leek from my Leek soup as well as carrot and parsnip tops, leftover from dinner prep. |
 |
| as well as any peelings from preparing your veg for dinner |
 |
| after pinching some foe my Leek Soup. Don't stir up your stock once it get's to this stage Stirring your stock will make it cloudy. |
If you would like to remove the fat's in the stock, (although I don't, unless it is really oily)
store it in the fridge overnight, this will allow the fat to settle on the top of the stock. simply scrape the top fatty layer off your stock and it is ready to use.
Leek & Choko soup
Walking around the garden yesterday, I was trying to decide where to put some peas in....I decided that the Choko vine has to go...I'll cut it at the base, so I still get a vine next season....but most of the vine now is dead anyway.....I made lots of plans for the garden yesterday...I'm thinking of pulling up some of the pavers in the back yard, and putting down more garden beds....I know I am adding more work for myself, but with the prices of food going up everytime I walk enter the supermarket...I don't think it leaves me much choice.
Anyway... while looking around the Choko vine...I found three new Choko's...2 of which, I picked...I found it funny to be picking Choko's as I thought they were all but finished....I still have a few sprouting chokoes, if anyone is interested in a plant....
Look at this incredibly huge Choko.....
All you need for this soup is:
Oh dear! you can see how dirty my stove top is, that's because I let the stock boil over...oops.
Anyway... while looking around the Choko vine...I found three new Choko's...2 of which, I picked...I found it funny to be picking Choko's as I thought they were all but finished....I still have a few sprouting chokoes, if anyone is interested in a plant....
Look at this incredibly huge Choko.....
 |
| Yep, and it's not an old one either there was so much moisture inside when I cut it open |
- 1 large leek, cut into thick slices
- 2 choko's, peeled and cubed
- a dab of sour cream
- a few cups of stock
- salt & pepper
 |
| Fry off the leek, add the cubed choko and some stock along with salt & pepper to taste. |
 |
| Chicken, Beef & Veg Stock |
 |
| Maybe even some sour cream.... Although I don't have sour cream, I do have 'crockpot yoghurt'. |
 |
| Blitz with a stick mixer to blend. |
 |
| Enjoy! |
New Followers 4 July 2011
Wow...I have a whole heap of new followers...Thank-you to all of you for following my blog.......
Wendy: I love your sweet chilli sauce recipe....I still have some chillies in the garden too. I love your blog, and your herbal blog is great too.
mountainwildlife: I love your rescue of the cicada..I always love to look at nature close up....I also love what you did with those Hartley photos.....I want to go there.
Andrea: I'm already a follower of your blog...I love the name of it too, Bees and Buttercups...how lovely. Butterflies ......Hi again...lol
Edwina, Enchanted things and Kim Bear, Welcome to all of you too...I hope you find some good reading...I tend to rave on some times.
Archer's Mum: looks like you have already decided....to blog....I can't wait to see what you blog about.
Carol: Is 'kackful' your blogs name? I couldn't get the link to work...Could you please provide me with an address for your blog?
Bobbi Jo: I can't believe you have four blogs...I have enough trouble keeping up with one...lol..Well done!
Amy: I love your garden...you have many beautiful photo's on your blog.
Wendy: I love your sweet chilli sauce recipe....I still have some chillies in the garden too. I love your blog, and your herbal blog is great too.
mountainwildlife: I love your rescue of the cicada..I always love to look at nature close up....I also love what you did with those Hartley photos.....I want to go there.
Andrea: I'm already a follower of your blog...I love the name of it too, Bees and Buttercups...how lovely. Butterflies ......Hi again...lol
Edwina, Enchanted things and Kim Bear, Welcome to all of you too...I hope you find some good reading...I tend to rave on some times.
Archer's Mum: looks like you have already decided....to blog....I can't wait to see what you blog about.
Carol: Is 'kackful' your blogs name? I couldn't get the link to work...Could you please provide me with an address for your blog?
Bobbi Jo: I can't believe you have four blogs...I have enough trouble keeping up with one...lol..Well done!
Amy: I love your garden...you have many beautiful photo's on your blog.
So a big warm Welcome to all of you...
Thanks for reading my blog...
If there is anything you would like to see more of,
just let me know and I will see what I can do....
Saturday, July 2, 2011
Family & Daisy Baked Potatoes
Well it's early morning with a slight drizzle falling towards the already damp earth. I have just seen my DS19 off on his first road-trip and holiday...I'm so proud of him; and not just for the things he has already achieved, but the loving and kind hearted young gentleman he is turning out to be. This is his first holiday since he started his apprenticeship back in January...He is working as an Overhead linesman Electrician for CityRail...I'm so proud of him....I think he gets his maths brilliance from my father, certainly not from me.
Our Rusty dog knew that he was leaving for a long time and decided she was going to go with him....Rusty loves the car, and every time a car gets packed for a trip, she thinks we are going to Poppy's....I had to pick her up to get her out of the car...Her mind was made up.
I have a lot of plans in the kitchen this weekend, but first on the list is soup....We get to go visit Aunty Irene and Uncle Fred again today at the races...
Today I will be taking along some more home-made chicken soup....some yummy biscuits that I made, which are better than Jam Drops. and some small Pasta's that Aunty liked....I love small pasta's for using in salads and soups...so I have bagged up 4 different shapes for her. I also have two potted Rhubarb plants that I have harvested from the original plants....These were my Nan's Rhubarb, which I transplanted when she passed....so Aunty Irene will be given some plants from her Mother's plants....I like the thought of that.
Daisy Baked Potatoes
Another yummy tea I make involves Baked Potatoes....I originally seen them in a store in Albury when I was younger....called Daisy Baked Potatoes....this is the original recipe...which I like to stick to...but there are plenty of toppings that you could add to this dish....
Bake your spuds.....I like to cover the whole tray with foil, this gives a better spud for this dish...I don't want the skin crunchy this time.
Cut the hot spud, add some herby butter.
Top with grated cheese and diced ham
Followed with fresh coleslaw
Top with a dollop of sour cream.....I didn't have sour cream and I wasn't going out in the rain to pick some chives, bit I did have home-made yoghurt, which I used.

Is it raining where you live? Do you have anything planned for the weekend? What are you baking?
Hope everyone has a lovely weekend....stay warm, and stay dry.
Our Rusty dog knew that he was leaving for a long time and decided she was going to go with him....Rusty loves the car, and every time a car gets packed for a trip, she thinks we are going to Poppy's....I had to pick her up to get her out of the car...Her mind was made up.
I have a lot of plans in the kitchen this weekend, but first on the list is soup....We get to go visit Aunty Irene and Uncle Fred again today at the races...
Today I will be taking along some more home-made chicken soup....some yummy biscuits that I made, which are better than Jam Drops. and some small Pasta's that Aunty liked....I love small pasta's for using in salads and soups...so I have bagged up 4 different shapes for her. I also have two potted Rhubarb plants that I have harvested from the original plants....These were my Nan's Rhubarb, which I transplanted when she passed....so Aunty Irene will be given some plants from her Mother's plants....I like the thought of that.
Daisy Baked Potatoes
Another yummy tea I make involves Baked Potatoes....I originally seen them in a store in Albury when I was younger....called Daisy Baked Potatoes....this is the original recipe...which I like to stick to...but there are plenty of toppings that you could add to this dish....
Bake your spuds.....I like to cover the whole tray with foil, this gives a better spud for this dish...I don't want the skin crunchy this time.
Cut the hot spud, add some herby butter.
Top with grated cheese and diced ham
Followed with fresh coleslaw
Top with a dollop of sour cream.....I didn't have sour cream and I wasn't going out in the rain to pick some chives, bit I did have home-made yoghurt, which I used.

 |
| This is such a filling dish I know that when I make this dish all the plates are left clean. |
Hope everyone has a lovely weekend....stay warm, and stay dry.
Subscribe to:
Posts (Atom)
