WELCOME to my BLOG

Hi there!

I’m slowly working towards some simplicity within the home, but hey! It’s a lot of hard work!

I love having a go at growing my own veges and always use herbs fresh from my garden. I try to plant from seed whenever I can and have learnt to save and share my own seed for the following year. I make Award Winning preserves and pickles; and my husband brews Award Winning boutique beers as well. I love to stockpile and try to limit quick trips to the shops. I dabble in bread making and enjoy making my own stocks too.

I enjoy feeding my family good hearty meals, nothing like those tiny restaurant stacks you have to look for on the plate. My husband maintains our vehicles and machinery and we both enjoy fabricating on a small scale mostly relying on metal & timber recyclers for any materials needed.


While I don’t always have time to reply to comments, I love reading them. I hope you enjoy your stay and I hope you learn something new because I love sharing what I learn, and I'm always looking for another new skill myself.

Cheers!

Monday, May 28, 2012

Milling wheat & making pasta


Yesterday; Celia over at Fig Jam and Lime Cordial posted about her Simple pasta in 15 minute's ......and that got me thinking of another way to thicken up the rest of the weekend soup to make into one more meal.....

Many people mill their own grains at home; and I've been giving it a go too. It's far healthier for you, no additives, no thickeners, no bleaching chemicals....just plain good wholesome wheat! If you have your own grain mill you can mill down a whole number of grains, seeds, nuts and even legumes. You even have full control over how fine you make your flour, depending on what you are planning to do with it.

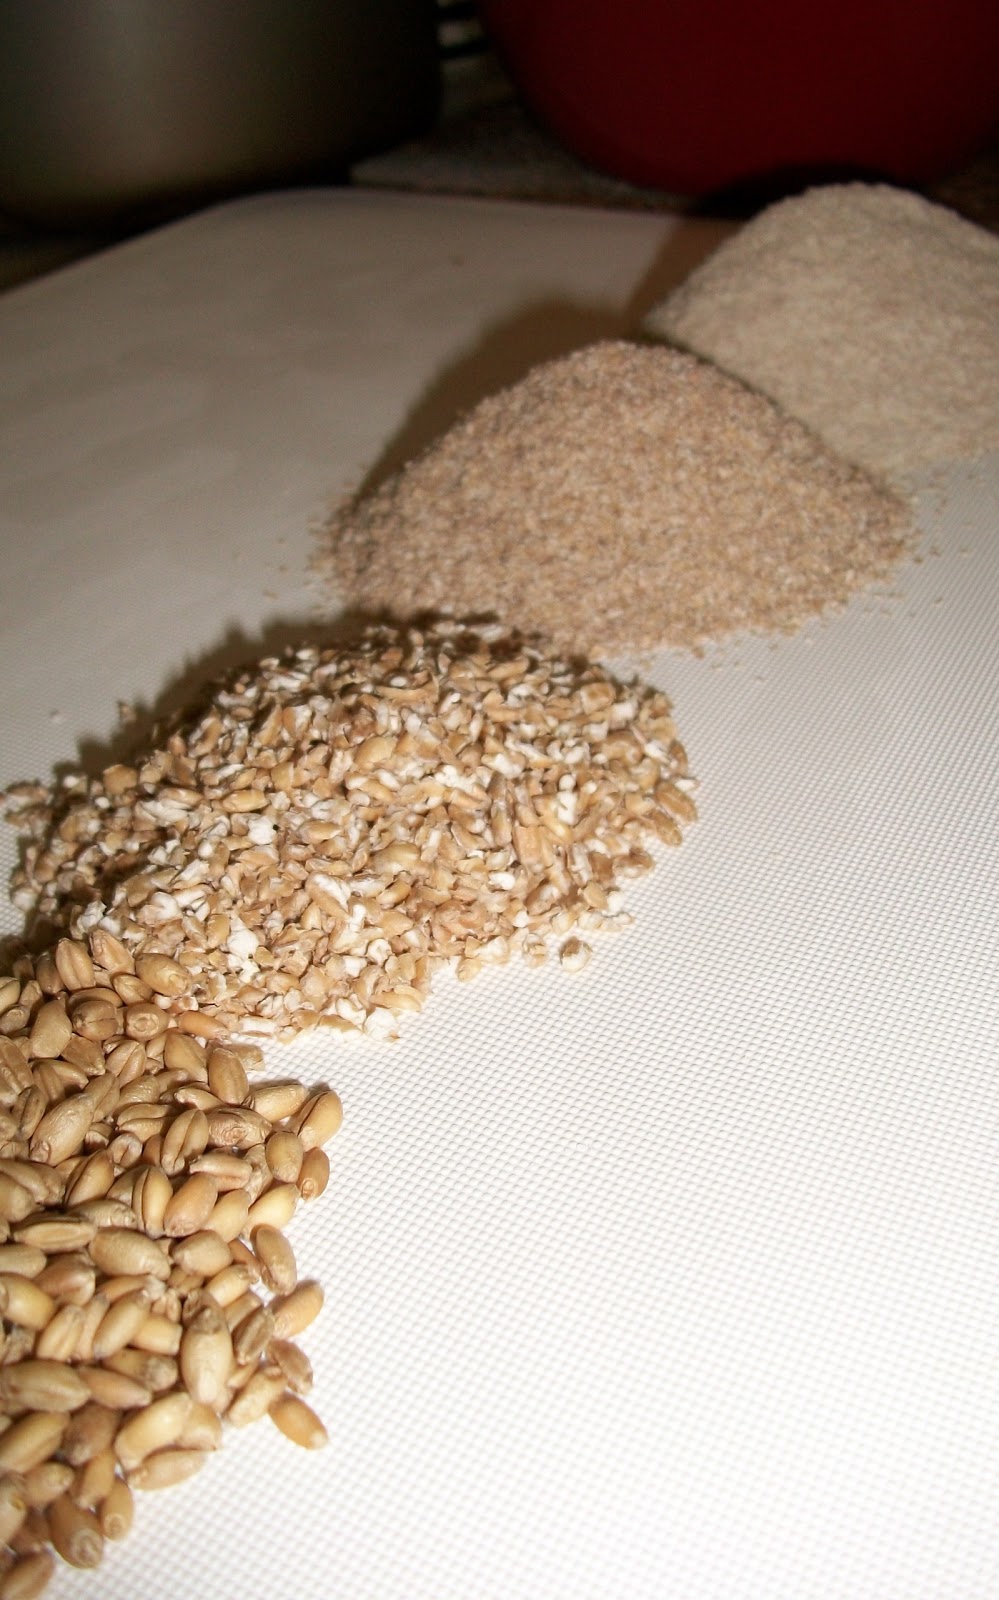
Since sourcing some good bulk grain I've been experimenting more with my electric grain mill. Here are some photos to show you the different stages of milled grain I've been playing with.........

Stage 1: Wheat berries....Whole clean, husked wheat ready for use.

Stage 2: Cracked wheat....I think cracked wheat is prepared by first boiling it...so this is really just crushed wheat. I've been adding some of this to a mix of whole grains when making 'multi-grain bread' and also sprinkling it on the top of bread rolls.

Stage 3: Wheat Bran....This is what you get when you sift the milled flour from its finest setting. Bran is really a by-product of making flour and is made up of the hard shell of the wheat berry. We're sprinkling this on our breakfast and also adding it to other recipes for added fibre.

If I'm making bread, I don't always sift the flour to separate the bran, but when I don't; it makes a very heavy bread....A better or lighter bread is made from 50:50 of whole milled flour and plain white flour. If you don't want to use such refined and bleached flour....just sift your freshly milled flour.

Stage 4: Wholemeal flour.... Here is your flour at it's purest.....
No refining, no bleaching, no additives.
Just Wheat!

********************************

Now I'm ready to make some WHOLEMEAL PASTA......
To every 100g of flour add 1 whole egg.

To 400g of wholemeal flour add 4 whole eggs....and mix well until combined.............


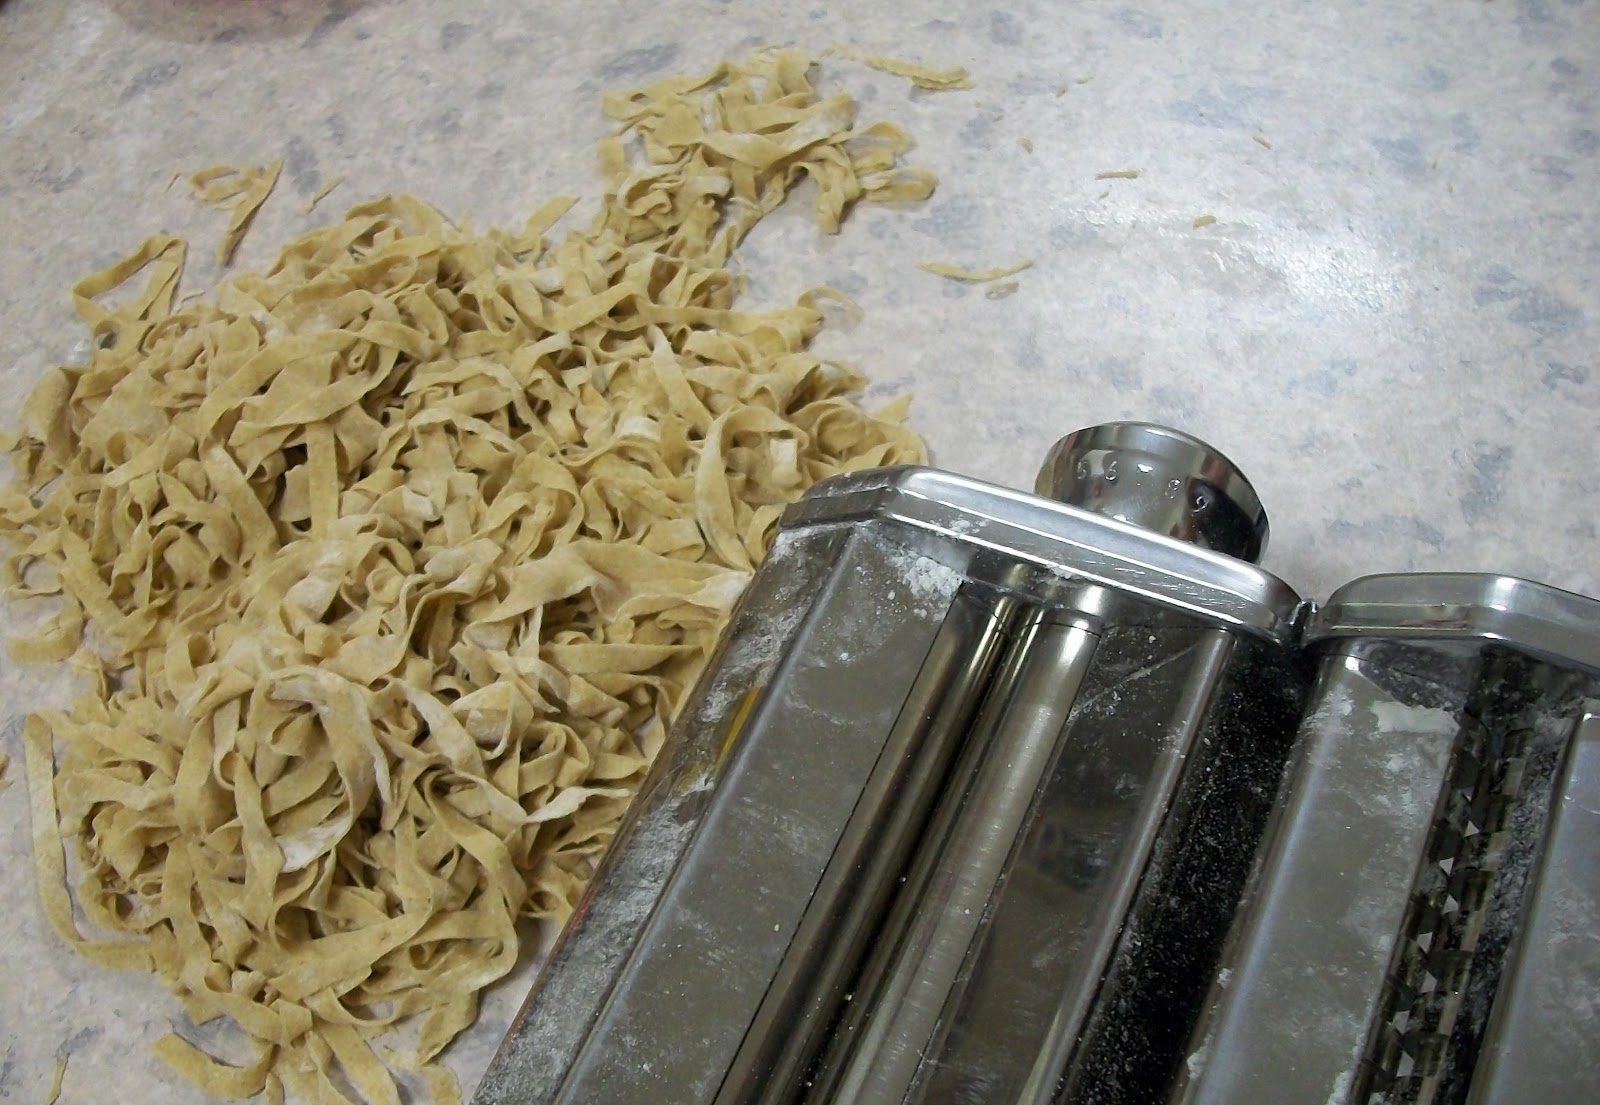
Then divide into four even blocks before putting it in the fridge to rest. I prefer to rest pasta dough for an hour before running it in the pasta machine.

Flatten the divided dough before placing in a plastic bag and pop into the fridge to rest. This shape helps to start preparing the dough for the dough machine.

Only remove one piece of dough from the fridge at a time. This ensures that the other dough pieces don't  dry out while you are working. I used half the dough for dinner ....the other half will keep in the fridge for one or two more days.

Then I heated up the soup that was made earlier..and also put on a pot of water to boil for the pasta....
Due to the cold weekend weather....another pot of soup was on the stove.....
The soup was made up of the following....

  • a smoked ham hock - boiled for an hour, meat removed and added
  • a few roasted chicken carcasses, with meat removed and added
  • chopped meats left to rest in the stock overnight....then fat skimmed off the top before adding other ingredients
  • grated vegetables of carrot, Swedish turnip, parsnip, onion, zucchini
  • mixed legumes and grains (another filler and thickener)
  • thickened with milled rice flour


When all the rolled pasta is cut into strips, lightly dust it with flour to stop it from sticking to itself.....

Once the water is boiling, add half of the pasta and let cook for 1 minute...remove the pasta with tongs and toss into the boiling soup....Repeat with the other half of the raw pasta. It's very quick!

then serve.........this soup was very filling, delicious...and quite rewarding; even for DS20 who took great joy in helping make the pasta.....Thanks mate...a job well done.

Do you have a grain mill? What other grains do you like to mill? I'd love to hear your ideas. 

Have you ever made your own pasta? Do you prefer wholemeal pasta or white pasta? How do you make your pasta? What do you add it to? 

Monday, May 21, 2012

Zucchini & Choko Slice


How many knuckles does it take to make a great slice? Three to be exact....well today anyway. With band-aids in place I continued grating until all the veg were done. Who knew a few pieces of skin could make such a delicious slice. Seriously though; there was no skin added, but I've never added choko to a slice before. With only two young zucchini I needed to increase the mixture. Hence another use for a Choko or three.


Zucchini & Choko Slice

8 medium eggs whisked well
add to that 2/3 cup of Olive Oil
then mix in 1 heaped cup of Wholemeal Self Raising Flour
mix well and put aside.

Now in another larger bowl grate the following:
2 zucchini
2 choko
1/2 a carrot
1/2 a sweet potato
1 cup of tasty cheese
then finely chop 1 brown onion & a small bunch of parsley

Mix all this together, then add the egg mixture and stir well.

When you fill your trays, you can fill right to the top, it will rise while baking, but fall when cooling.....
After pouring into two trays,....if your like me you might just have some mixture left over...so if you do...add another egg, a tablespoon or so of flour, and add in another grated choko....then you will not only have two large slices, but enough slice baked for lunch.
Lunch
Grease your trays well, then bake in a moderate oven of 170o C for 20 minutes for the small ones...and an extra 15 to 20 minutes for the larger baking trays. It was a delicious surprise for mum when she returned from Bingo today.
I have enough to serve for dinner tonight, and one for the freezer. Yummmmm!

Have you ever added choko to a slice?

Please forgive the poor quality of the photos today, I guess my camera was having a bad day and maybe I need to refresh my rechargeable batteries. 

Tuesday, May 15, 2012

Today's agenda & Worm Castings

I've had some lovely emails welcoming me back to blogland...thank-you to all who wrote. While I am extremely busy now that I run the house fully on my own, with Hubby being only home briefly for weekends.....I do hope to continue writing posts. I still do lots, but I just don't get around to computer time much nowadays.

What's on your agenda today? Here's what is on mine....so far:
7.30am... Solar Skylight man coming to check a skylight that has gone dark.
                Hang washing out on line
                Tidy up kitchen
8.30am... Need to have DS17 at work in Oak Flats for Work Experience
8.35am ...Pick up 5 bags of gum-nuts from Freecycle while in Oak Flats
9am...      Community Garden with Albion Park Rail
12 noon   Lots more house work or garden work, which ever I feel like doing more.
2pm...      Community Garden with Barrack Heights
4.30pm....Pick up DS17 from Oak Flats work experience.


Oops,....I double booked myself here...will have to fix this with Max......
4.30pm... Max is dropping of 160kg of Worm Castings (2 x full Potato Sacks roughly 80kg each) for $40....bargain$$$


Max also supplies a tipper ute of good food compost (from restaurant waste) for $80.00 which is a great way to enrich your gardens and pots quickly while waiting for your own compost to break down. 


Max works out of Albion Park and can be contacted on 0414 733823
He's one of those genuine blokes that you will go back to time and time again.
If you ring him, tell him you seen his number on my blog. I know he'll appreciate the work.

*********************************
Over at Rose's blog, she has a lovely photo of Big Bill all cuddled up on the couch....
so I thought I'd show you a photo of my Cindy Loo
enjoying the warmth of a pillow-slip....
It's so cute to watch her try to get inside...
sometimes I just can't help myself and give her a bit of help...lol
Cindy Z z z z z z z

What's the bright light for...don't you know I'm trying to sleep?
After my nap, THEN I will take on the world.


Saturday, May 12, 2012

Seating Circles & Donut Muffins

Beginnings of our Seating Circle which will be in the centre
of our Bush Medicine & Bush Tucker garden
Wow, what a weekend already! We had a productive day at the Community Garden today with the beginnings of our Seating Circle.  Down the track it will be the centre of our Indigenous Bush Tucker and Bush Medicine Garden; but things have to start somewhere...........

So that's what we achieved today....It was all hands on deck....or tyres & bricks really. We are using some reclaimed bricks to help fill the tyres. But it's lots of hard work, as the bricks need to be smashed up and the earth dug up to make the seating level.

We still have lots to do, there's more filling in for this level, then another level of tyres needs to be built on top. After that the framework goes on to make the timber seating....then we will start incorporating the garden around it.

Invitation for the Working Bee
for starting our Seating Circle
Another Seating Circle made from reclaimed tyres, rubble & timber.
I presume this in the one from either Kiama Primary or Kiama Community Garden

Seeing Kiama Community Garden's seating has given us the inspiration to build our own seating. You can check out the beginnings of their seating area hereI'm sorry I don't have a colour photo of the finished circle yet, but next time I visit them I will take a camera.

Kiama Primary School has also built their own seating circle in their permaculture garden. You can check out a great post about the construction on Darren's blog at GreenChange here.

**************************************
We had a lovely lunch cooked on our little barbecue, which is also in the plans to be moved and enlarged....but here's what we dined on for today's lunch: 
  • Freshly caught by Darren (that morning) Kingfish and Cuttlefish. I wrapped the Kingfish in foil after placing it on a bed of Warrigal Greens and scattering aromatic herbs from the garden, before laying lemon slices along the fish. It was then cooked on the makeshift barbecue we have at the moment. I sliced the cuttlefish ribbon thin and tossed it in olive oil before being quickly frying it off in a very hot pan. It only took about 1 minute to cook the cuttlefish and I can still taste it. 
  • Yummy Meat Patties and Vege Burgers and different breads supplied by Angela
  • Delicious and filling Fried Rice by Marty
  • I made a salad from fresh pickings in the garden including Nasturtium petals and young leaves, marigold petals, chives, lettuce, cucumber and many herbs. A simple dressing was made from lemon juice & olive oil.
  • Coffee and tea was also served throughout the day, along with herbal tea brewing on the barbecue too.
  • Yesterday I also made a batch of Donut Muffins to take along....these were a great hit with everyone. I'd say especially the children.....but I think the adults enjoyed them just as much. I had to hide them yesterday afternoon from DS17 or there might not have been enough to take to the garden...lol. 
There was plenty to go around. I'm glad I made a double batch, and the mini size went down well while everyone was working.......
So here's the recipe for the Donut Muffins....this is a new recipe for me....but I will certainly be making them again....so easy....but ohhhhhh so doubly yummy!

Donut Muffins

175g (6oz) butter, softened
200g (7oz) caster sugar
2 eggs, lightly beaten
375 g (13oz) plain flour
3/4 tablespoon baking powder
1/4 teaspoon bicarbonate of soda
pinch of salt
1/2 teaspoon freshly ground nutmeg
250mls (9 fl-oz) milk

Topping
100g (3 1/2oz) caster sugar
1 teaspoon ground cinnamon
25g (1oz) melted butter


  1. Preheat your oven to 180 degrees Celsius or 350 degrees Fahrenheit. 
  2. Grease your muffin pans well with melted butter.
  3. Beat the butter and sugar until light, fluffy and creamy.
  4. Add the eggs a little at a time, making sure the egg is incorporated well before adding more.
  5. In another bowl, sift the flour, baking powder, bicarbonate of soda, nutmeg and salt.
  6. Add half of the flour mix to the creamed mixture along with half of the milk.
  7. Gently fold the mixture together until well combined..then repeat using the remaining half of the milk and flour.
  8. Spoon mixture into the muffin pans filling them to roughly 2/3 full.
  9. Bake for 15 to 20 minutes depending on your oven. Or until lightly golden or clean skewer tested.
  10. For the topping, mix the sugar and cinnamon together. 
  11. Fresh from the oven after removing them from the muffin pan, paint the tops with melted butter, then toss them in the cinnamon sugar.
  12. Eat them warm from the oven or eat them cold....if they last that long. 
Donut Muffins

Here's wishing all the ladies that are
celebrating Mothers Day
this Sunday.....

a very happy Mothers Day !


Friday, May 11, 2012

Taking the GOOD with the BAD


Gardening for me is a learning process. I have learn't soooo much in these last few years in the garden. I've added heaps of new plants to my list of 'Plant it and have a go'.

I've two new plants in the garden which I have been excited to watch grow....Rosella and Chinese Water Chestnuts. My Rosella hasn't exactly been what you would call a success...but I have learnt lots while attempting to grow it....But the Chestnuts are going great!

Annette Mcfarlane has an informative PDF on Rosella; and according to her notes...I think my plants fell to 'root rot'. I couldn't understand why after all the rain we had a while back caused my plants to become sad looking....I was sure they had gotten plenty of water....but they began looking like they were dying of thirst just the same....

Rosella with Rootrot
Rosella with their calyx
inside the calyx are the seeds
So I've learn't lots about growing Rosella, and will take it all under my wing next season when I try again.....I've excepted the fact that I can't do anything with such a small harvest of calyx, so the one reasonably healthy plant that stands away from the others will be saved for it's seed. Some good came out of this bad after all....because I will have enough seed to use next season. You have to look at the bigger picture and not dwell on what you don't have...but focus on what you DO have. I have Rosella seed for next year! Yayyyy!

*****************************************
That was the bad news....now on to the GOOD news........I've talked about planting my Chinese Water Chestnuts before....in my water garden (the neighbors bath).


The Chestnut reeds are beginning to dye off....which is natural....I will be saving the reeds for weaving...Once they are all dried, they can be soaked to make a good medium for weaving.

Long thin Reeds of the Chinese Water Chestnuts
are beginning to die off
almost ready for harvest
(The other leaf is Water Celery)
I started off with just a few Chestnuts just like these. (Thanks Sonia)....For your water garden, mix a 50:50 of rich compost with sand...and build a good layer of that on the base of your water garden...fill with water and plant a few Chestnuts. You can purchase them online or better still, barter some from a friend to begin your own patch. If they have dried out, or have been frozen, they will not be viable. So fresh is best.

Their taste is unique, but sweet, crispy and fresh. I would describe the flavour as a blend of coconut, apple and maybe sugarcane.......I do have a hard time explaining flavors, so if you can help here...please feel free to leave a comment.

We have been enjoying them fresh from the water garden, or simply sliced thinly into salads. The boys aren't too keen on them whole as a snack, but their salads are still being eaten.....lol. Mum struggles with the skin if left on.....so I peel them roughly when I add them to a salad...but me...I eat them straight from the pond.

Chinese Water Chestnuts

I believe they hold their crispness after cooking too which also improves their flavour and texture. They can be added to all sorts of meals including stews, curries, soups and stir fries. Many Asian recipes include Water Chestnuts.  There is also an Asian drink made by blending raw chestnuts in water  or boiling them or their skins in water for 15 to 30 minutes...adding a little palm sugar to enhance the flavour. The drink tastes like water that has sweet corn added to it.....and it is believed the drink has cooling properties; great for hot days is Asia or even Australia maybe...lol.......  I'm yet to try these other recipes, but they sound interesting.

As I dig around the bottom of the sandy soil, beneath the water...I'm also finding chestnuts with new shoots...the ones with the most shoots....I will be keeping to follow on the next planting...but they must  be kept in water while you prepare your next water garden or finish your harvest in your existing water garden.

Chinese Water Chestnuts
chosen for replanting the next crop

Have you ever tried Chinese Water Chestnuts? Would they be something you would consider growing in a water garden? What about the Rosella? Have you had success? What conditions did you have?


Monday, May 7, 2012

Vermin & Basket Weaving with raw materials

Hi there.....I've got lots to tell you, but firstly I must apologise for my absence. I've been in a bit of a rut lately and life has been full on to say the least. For those who have written to me asking when I will be blogging again....Thank-you for all your well wishes....I'm back, or at least I'm going to try to be back!
During my absence I've lost touch with what everyone else is up to as well. So I want to hear from you. Tell me what's happening at your house at the moment!


So here is a catch up with some things you may find interesting........


A week ago, I would have said the biggest thing I was dealing with would have been trying to get my Mother's blood sugar levels under control...but thankfully that's all good now.......NOW the biggest thing I'm dealing with at the moment is VERMIN...It seems my crop of Madagascar Beans has attracted all the rats and mice in the street...Who knew there was this many....I mean it's not something I care to think about really......I assume they are all coming from the neighbours (3) that keep chickens....
I first thought that the damage was maybe due to birds, as most of the devastation was near the top...(where a bird could perch)...until I found evidence...droppings...large droppings......arrrrghhhhh!

First crop was totally munched....I picked a whole bucket of beans....every one damaged beyond edible.....Thankfully there's still hope because the vines are still flowering.......But I need to get rid of the VERMIN if I want to save any future crops.

 You can see how big these rats are....

VERMIN COUNT SO FAR....RATS 4, MICE 10...... to be continued, I'm sure.....
*********************
On to some exciting news....... 
I recently attended a BASKET WEAVING COURSE
organised by the Shellharbour Council through the Barrack Heights Community Garden.
What an awesome day we had.....


Lovely hand-crafted baskets and other items made by Mr Jim Walliss can be admired at the Arts and Crafts NSW gallery at the Rocks in Sydney...Jim, who ran the class was mostly self taught many years ago from studying aboriginal artefacts in State museums in both South Australia and Queensland. Wanting to use plants indigenous to his local area...NSW.....he found there was very little documentation. 

You can read more on the Aboriginal Plant use for NSW Southern Tablelands website here.....Even after seeking help from Aboriginal Elders he found very few who knew the skills AND were willing to teach him. I can tell you he has certainly done himself proud with his research and developed skills, now having Aboriginal elders seeking him for his knowledge; and we were fortunate enough to be his pupils for the entire day.

The class was split into two groups....One being taught the Coiled basket....and the other half being taught the String Bag technique; with the intent to take your new skills away and swap teaching another person the technique you learnt....I was taught the coiled basket technique. Here is a copy of the booklet we were given which is very simple, but very informative. 

Here are a few photos of some of the items which were made on the day.....

Ross and Joy made these items
Bark from the
Brown Kurrajong tree
Cordage from the bark of the Brown Currajong
Seeds Left to Right: 
Bunya (dyed with most likely red ochre),
Macadamia & Wisteria


Towards the end of the day we were all taught how to harvest and make string from the bark of the brown Kurrajong tree. 
I found this to be very interesting. 

We also used the dried and re-soaked leaves of the Red Hot Poker plant to make a thicker cordage.....I preferred this cord......but it is an introduced plant and not indigenous to Australia. Did you know that your Aloe Vera also belongs to the same family as the Red Hot Poker? Picture the flower......

String made from the leaves of the Red Hot Poker plant
One of the ladies was also shown how to make a New Zealand Flax basket from the leaves of the New Zealand Flax plant....as we watched.....I had a go at making one after the course with a Cordyline, but the leaves were too short and too thin....

New Zealand bag using the leaves of a Cordyline plant
Wanting to finish my own basket from the course...(below)
This basket is roughly twice the size of the one Joy made
: Reason for not being finished...lol
..........I set out hunting and gathering plants last week...and found many along the side of the road and not too far from home.....I had gathered some on my own, then another day after visiting the Albion Park Community Garden; both myself and Ross and his wife Joy went gathering more....
Ross has more knowledge of plants and where they are in the area than I do...but I'm learning. Thanks Ross and Joy for all your help!


Here are the plants that we gathered............................


This seems to be very brittle....Once soaked..
it should be easier to manage.


The base of the thicker plants can be used to make beads like below
Phragmites reed used to make the four beads on the top necklace.
Cordage was Red Hot Poker leaves

For some very clear instruction on how to prepare the flax look here......
To learn how to weave a place-mat look here.
This large Flax will be excellent for weaving a basket.

Ross kindly showed me where this tree is, but I don't plan on harvesting any of the branches as it has been planted in a Bush Regeneration Program and I also took home the sample of bark from the class.
Commersonia fraseri BROWN KURRAJONG
Branch
Commersonia fraseri BROWN KURRAJONG Foliage 


It's an idea to harvest dried plant material as this can save you a lot of time. In order to use most plant matter for basket weaving, you first dry it, then soak it for hours to make it pliable for weaving. 


I think this is the correct photo?

Stripping the willow of its leaves and gathering it in coils
will make it easier later to soak in water.


See how huge this pod is in comparison
to the front of my car? I wonder what I will make with this?
Inside the pod
The outer layer of the pod.


I've also gathered some leaves from the Bana Grass at the local Community Garden


and some Agave leaf...this produces lovely fine thread

Everyone found the class to be very rewarding....now I find myself looking at plants that I never gave a second thought to.....I just need to make time to finish my basket and begin another item......

(I better go do some house-work, this post is far more in depth than I had planned
...but hey...I've loved sharing it all with you)

Have you ever made a basket from raw materials?
Maybe you have done a similar course?
Would you be interested in learning more about
basket weaving with raw materials?


Related Posts Plugin for WordPress, Blogger...