WELCOME to my BLOG

Hi there!

I’m slowly working towards some simplicity within the home, but hey! It’s a lot of hard work!

I love having a go at growing my own veges and always use herbs fresh from my garden. I try to plant from seed whenever I can and have learnt to save and share my own seed for the following year. I make Award Winning preserves and pickles; and my husband brews Award Winning boutique beers as well. I love to stockpile and try to limit quick trips to the shops. I dabble in bread making and enjoy making my own stocks too.

I enjoy feeding my family good hearty meals, nothing like those tiny restaurant stacks you have to look for on the plate. My husband maintains our vehicles and machinery and we both enjoy fabricating on a small scale mostly relying on metal & timber recyclers for any materials needed.


While I don’t always have time to reply to comments, I love reading them. I hope you enjoy your stay and I hope you learn something new because I love sharing what I learn, and I'm always looking for another new skill myself.

Cheers!

Showing posts with label Recycle. Show all posts

Wednesday, March 7, 2012

Saving the fence!

When we moved in, just 8 years ago, we knew there would be maintenance to deal with. Sure, that's part of owning your own home. There have been many changes over those years with some busier than others. I've built complete walls in the garage, storage shelves too....I even built a built-in-robe in our bedroom. Although it hasn't got the doors on it (yet), it's still somewhere to hang our clothes.....and that's something we didn't have at first.

The land in the back yard has been built up, levelled out and paved to the far fence to make the ground not so steep. If your weren't told how deep those back garden beds were, you would never have guessed. There's 12 tonne of road base under those pavers out there, as well as 2 tonne of sand. I'll give you one guess as to who transported it all into the back yard by wheelbarrow (before my bone disease) At the end of Hubby's work day, he would also help with a few barrow fulls, but by then it was time to finish up for the day.

When we were looking for a house, like other first home buyers, we had expectations of what was needed. First priority after affordability and bedrooms etc; was that there had to be room for Mum to build a dwelling in the back yard. After looking at over 50 houses, and losing out on one house, we finally put a bid in for the home we live in today.

I love our home, it's not fancy, there's no style...because I have no sense of the word...(lol), and it's not huge and new like the double story houses that are popping up in the new estates around here. If you go for a drive in a new estate roughly 12 months after the houses are built...You would be amazed at how many of the freshly completed houses are up for sale. Why so quickly? I can't help but think if the young couple bought outside their budget and were living beyond their means.

You MUST live beneath your wage, otherwise there is no true way of earning and saving ANY money.

I see and hear of it all too often around here, people buying a huge house, adding a lovely new car to the mortgage, and while they're at it, adding a pool too. It's like free money when it just gets added on to the end of your mortgage. But it couldn't be further from ideal. It seems there is a reputation of new mortgage couples want it all today. I'm talking of the lovely huge house, the new car, the new swimming pool and possibly a boat if they enjoy fishing. Most of the new houses don't have access to get a boat out the back yard anyway. What about other scenarios like including a huge salary sacrifice if the newly weds become pregnant and one parent has to give up work early. All of these possibilities can spell trouble if you buy above your means.

When it comes to repairs and maintenance on the family home.....
The more you can build, repair, replace, grow and cook....the better off financially you will be. Whenever we find a new breakdown to add to that ever evolving list of household tasks, we try to do the work as soon as possible or as soon as we can afford it. I know we  have saved thousands in work labour alone, having done most of the work ourselves. (Except for when I was really ill, stuck in bed with my Bone Disease ).

This brings me to Repairing the Fence!......
With two fence posts completely rotten at the base...2 whole fence sections have been on a lean that has been  propped up for too long....That has all changed now, and has been corrected. Shopping around at the metal recyclers...We found enough angle iron to repair the side fence. Both my boys helped me with all the work.

*First you need to clear the soil from around the problem post/s....
*Then break up the old concrete from around the post....We hired a Jack Hammer for this job and I took small turns with DS17 and DS20....I was extra proud of my boys and the work they did that day. Although this is a very labour intensive job, it does need to be done, because wet concrete does not stick to dry concrete. (sorry for the bad news)....
*Cut away any dead rotting timber from the base of the posts....
*Measure and cut angle iron to 1 and 1/2 depths of the hole dug....
*Pre-drill the angle iron to the correct size of the bolts chosen....
*Pre-drill the timber posts while holding the angle iron on the post and pulling the fence back into alignment....


*After mixing 'quick mix concrete', pour it into the hole....
*Pull the fence post into alignment and place the angle iron in the future spot that will fit with the timber post. You can judge this by temporarily screwing a few bolts into the post and angle iron. Gently allow the fence to fall back away from the angle iron...it's critical at this time that the angle iron does not move in the wet but setting cement....then allow 24 to 48 hours for the cement to set well....
*Once the cement is well set, pull the fence post into alignment with the angle iron that is set in the concrete....
*While someone is holding the post in place, have someone else put the bolts in. Then screw them in tightly....


And there you have a fence.....all fixed! 


It's much cheaper than replacing the fence...The fence is fine for many years to come...it was just the timber that is in the ground.....when the others go, they will be repaired the same way. I hope you can save some money by doing a fence repair this way.....There's still some life left in the old fence!

Tuesday, May 17, 2011

Drying Roses

Mum gave me her Birthday roses (which she got from my DS19) today to discard...little does she know I have kept them and will be drying them out to make her some Pot Pourri..

The art of keeping the colour in a dried rose petal is to not disturb them while they are drying. I used to shuffle them to rotate them while drying, till one time I forgot I had them and left them.....went back and found the colour was so much better.

Gently pull the roses apart, separating all the petals, and clipping the rose head....the rose heads and smaller leaves are good to add to your pot pourri for bulk.....

Leave them all to dry in a draft free area....check in on them from time to time...once they are all dried and crispy, store in an air-tight container....
I will add some dried pot pourri to some organza bags for her for her draws, she likes smelly things in her draws.


This way she gets to keep the flowers her grandson gave her for her birthday for many years to come.

Oh and the scraps...they go into the Bokashi bin of course....or the compost bin.


I have done this with many gifted flowers, I still have some of my nan's rose petals, but the jar is getting very low...I have started adding my own dried Lemon Verbena to her dried roses to make them go further...and the gift bags are getting alot smaller.

Monday, May 16, 2011

Dish Cloth swap for Mum

If  you have been reading my blog, you will know that I have recently been involved in a Dish-cloth Swap...I received a lovely set of dishcloths from Becci....thanks once again Becci for the lovely swap.
I also included my mum (who lives with us) in the swap too...She ended up with two swap partners, which is very exciting....

Mum has received her first swap in the mail on Friday....and I am ashamed to say that hers has not reached the post office yet....I have just been really busy....Sorry

Here is the lovely swap mum received from ellimay (Lisa)....
Thank-you so much Lisa, how lovely they are.
I would love that soap recipe.
 Once Lisa receives her swap in the mail...I will post a photo of it, like I did with my swap.
So come back soon and check out what Lisa received as her swap from Mum.

*****************************************
Using recycled cottons for my dishcloths
Here are the cotton rolls I have used up so far.....
I sent these off to Victoria with me
to give my niece for her youngest for Kinder....
I love that I am able to use up all Mum's leftover cottons.
I have also been looking in the op-shops for cottons lately.
Here is what I have reclaimed from op-shops so far....a stash I have  found so far....

You won't find any 100% cotton near the wool in your op-shop,
but you may find some in the craft area.
100% cotton, Aida cloth, Frames & Timber knitting needles
Some balls have been very cheaply priced, as the larger green ball $1...and the smaller dark green ball behind it $.35cents. Sometimes I have found a bag with a few balls in it for as little as $1.50

I hope I have inspired you to use up all your leftover cottons, or maybe next time your in the op-shop, you will look for some cottons that need to be claimed and up-cycled into a lovely dishcloth.

Friday, April 29, 2011

RECYCLING STATION IN MY HOME

Since completing the composting/recycling course a few weeks ago, I have made some great changes in the house and the yard.
I have set up a Recycling Station with many smaller sub-stations around the house.....Yep that's what I will call them...the Recycling Station & Sub-Stations.....

Now since I don't have a lot of space, because I haven't de-cluttered since I became sick with my hip....I have had to put the main Station in the hallway for now. Because the new procedures are New.....and we are still getting used to it ....it's actually handy having it in the hallway.

First of all........Just a bit of info I have learnt since the course...Here goes

If I am going to be working in the garden I shred papers and cardboard the night before, so I have it ready to add to the compost bin. I am learning how to manage my compost bins really well now....

Two parts CARBON to one part NITROGEN......Carbon from the brown and dry materials and Nitrogen from the green moist materials.

Examples of Carbon to add to your compost bin are raked up dried leaves, dried or dead twigs and branches cut up into smaller manageable sizes, shredded paper and cardboard etc...

Examples of Nitrogen to add to your compost bin are Fresh Lawn Clippings, Freshly pulled plants that are finished, fresh veg scraps, Bokashi Bin waste, etc.....


I remember them both now by saying in my head: 
"Nitrogen has a G in it, G for Green Waste, 
and Carbon has Car...in it...
Car for Cardboard....
which is dry...
so the dry stuff is Carbon".

And I used to think it was all very complicated.

Now onto My RECYCLING STATION 


The top shelf is just for the purpose of this photo....

  • On the top of the shelving, I have added some jars that still need to be put through the dishwasher before being boxed up into their sizes.....
  • Next to that are some Fowlers Vacola jars I received off freecycle, but that is another post coming soon...as I want to show you how I store my empty jars......
  • The green-circled box belongs in the kitchen and holds recycled papers from anything I buy at the deli...like cold meats, ham hocks etc...I use this paper now instead of Paper Towel....It soaks up oils just fine, and its free. 
  • The bucket belongs in the kitchen and is for ALL my food waste..including cooked leftovers, meat, fish, chicken bones, fish bones, food scraps and peelings...stale bread....Once the kitchen bucket is full, it gets transferred to the Bokashi Bucket on the back verandah. 
  • Absolutely all my food waste goes into my Bokashi Bucket. 
I even put all my prawn shells in there over Easter...and just yesterday, I put in 5 chicken carcasses from making a Chicken Stock,. You can even put in your wilted flowers, cheese, coffee grinds, tea bags, tissues, cooked and uncooked meats and small bones from chicken, lamb and pork chops
This Bokashi thing is truly amazing!! 
And next weekend I am doing a Bokashi course 
where we learn to make the Bokashi powder....
Even Better!!!


  • Beside the shelving is my Paper Shredder tub, which I store papers ready to shred...It's really full at the moment because I sorted out One draw of my filing cabinet...OMG , just one!!

The next shelf shows the following:

  • Empty egg cartons and shredded paper for the bokashi bucket or compost bin......
  • Trash bags I received at the course for rubbish in your car (made from recycled papers), I have also handed many of these out to friends.
  • Fridge magnet memo boards also from the course...displaying "Slim your bin", and "Compost your kitchen scraps at home"....I have one on my fridge and one on mums fridge...I have also handed them out to friends.
  • A tub for empty pill bottles, I use these for storing seeds I have collected from the garden, Once my gathered seeds are fully dried, I use these medication containers...some of the lids even have a built in gel thingy to absorb any moisture.
  • Clear plastic tubs from bought foods like cheese and strawberries..
  • A box for dead batteries....which when full can be taken to Battery World to be disposed of properly.
  • A box for corks...which I am yet to use, and may change as we don't drink bought wine.


The next shelf shows the following:
  • Heavy cardboard from packaging, I may break this down and make paper seed tape....
  • A tub for small cardboard boxes including medication boxes, biscuit boxes, foods that are packaged in small boxes.....
  • Margarine containers, meat trays
  • Ice-cream tubs, small plastic tubs....
  • Mail bags sent to me. I recycle these and use them to send on parcels in the mail...I collect all sizes but the smaller ones I keep here now...I just turned the box on its side so you could see them better.
The bottom shelf shows the following:
  • An empty box, I haven't found a use for yet, but it fits....
  • A box for things to donate to the local Pre-School like yoghurt tubs, kitchen wrap rolls, any of the tubs above,  and the cardboard rolls from dishcloth cottons....(I am using left-over cottons, so I am gathering a lot of empty rolls.)
  • A box for Shopping Bags..I used to have these stuffed everywhere in nooks n crannys...now when the box is jammed full, I take them to the recycle bin at Coles to be recycled.
  • Newspapers, we get two free local newspapers every fortnight, and I also order Saturdays's newspaper. These are stored ready to shred either for the worms, the compost bin...I also wrap soft drink bottles of ice...if going on a trip...It makes them stay cold a lot longer. Newspapers are good for wrapping sanitary napkins at that time of the month too...and wrapping broken glass before being put in your normal bin.
Broken Glass has just reminded me to add my sharps bin to this area. My mum is an Insulin Dependant Diabetic, so we have a Sharps Bin in place too.


Substations around the home:


Here is the new area for my compost bins, I still have the soil bins down the back yard, but this is for the good stuff. I am going to build another garden bed here mainly for a Passion Fruit vine....
The green bin is the one I received for free from the course..and the black one is from the tip for $2 with a 4 inch split in one side....So What!!.....I still have to move all the bricks and the huge slab of cement...but I think this will be a good use of this area.


I have posted this photo before, but when we bought the house the back yard was bear, besides this concrete  wall in the middle of the back yard...so I came up with the idea of putting a sink in (from the tip for $5, and its a double sink)...This is where we clean all the fish we catch...Where I rinse out seedling pots...etc...

  • I store cut soft drink bottles for protecting young plants. 
  • The black bucket is used for my SeaWeed fertiliser which I wrote a tutorial on....
  • The dishdrainer is from the tip...and its heavily plastic coated so it will never rust unless it gets cut....
  • Seedling trays are gathered from freecycle friends
  • The shelf is from the tip....
  • The lattice work behind, is from the tip.....Nothing a coat of paint can't fix....
  • I even get buckets from the tip.....


  • If you have been following my blog, you will know that this is where I bury the Bokashi Waste....but may put it in the compost bins now, to feed the Passion Fruit vine....Oh it will be so happy in all that good soil I am planning and preparing.........


  • Here is  a view into my Bokashi bucket at the moment, In it is prawn shells from Easter, leftovers, all my food waste since I completed the course......When you start putting meats and fish and bones in your Bokashi Bucket, you will find you need more of the powder to help break it down...but I recently added the Chicken Carcasses and it still smells fine....Truly Amazing this Bokashi thing!!


  •  On the back veranda which separates my house with my mum's granny flat, is where I now store the Bokashi Bucket and my new Worm Farm......I don't need to go down stairs to the shed when I want to fill the Bokashi, and I am not going to COOK my worms, like I did last summer...It seems everywhere in my back yard is a potential killing area for worms....but under the veranda its nice and cool... 


Please, if you like what I am doing, or can share some ideas on how to improve this....I would love to hear from you. 


If you have set up your own Recycling Station, take a photo and put it on your blog, leave a comment linking it back to your blog....so we can all share our ideas.....


If I have inspired you to set up something similar in your home, I would also love to hear about it.

Tuesday, April 19, 2011

EASY CHEAP WORM FARM

While completing the compost/recycling workshop...I learn't many things as you would know from my last post.
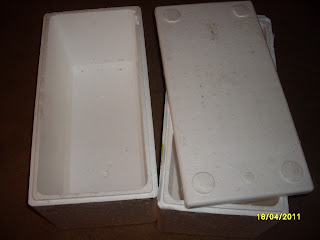
We also learn't how to build the cheapest worm farm I have ever seen...So with some worms from the course, thanks to Brook who won and shared her prize....I set off home to find a nice cool spot for my worms and to source the items needed to make them a home.

Now all you need is 2 foam broccoli boxes...4 kebab sticks....and worms,.....some compost and maybe some mulch.    and food scraps......How easy could it be?  This easy....watch this............


The top box gets holes punched in it.

The bottom box gets 4 skewers stabbed into it like this.....

The top box is now connected to the bottom box.

Add some shredded newspaper on the bottom of the top box.

Wet it down...

Add some compost for your worms to rummage in...
.if you don't have compost and are just starting out, you can use plain peat.

Feed your worms some food scraps.
Not too many, as you may only have a small amount of worms...
.the ratio of food you give them has to be small enough for them to cope,
otherwise the scraps may rot and you may be able to smell it.
Where to get your worms, you ask?  Ask a neighbour or a friend who you know already has a working worm farm....a handful of worms are not going to be missed from a fully established worm farm....or put a request out on freecycle even.
DRAINAGE & HARVESTING THE CASTINGS.....
When I want to collect the "worm tea" (worm wee)...I will just remove the top box, pour the tea into another container and re-assemble the boxes....
To harvest the castings...When the top box is almost full....I will scoop all the worms over to one end of the box...and put some food down on the lower empty side....this will in turn make the worms migrate to the food, leaving me to gather the lovely goodness that they have created.....add some compost to the box....allow them to sort it out...and feed them if needed....back to work for the worms.

Sunday, April 17, 2011

COMPOST COURSE THROUGH MY COUNCIL

Today I attended a FREE course run by my local council on Composting. I recommend checking your local council website to see what workshops are available for you. Local Council's are supporting the efforts of residents, by running free or very cheap workshops...Some councils supply free compost bins if you attend the course...What an excellent incentive for attending a workshop! The compost bin I will receive when I pick it up is a 120 litre original waste bin...the base has been removed to allow contact with the earth...and the lid is still intact. Excellent!! Monday morning bright and early I will pick up my new compost bin.

Please note: This is based on the recycling facilities for Shellharbour Council...
Check with your council for more details.

What I learnt while attending the course
Here is a table I created.


COMPOST FOR LIFE
Get Involved, Protect, Conserve
www.shellharbour.nsw.gov.au 
Remember: Yellow Compost bin items are sorted by hard-working real people of the community.
                                                                      
YELLOW
topped Bin
GREEN
topped Bin
RED
topped Bin
· Aerosol cans – (emptied & lids removed)
· Aluminium
· Bottles
· Butter containers
· Cake/biscuit trays
· Cardboard
· Chinese containers
· Clear plastic cups
· Coffee cup lids
· Envelopes (with/without windows)
· Foil bag from biscuit box
· Foil trays
· Food cans
· Glass bottles
· Make-up jars –(emptied)
· New fridge/tv polystyrene packaging
· Paper
· Pens-outer case
· Pizza boxes –clean
· Plastic tubs
· Printer cartridges
· Pudding tubs
· Soda bottles
· Textas
· Toothpaste tubes – (emptied)
· Tupperware
· Water bottles
· Yoghurt containers

· NO BROKEN GLASS


· Anything from the garden
· Small twigs
· Cuttings
· Grass clippings

· NO FOOD SCRAPS
· NO DOG POO
Any residual waste that cannot be placed in either the yellow or red bin.

· Any plastic bags you can scrunch in your fist.
· Diabetic needle tops
· Juice cartons
· Long Icy-Pole wrappers
· Nappies-disposable
· Newspaper wrappers
· Pizza boxes –dirty
· Polystyrene cups & trays.
· Popper cartons
· Timber off-cuts
· UHT Milk Cartons
· Coloured Junk Mail

· NO COMPUTERS
· NO TV’S


Now here is another table I have created.
Looking even closer at your recycled items.

BEFORE PUTTING IT
IN THE
YELLOW BIN
THINK ABOUT HOW ELSE IT CAN BE USED
YELLOW
topped Bin
HOME COMPOST
BIN
RECYCLE
&
REUSE
· Aerosol cans – (emptied & lids removed)
· Aluminium
· Foil bag from biscuit box
· Foil trays
· New fridge/tv polystyrene packaging
· Pens-outer case
· Printer cartridges
· Textas
· Toothpaste tubes – (emptied)

START A
BATTERY RECYCLING
TUB AT HOME
Have a purple ice-cream container in your home recycle area & label for small batteries. See below for a drop off point.


· Cardboard
· Envelopes (with/without windows)
· Paper
· Pizza boxes –clean
· Garden waste
· Small twigs
· Grass clippings
· Food scraps
· Onion skins
· Egg shells
· Fruit seeds
· Vacuum waste
· Dryer lint
· Newspapers – shredded
· Icy Pole sticks

ADD A
BOKASHI BUCKET TO YOUR HOME COMPOST SYSTEM

· Food scraps
· Meat scraps
· Chicken fat
· Animal bones
· Cooked leftovers
· Breads
· Pasta & Rice
· Bottles
· Butter containers
· Chinese containers
· Clear plastic cups
· Coffee cup lids
· Food cans
· Glass bottles
· Make-up jars –(emptied)
· Plastic tubs
· Printer cartridges
· Pudding tubs
· Soda bottles
· Tupperware
· Water bottles
· Yoghurt containers
· Cake/biscuit trays

· USE SMALL TUBS FOR RAISING SEEDLINGS

· DONATE UNWANTED ITEMS TO A PRE-SCHOOL

· REUSE CORDIAL CONTAINERS AS CANNISTERS (eg Rice, Sugar, Flour)
·  PRINTER CARTRIDGES: All types and brands can be recycled via the ‘Cartridges 4 Planet Ark’ recycling boxes in participating Australia Post, Officeworks, Harvey Norman,Tandy, Dick Smith Electronics and Powerhouse stores.

·  CORKS: Guides Australia collects wine and champagne corks nationally through a network of individuals and collection points at hotels, restaurants and supermarkets.

·  MOBILE PHONES: These can be recycled via most mobile phone outlets.

·  PLASTIC SHOPPING BAGS: These can be recycled at most Coles, Woolworths, Franklins and Safeway supermarkets.

·  BATTERIES: Batteries of all sizes can be recycled via Battery World near Bunnings.


After learning so much on composting..................
I am excited to compost more of the items I use at home.
I have a whole new list of items to add to my Bokashi bucket..........
and I am determined to start a proper recycling area at home in the near future.
So you will have to check back and see how its going.

We also learnt about starting a worm farm...10,000 worms were included as a raffle, but divided by the winner and shared with 3 other people....How lovely! I took home some worms too, but that will be another post in the next few days.

If you have any other ideas..please don't hesitate to leave a comment. After all, we need to learn from one another....Recycle your knowledge and pass it on.
Related Posts Plugin for WordPress, Blogger...