WELCOME to my BLOG

Hi there!

I’m slowly working towards some simplicity within the home, but hey! It’s a lot of hard work!

I love having a go at growing my own veges and always use herbs fresh from my garden. I try to plant from seed whenever I can and have learnt to save and share my own seed for the following year. I make Award Winning preserves and pickles; and my husband brews Award Winning boutique beers as well. I love to stockpile and try to limit quick trips to the shops. I dabble in bread making and enjoy making my own stocks too.

I enjoy feeding my family good hearty meals, nothing like those tiny restaurant stacks you have to look for on the plate. My husband maintains our vehicles and machinery and we both enjoy fabricating on a small scale mostly relying on metal & timber recyclers for any materials needed.


While I don’t always have time to reply to comments, I love reading them. I hope you enjoy your stay and I hope you learn something new because I love sharing what I learn, and I'm always looking for another new skill myself.

Cheers!

Showing posts with label bokashi. Show all posts

Saturday, May 7, 2011

Make your own Bokashi Powder

Today I attended the Bokashi course run by my local council...Shellharbour Council....I encourage you to check your local council and see what FREE courses they offer....Yes FREE!! This Bokashi course was totally free, and we got to bring home a whole heap of Bokashi Powder that we made on the day. You can't get any better than that. 


Notes from the course...
********************************************

THE BOKASHI BUCKET
You can compost almost every kitchen food waste including:
  • fresh fruit and vegetables
  • prepared foods
  • cooked and uncooked meats and fish
  • cheese
  • eggs
  • bread
  • coffee grinds
  • tea bags
  • wilted flowers 
  • tissues

 MAKING YOUR OWN BOKASHI MIX (EM Bokashi)  
((Any italics is my own words))

Original Recipe Bokashi Mix from Stephen Willis.

There are 3 mixes to prepare: 
a lactic acid, a wet mix and a dry mix.

HOW TO OBTAIN LACTIC ACID  (this was prepared ahead of time.)
  • White Rice
  • Wheat Bran 
  • Water
1. Let water that has come from rinsing white rice (homebrand) sit for 5 days until it smells sour.
2. Mix some rice bran or wheat bran with the sour water and leave to float to the surface.
3. Remove floating bran or wheat. The Remaining Liquid is the LACTIC ACID.

To use lactic acid in Bokashi preparation: 
1. Mix one part lactic acid to two parts milk.
2. Leave for a few days until the milk protein separates from the water which can be removed from the top.
3. This leaves a creamy yellow water which you can use.
4. To keep, add equal parts of molasses or brown sugar and store in the fridge.

HOW TO MAKE THE WET MIX   (this was prepared ahead of time)
(In a milk carton add the following......)
  • 2 litres water (pure rainwater or filtered water. Chlorine will kill the bacteria and fungi)
  • 20 mls molasses or brown sugar (dissolved in the water)  
  • 20 mls lactic acid

MIX THE FOLLOWING TO MAKE YOUR DRY MIX
In a large tub of about 80L size....Wearing garden gloves mix the following......
  • 10 Litres of Rice Bran or Wheat Bran...(We used Wheat Bran...you can see the large 25kg bag of Horse Bran from the Produce Store for $14)
  • 5 Litres of Fish Meal or Bone Meal or Chicken Manure (We used a bag of Chicken Manure from the Produce Store for $6)
  • 5 Litres of seed remains after oil extraction of either Canola Seed or Soya, Sunflower, Sesame or Linseed (We used Linseed from the supermarket or health food store, but don't buy organic as it is not needed...Linseed is the cheapest option)
1. Mix dry ingredients in large bucket or crate
2. Combine with wet ingredients
3. Knead together until mixture becomes crumbly yet sticky, like a biscuit base
4. Put into a heavy duty garbage bag, remove all the air, seal and store for about 1-2 weeks inside a plastic tub with an airtight lid. Check after 5 or so days. When it is ready it will crumble to the touch. It will smell sweet and fermented when finished, even without opening the bag. Do not use if it is still fermenting. 

HERE ARE SOME PHOTOS I TOOK
WHILE WE WERE MAKING THE BOKASHI POWDER

Everything you need to make your own Bokashi Mix

Wheat Bran: Also sold as Horse Bran.


Adding the chicken manure


Taking turns mixing


Another happy student with her Bokashi Powder

L to R: Wet mix in Milk carton, plastic bags,
Linseed in 3 packets,
Jam jar lying down with sugar water mix &
Chicken Manure

HOW TO USE THE BOKASHI BUCKET
1. Place a 3 to 4 cm layer of organic wast on top of the grate before coating evenly with a layer of EM Bokashi.
2. Use approximately one handful of EM Bokashi to every layer of waste. Use more EM Bokashi when adding high protein foods such as meat, fish, cheese and eggs.
3. Press down to remove air after every application. A plastic Potato Masher from the op-shop is good for this.
4. Ensure that the lid is closed tightly after each application.
5. Repeat this layering process until the bucket is full, and top-up with a generous layer of EM Bokashi.
6. Frequently drain the Bokashi Juice that has accumulated in the bottom of the bucket.
7. Once the fermentation period is over, you will see that the food has been preserved and now has an appearance similar to pickles. This indicates The Bokashi Bucket composting process has been a success.


Friday, April 29, 2011

RECYCLING STATION IN MY HOME

Since completing the composting/recycling course a few weeks ago, I have made some great changes in the house and the yard.
I have set up a Recycling Station with many smaller sub-stations around the house.....Yep that's what I will call them...the Recycling Station & Sub-Stations.....

Now since I don't have a lot of space, because I haven't de-cluttered since I became sick with my hip....I have had to put the main Station in the hallway for now. Because the new procedures are New.....and we are still getting used to it ....it's actually handy having it in the hallway.

First of all........Just a bit of info I have learnt since the course...Here goes

If I am going to be working in the garden I shred papers and cardboard the night before, so I have it ready to add to the compost bin. I am learning how to manage my compost bins really well now....

Two parts CARBON to one part NITROGEN......Carbon from the brown and dry materials and Nitrogen from the green moist materials.

Examples of Carbon to add to your compost bin are raked up dried leaves, dried or dead twigs and branches cut up into smaller manageable sizes, shredded paper and cardboard etc...

Examples of Nitrogen to add to your compost bin are Fresh Lawn Clippings, Freshly pulled plants that are finished, fresh veg scraps, Bokashi Bin waste, etc.....


I remember them both now by saying in my head: 
"Nitrogen has a G in it, G for Green Waste, 
and Carbon has Car...in it...
Car for Cardboard....
which is dry...
so the dry stuff is Carbon".

And I used to think it was all very complicated.

Now onto My RECYCLING STATION 


The top shelf is just for the purpose of this photo....

  • On the top of the shelving, I have added some jars that still need to be put through the dishwasher before being boxed up into their sizes.....
  • Next to that are some Fowlers Vacola jars I received off freecycle, but that is another post coming soon...as I want to show you how I store my empty jars......
  • The green-circled box belongs in the kitchen and holds recycled papers from anything I buy at the deli...like cold meats, ham hocks etc...I use this paper now instead of Paper Towel....It soaks up oils just fine, and its free. 
  • The bucket belongs in the kitchen and is for ALL my food waste..including cooked leftovers, meat, fish, chicken bones, fish bones, food scraps and peelings...stale bread....Once the kitchen bucket is full, it gets transferred to the Bokashi Bucket on the back verandah. 
  • Absolutely all my food waste goes into my Bokashi Bucket. 
I even put all my prawn shells in there over Easter...and just yesterday, I put in 5 chicken carcasses from making a Chicken Stock,. You can even put in your wilted flowers, cheese, coffee grinds, tea bags, tissues, cooked and uncooked meats and small bones from chicken, lamb and pork chops
This Bokashi thing is truly amazing!! 
And next weekend I am doing a Bokashi course 
where we learn to make the Bokashi powder....
Even Better!!!


  • Beside the shelving is my Paper Shredder tub, which I store papers ready to shred...It's really full at the moment because I sorted out One draw of my filing cabinet...OMG , just one!!

The next shelf shows the following:

  • Empty egg cartons and shredded paper for the bokashi bucket or compost bin......
  • Trash bags I received at the course for rubbish in your car (made from recycled papers), I have also handed many of these out to friends.
  • Fridge magnet memo boards also from the course...displaying "Slim your bin", and "Compost your kitchen scraps at home"....I have one on my fridge and one on mums fridge...I have also handed them out to friends.
  • A tub for empty pill bottles, I use these for storing seeds I have collected from the garden, Once my gathered seeds are fully dried, I use these medication containers...some of the lids even have a built in gel thingy to absorb any moisture.
  • Clear plastic tubs from bought foods like cheese and strawberries..
  • A box for dead batteries....which when full can be taken to Battery World to be disposed of properly.
  • A box for corks...which I am yet to use, and may change as we don't drink bought wine.


The next shelf shows the following:
  • Heavy cardboard from packaging, I may break this down and make paper seed tape....
  • A tub for small cardboard boxes including medication boxes, biscuit boxes, foods that are packaged in small boxes.....
  • Margarine containers, meat trays
  • Ice-cream tubs, small plastic tubs....
  • Mail bags sent to me. I recycle these and use them to send on parcels in the mail...I collect all sizes but the smaller ones I keep here now...I just turned the box on its side so you could see them better.
The bottom shelf shows the following:
  • An empty box, I haven't found a use for yet, but it fits....
  • A box for things to donate to the local Pre-School like yoghurt tubs, kitchen wrap rolls, any of the tubs above,  and the cardboard rolls from dishcloth cottons....(I am using left-over cottons, so I am gathering a lot of empty rolls.)
  • A box for Shopping Bags..I used to have these stuffed everywhere in nooks n crannys...now when the box is jammed full, I take them to the recycle bin at Coles to be recycled.
  • Newspapers, we get two free local newspapers every fortnight, and I also order Saturdays's newspaper. These are stored ready to shred either for the worms, the compost bin...I also wrap soft drink bottles of ice...if going on a trip...It makes them stay cold a lot longer. Newspapers are good for wrapping sanitary napkins at that time of the month too...and wrapping broken glass before being put in your normal bin.
Broken Glass has just reminded me to add my sharps bin to this area. My mum is an Insulin Dependant Diabetic, so we have a Sharps Bin in place too.


Substations around the home:


Here is the new area for my compost bins, I still have the soil bins down the back yard, but this is for the good stuff. I am going to build another garden bed here mainly for a Passion Fruit vine....
The green bin is the one I received for free from the course..and the black one is from the tip for $2 with a 4 inch split in one side....So What!!.....I still have to move all the bricks and the huge slab of cement...but I think this will be a good use of this area.


I have posted this photo before, but when we bought the house the back yard was bear, besides this concrete  wall in the middle of the back yard...so I came up with the idea of putting a sink in (from the tip for $5, and its a double sink)...This is where we clean all the fish we catch...Where I rinse out seedling pots...etc...

  • I store cut soft drink bottles for protecting young plants. 
  • The black bucket is used for my SeaWeed fertiliser which I wrote a tutorial on....
  • The dishdrainer is from the tip...and its heavily plastic coated so it will never rust unless it gets cut....
  • Seedling trays are gathered from freecycle friends
  • The shelf is from the tip....
  • The lattice work behind, is from the tip.....Nothing a coat of paint can't fix....
  • I even get buckets from the tip.....


  • If you have been following my blog, you will know that this is where I bury the Bokashi Waste....but may put it in the compost bins now, to feed the Passion Fruit vine....Oh it will be so happy in all that good soil I am planning and preparing.........


  • Here is  a view into my Bokashi bucket at the moment, In it is prawn shells from Easter, leftovers, all my food waste since I completed the course......When you start putting meats and fish and bones in your Bokashi Bucket, you will find you need more of the powder to help break it down...but I recently added the Chicken Carcasses and it still smells fine....Truly Amazing this Bokashi thing!!


  •  On the back veranda which separates my house with my mum's granny flat, is where I now store the Bokashi Bucket and my new Worm Farm......I don't need to go down stairs to the shed when I want to fill the Bokashi, and I am not going to COOK my worms, like I did last summer...It seems everywhere in my back yard is a potential killing area for worms....but under the veranda its nice and cool... 


Please, if you like what I am doing, or can share some ideas on how to improve this....I would love to hear from you. 


If you have set up your own Recycling Station, take a photo and put it on your blog, leave a comment linking it back to your blog....so we can all share our ideas.....


If I have inspired you to set up something similar in your home, I would also love to hear about it.

Sunday, April 17, 2011

COMPOST COURSE THROUGH MY COUNCIL

Today I attended a FREE course run by my local council on Composting. I recommend checking your local council website to see what workshops are available for you. Local Council's are supporting the efforts of residents, by running free or very cheap workshops...Some councils supply free compost bins if you attend the course...What an excellent incentive for attending a workshop! The compost bin I will receive when I pick it up is a 120 litre original waste bin...the base has been removed to allow contact with the earth...and the lid is still intact. Excellent!! Monday morning bright and early I will pick up my new compost bin.

Please note: This is based on the recycling facilities for Shellharbour Council...
Check with your council for more details.

What I learnt while attending the course
Here is a table I created.


COMPOST FOR LIFE
Get Involved, Protect, Conserve
www.shellharbour.nsw.gov.au 
Remember: Yellow Compost bin items are sorted by hard-working real people of the community.
                                                                      
YELLOW
topped Bin
GREEN
topped Bin
RED
topped Bin
· Aerosol cans – (emptied & lids removed)
· Aluminium
· Bottles
· Butter containers
· Cake/biscuit trays
· Cardboard
· Chinese containers
· Clear plastic cups
· Coffee cup lids
· Envelopes (with/without windows)
· Foil bag from biscuit box
· Foil trays
· Food cans
· Glass bottles
· Make-up jars –(emptied)
· New fridge/tv polystyrene packaging
· Paper
· Pens-outer case
· Pizza boxes –clean
· Plastic tubs
· Printer cartridges
· Pudding tubs
· Soda bottles
· Textas
· Toothpaste tubes – (emptied)
· Tupperware
· Water bottles
· Yoghurt containers

· NO BROKEN GLASS


· Anything from the garden
· Small twigs
· Cuttings
· Grass clippings

· NO FOOD SCRAPS
· NO DOG POO
Any residual waste that cannot be placed in either the yellow or red bin.

· Any plastic bags you can scrunch in your fist.
· Diabetic needle tops
· Juice cartons
· Long Icy-Pole wrappers
· Nappies-disposable
· Newspaper wrappers
· Pizza boxes –dirty
· Polystyrene cups & trays.
· Popper cartons
· Timber off-cuts
· UHT Milk Cartons
· Coloured Junk Mail

· NO COMPUTERS
· NO TV’S


Now here is another table I have created.
Looking even closer at your recycled items.

BEFORE PUTTING IT
IN THE
YELLOW BIN
THINK ABOUT HOW ELSE IT CAN BE USED
YELLOW
topped Bin
HOME COMPOST
BIN
RECYCLE
&
REUSE
· Aerosol cans – (emptied & lids removed)
· Aluminium
· Foil bag from biscuit box
· Foil trays
· New fridge/tv polystyrene packaging
· Pens-outer case
· Printer cartridges
· Textas
· Toothpaste tubes – (emptied)

START A
BATTERY RECYCLING
TUB AT HOME
Have a purple ice-cream container in your home recycle area & label for small batteries. See below for a drop off point.


· Cardboard
· Envelopes (with/without windows)
· Paper
· Pizza boxes –clean
· Garden waste
· Small twigs
· Grass clippings
· Food scraps
· Onion skins
· Egg shells
· Fruit seeds
· Vacuum waste
· Dryer lint
· Newspapers – shredded
· Icy Pole sticks

ADD A
BOKASHI BUCKET TO YOUR HOME COMPOST SYSTEM

· Food scraps
· Meat scraps
· Chicken fat
· Animal bones
· Cooked leftovers
· Breads
· Pasta & Rice
· Bottles
· Butter containers
· Chinese containers
· Clear plastic cups
· Coffee cup lids
· Food cans
· Glass bottles
· Make-up jars –(emptied)
· Plastic tubs
· Printer cartridges
· Pudding tubs
· Soda bottles
· Tupperware
· Water bottles
· Yoghurt containers
· Cake/biscuit trays

· USE SMALL TUBS FOR RAISING SEEDLINGS

· DONATE UNWANTED ITEMS TO A PRE-SCHOOL

· REUSE CORDIAL CONTAINERS AS CANNISTERS (eg Rice, Sugar, Flour)
·  PRINTER CARTRIDGES: All types and brands can be recycled via the ‘Cartridges 4 Planet Ark’ recycling boxes in participating Australia Post, Officeworks, Harvey Norman,Tandy, Dick Smith Electronics and Powerhouse stores.

·  CORKS: Guides Australia collects wine and champagne corks nationally through a network of individuals and collection points at hotels, restaurants and supermarkets.

·  MOBILE PHONES: These can be recycled via most mobile phone outlets.

·  PLASTIC SHOPPING BAGS: These can be recycled at most Coles, Woolworths, Franklins and Safeway supermarkets.

·  BATTERIES: Batteries of all sizes can be recycled via Battery World near Bunnings.


After learning so much on composting..................
I am excited to compost more of the items I use at home.
I have a whole new list of items to add to my Bokashi bucket..........
and I am determined to start a proper recycling area at home in the near future.
So you will have to check back and see how its going.

We also learnt about starting a worm farm...10,000 worms were included as a raffle, but divided by the winner and shared with 3 other people....How lovely! I took home some worms too, but that will be another post in the next few days.

If you have any other ideas..please don't hesitate to leave a comment. After all, we need to learn from one another....Recycle your knowledge and pass it on.

Monday, March 28, 2011

RENDERING FAT & BOKASHI BURIAL & OOPS CHEESE

While I have been ill, there have been a few new followers, so I welcome you to my blog
I hope you like what you see and read. 


I am sure you will be pleased with today's post.
It sure has been a busy day......I'm feeling much better, 
and looking around, there is so much to do....
things I should have been doing but didn't have the energy.....

First off I had fat to render that I had gotten from my new friend Colin the butcher......
and as it was frozen, I thought I would give my new mincer a try...
I have had my mincer for almost a month...but not used it yet as I haven't had time or been too sick.  
I picked this up at Aldi's for $99. 
So today I began rendering the fat. I was disappointed with the amount of waste left over with the last lot of fat I rendered; so I decided to give the mincer a go.....and ground the fat to a fine grade. 
These smaller pieces should prove easier to render.


Mincing the fat before rendering.

For cleaning up the mincer attachments....I came up with the idea of placing them all in boiling water..
This; I hoped would make all the fat dissolve off the attachments and rise to the top of the water....
It worked....Yayyy

Below: I then rubbed baking soda all over the attachments.....straight on the bench that I had the mincer on....which was still greasy....then rubbed the baking soda all over the bench to soak up any fat residue....
It worked tooo!!


Then I washed the parts in warm soapy water, dried them, sprayed them with olive oil (to prevent rust)..
I have seen that some parts can be susceptible to rust, not sure of this model, but not taking the risk.
And have now stored them in a plastic bag...and sealed it.

Here is the oil, simmering away.....I will probably simmer this all day and evening.........
I will write more about these steps, once I have finished rendering.


*****************************************************
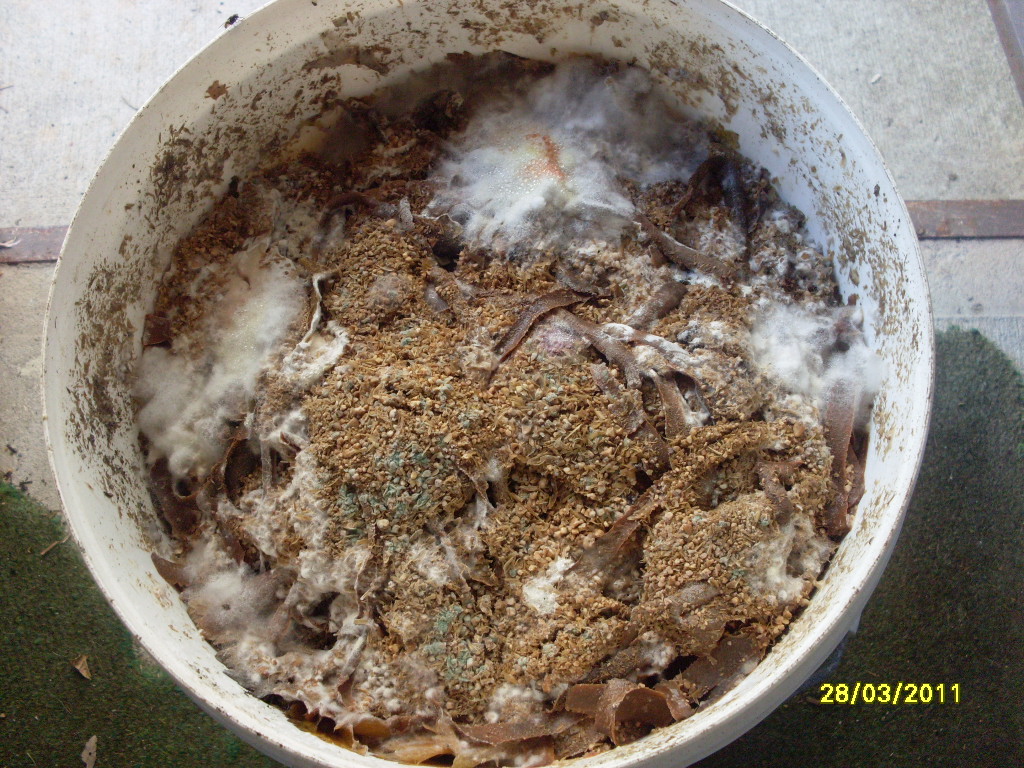
TIME TO BURY WHAT'S IN THE BOKASHI BUCKET

First I went and dug the hole in the compost....this is where I buried all the mushroom stems a few months back....the soil in here is so good. I am really impressed with the quality.


 Collecting the last of the Bokashi tea
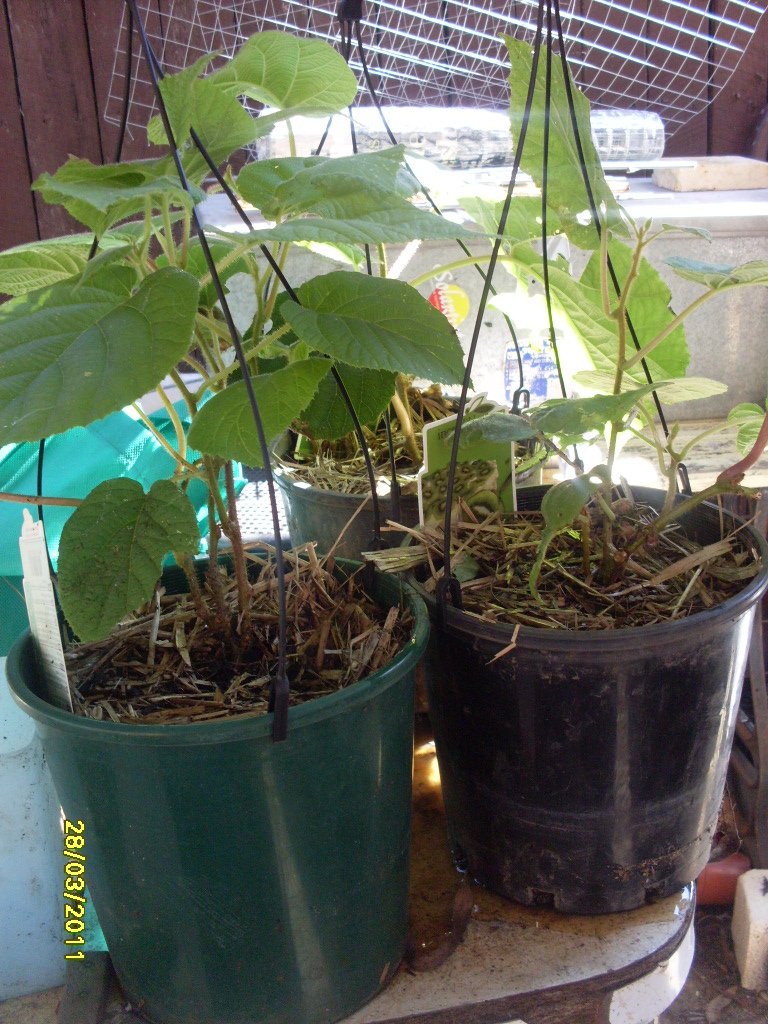
which will be used on the strawberry plants, Aloe Vera & Kiwi Fruit plants. 
Such spoilt plants.


Below: you can see that unwanted mould is starting to develop here....
It is definitley long over due....to be emptied. Surprisingly it doesn't smell offensive though...I can smell a fermented aroma, but certainly not offensive.


 It was so heavy, while I was trying to upend the bokashi bucket,....it sort of just fell like this.


Spread the bokashi waste over the entire pit.


Now cover the Bokashi waste with compost or soil.


 Ahhh more Bokashi tea..... and clean up was so easy!


******************************************************
MY OOPS CHEESE......First of all, let me tell you that I began making a double batch of  Parmesan Cheese yesterday....I found that my rennet was not up to scratch..My milk did not set!    
Last time I used it, I had left it out of the fridge for 24 hours, accidentally packing it away in the cupboard....
I guess I killed my rennet..:(
Not sure about the cultures as they were in the same container :(
and not chilled for the same amount of time   :(

Yep It didn't work, so I saved it by doing the following...............

***************************************
 OOPS CHEESE #1 - Whey and Milk Ricotta
***************************************

I used some of the milk that didn't set properly from the Parmesan Cheese to make this Ricotta.
I also added the cream I had skimmed from the Parmesan Milk and some whey from another cheese. 
I think it will end up a baked Ricotta...this will be a first for us.

First add half a spoon full of baking soda to the milk.....
Then heat the milk/whey/cream to 65 degrees celcius...do not stir......

 When it gets  to 65 degrees C, add 1 tspn of salt to every litre of liquid.........still don't stir.....

Leave it on the heat, and once it reaches 85 degrees C, add 20mls of vinegar per litre.....
don't stir, 
the particles are very small at this stage and rather delicate.......
After adding the vinegar, leave on the heat for another 5 minutes....don't stir.....
 Turn the heat off, and gently remove the curds from the whey....
place all the curds into a strainer lined with a clean cloth.

After all the curds are removed.


Wrap the curds in the cloth, and place a lid on top.

Now wrap up the curds, and place a lid on top, 
Place a bowl on top of that, and fill with water....this acts as a press. 

Once pressed, unwrap and place on a plate....I am going to bake this one.
I have never baked Ricotta before.

Update on the Baked Ricotta

Here is my Chabichou Cheese, and Pressed Ricotta
I am using the infused oil from the Chabichou to fry the Ricotta.....
but you could use any infused oil or even plain oil.

I decided to fry the Ricotta instead of baking it. Much easier this way.


 Hmmm it's smelling good from here.....


Oh no!!! a little bit broke off the side,.....I guess I will just have to try it...
.OMG it is so yummy
Another COOK'S TREAT!!!! heheheheh

****************************************
OOPS CHEESE #2 - nellymary's lemon cheese
Yep, tweaked again.
***************************************

I first strained some more of the milk overnight in a cloth bag, 
thinking I could make some yoghurt....but duhhhh!!! 
I used a cheese culture, not a yoghurt culture....
so cheese it is....but I will tweak it...nellymary style...


So added to this lot, some Lemon Thyme, salt, Lemon rind

 and Lemon Juice, just a half will do.

I have put this into a mould to drain....not sure if it will work,
but I have salted the top, to help draw out the whey.....
once I turn it over, I will salt that side as well....
Leaving it overnight to cure.
I am not expecting a hard cheese, but semi soft will do....
But I will have to wait until tomorrow to see how it is going.

See, it just goes to show, even when you think your milk can't be salvaged because your 'cheese' is not going according to plan.....sit back, have a think about it, and just try something different.....
You never know....
Throw nothing out!!! that's my motto.
**********************************************
NOW TO THINK ABOUT TEA.....
BAKED CHICKEN PIECES
WITH VEG PATTIES & BAKED RICOTTA
**********************************************

The vegetables are from last night, I prepared more than needed to help with tonight's dinner.....
I love mashed potato with a bit of pumpkin....but I didn't have fresh pumpkin on hand.......
So out of the freezer, a bag of frozen cooked pumpkin...to add to the mash...That was last night.

When I have lots of pumpkin, I cube it, and place in the steamer....
then into plastic press-seal bags goes 1 cup of mashed pumpkin....
I add these 1 cup serves to the freezer for 
recipes like my mashed spuds, 
but especially for muffins or scones, Oh they are soooo good.

I also do this with Banana's, and even though they are expensive at the moment, I can make banana bread, or banana scones....or even muffins, on the cheap, because of my stockpile in the freezer.

Leftover veges and Mashed Potato with Pumpkin.
Back to dinner, I just add all the veges into the whizzer to roughly chop them all  to combine them.
Place in a mixing bowl, add a few eggs, 
some plain flour, herbs and spices, some chopped spinach from the garden, 
and Oh! I forgot the grated onion....Oh well. 


Now shallow fry spoonfuls....
and flip when golden. 
If the oven is on, place them in the oven to keep warm until all the mix is used.


Not a bad dinner, everyone enjoyed it....Pretty cheap too......

Baked Chicken Pieces
with Veg Patties and Baked Ricotta

*******************************************************
I also did 2 loads of washing and even had time to plant out the Lemon Thyme and Perpetual Spinach.

 
Some Bokashi tea for these plants and even some for the Kiwi Plants, which are happy since being transplanted a few weeks back.
  I will look after these until they are strong and bold, before I planted them into the ground.

Here is a visitor I found....look closely and you will see his web takes up the entire photo.

I will leave you there for now, my little friend, 
but you will eventually have to move on.

I sure hope you enjoyed reading about my day.....
It was a busy one, and it's good to be feeling healthy again.
If you like something I did, please leave a comment.....
I would love to hear from you.

Oh, I forgot to check the Camembert, I think it needs to be wrapped.....
Ahhhhh tomorrow's another day...
zzzzzzzzzzzzzzzzzzzzzzz

Related Posts Plugin for WordPress, Blogger...