
I wrote about it here, along with the recipe and details on how to make it...
So first of all, you need to prepare your lactic acid..You will see Part 1 here
Then to complete the last step in preparing the lactic acid ready for the Bokashi Powder I wrote Part 2 here
I last wrote the following: ...................
now I am waiting for it to seperate, once that happens, I will be on to Part 3.
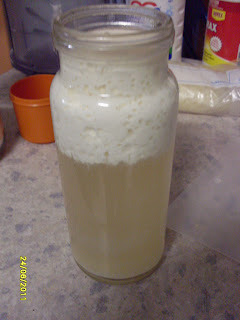
2. Leave for a few days until the milk protein separates from the water which can be removed from the top.
3. This leaves a creamy yellow water which you can use.
4. To keep, add equal parts of molasses or brown sugar and store in the fridge.
So here goes for the final step....gathering all the ingredients and making the Bokashi Powder
The milk protein separated....but I didn't keep the whey for scones this time...I'm keeping it for the Bokashi Powder.....
Measure the amount of whey liquid you have...and add the same amount of brown sugar or molasses ...and mix well...This is ready now to use in the Bokashi Powder recipe...and also ready to store in the fridge until you need to make more.....


After mixing it really well.....then mixing it some more.....bag it up.....removing as much air as possible....Remember this works on the anaerobic principles.


Rice: not added as after soaking and rinsing the rice....I cooked it for tea that night.....I only needed the rinsing water for the Bokashi recipe.
Water: nil
Wheat Bran: .50 cents
Milk: 3 cups or 750mls $2.00

 |
| Equal parts of brown sugar and the whey liquid. |
Making up the final liquid to add to the dry mix...
Add 2 Litres of rain water or filtered water...(not tap water, as there is too much chlorine)
also 20mls of the Lactic Acid you have made....
and 20mls of the Brown Sugar....It's a bit unclear if this is needed in the recipe, seeing it has already been added to the larger bottle....but I figure it won't hurt.....
Mix it all together..you now have your wet mix ready to move on to the final stage of mixing....

Below: See the colour of the water in the recycled milk carton at the back....It's changed colour because it is the now ready to add to the dry ingredients.....
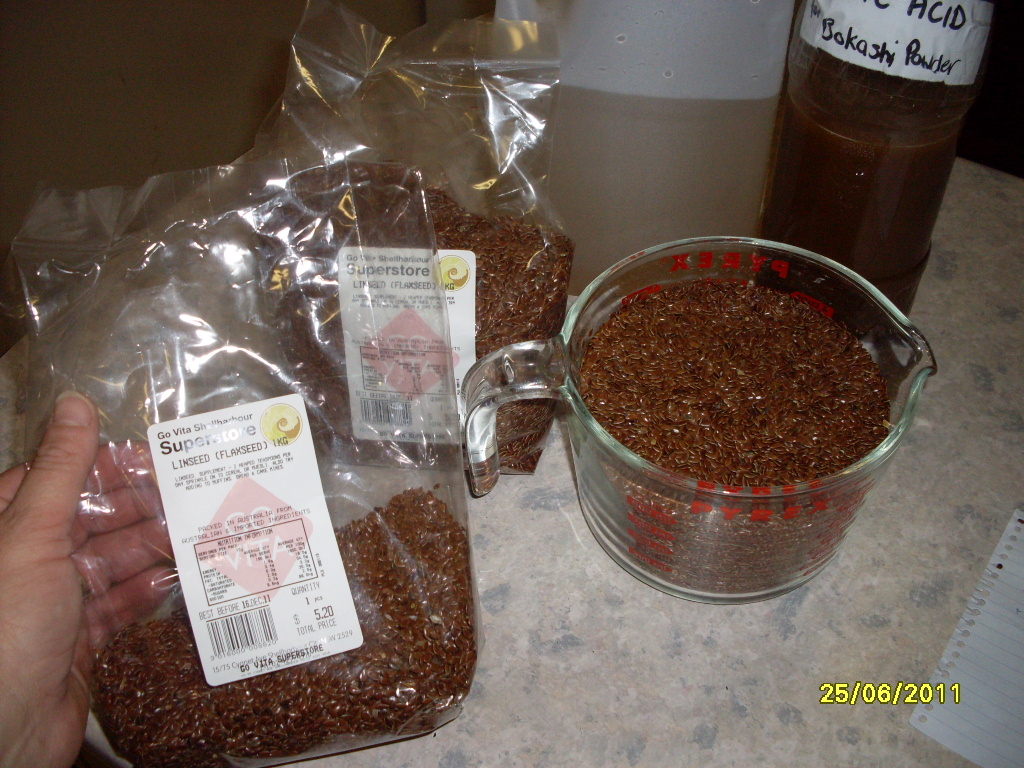
Measure your Linseed or Flaxseed....the 1 kg bag I am holding shows what was left after measuring out 1 Litre of the seed.....this bag cost me $5.20 and I needed about 3 and a half bags.....


Above: Left to Right: A mixing tub..5L of flaxseed (linseed), on the bucket is the wet mixture, then below is the chicken manure....and Wheat Bran....
25kg of Chicken Manure cost me $6.00 (I used about a quarter of this...$1.50)
25kg bag of Wheat Bran cost me $14.00 (I used maybe an eighth of this....$1.75)
Mix in a large tub...the Wheat Bran...the wet mix, the chicken manure, and the linseed.....note how I poured the linseed into the tub, then lined the tub with a plastic bag before measuring out the chicken manure....(manure and food grade containers don't mix in my house)........

Get helpers in to help mix....don't forget to get into the corners.....due to the manure in the mix...wear gloves if your going to use your hands......Thanks for helping DS16...I love ya!


The final price I have worked out to be $24.25.....Now the middle bag in the top row; is a reused 5kg Bokashi bag from Bunnings which cost me $17.00.....I reckon I have about $95 dollars worth of Bokashi Powder there....
So for all the people who are asking if it is worth it.....You betcha it's worth it....What a huge savings.
Plus; I don't feel like I need to scrimp when adding the powder to my food scraps now.......
Once bagged up....you need to let it ferment ....so wrap the bags in a black plastic bag....and place in a cool dark place..In about 2 weeks or so...check on the mix by just moving the tub...If it has started fermenting...you will smell it...It is not an offensive smell....rather sweet really....

The total price:
Rice: not added as after soaking and rinsing the rice....I cooked it for tea that night.....I only needed the rinsing water for the Bokashi recipe.
Water: nil
Wheat Bran: .50 cents
Milk: 3 cups or 750mls $2.00
Flaxseed: $18.50
Chicken Manure $1.50
Wheat Bran $1.75
Total Price: $24.25.....a savings of over $70.00


