WELCOME to my BLOG

Hi there!

I’m slowly working towards some simplicity within the home, but hey! It’s a lot of hard work!

I love having a go at growing my own veges and always use herbs fresh from my garden. I try to plant from seed whenever I can and have learnt to save and share my own seed for the following year. I make Award Winning preserves and pickles; and my husband brews Award Winning boutique beers as well. I love to stockpile and try to limit quick trips to the shops. I dabble in bread making and enjoy making my own stocks too.

I enjoy feeding my family good hearty meals, nothing like those tiny restaurant stacks you have to look for on the plate. My husband maintains our vehicles and machinery and we both enjoy fabricating on a small scale mostly relying on metal & timber recyclers for any materials needed.


While I don’t always have time to reply to comments, I love reading them. I hope you enjoy your stay and I hope you learn something new because I love sharing what I learn, and I'm always looking for another new skill myself.

Cheers!

Showing posts with label campden tablets. Show all posts

Tuesday, March 6, 2012

More progress in the garden!

First off the ranks...I need to let you know that the carrot experiment wasn't a success. Upon inspection the very next day I noticed the carrot lid was to the point of popping off. It was bulging like an explosion was on the horizon...lol....So when I opened the lid to release some pressure....this is what happened....all the fizz came flooding out of the jar.....as I'm not sure this is what is meant to happen, I've tossed the carrot. Carrot NIL...Beans still going........Oh well...worth a try hey!


*************************************
As I have never grown zucchini, I just had to show off what I picked...
but there is something much more exciting than this to show you.....

*************************************

Check this out...We finally finished the front garden bed...Phew...what a job! But it is sooooo worth the work, to think that it will provide us with fruit in the future...and plenty of space beneath for the odd vegetable or herb too. I knew that when we finally filled in the bed, I would have an instant garden; because I have been planning it so long...and hoarding plants in pots out the back too.


So when it came time to planting out...I had  grown from seed or cutting...... Comfrey, Nasturtium, Rosemary, Lavender, Violets and Pyrethrum. I also have a pot of Thornless Blackberries shooting, which will go on the fence later on. I've been buying dwarf fruit trees in ready for freshly built garden beds...I have planted out the dwarf Washington Navel Orange, a dwarf green Apple and a dwarf Seedless Valencia Orange.

Remember, any work you do now, any planning and planting in your garden, is an investment for your future. When I look to the future and I imagine the 'fruits of my labour'....I get excited. 

Over the back behind the Feijoa tree, I planted the triple grafted Apricot tree which I bought for hubby for Christmas. Apricot is his favourite fruit.
In the original garden bed in the front yard, the Taro and the Rosella are very happy. It won't be long before I start seeing new buds on these Rosella.

*************************************
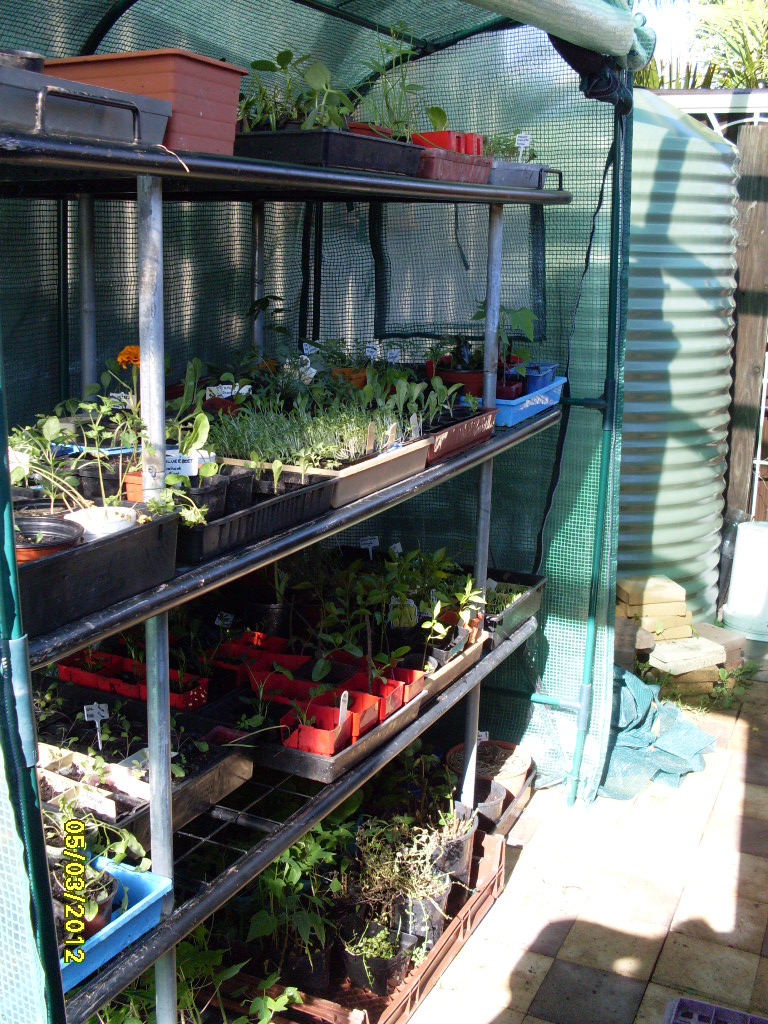
More exciting progress....Hubby was busy on Sunday too, while I was pottering away in the new garden bed with even more plants. .....We had finally sourced enough materials to build a shelving unit for the hothouse. It's only a cheapy from Bunnings, but it gets the job done! The shelving is made up of some bed frames...and some pipe from what we think was once a trampoline cage. I'm so impressed with the shelving...it's made to fit...and without including the ground floor, it can hold 30 seedling trays. That's awesome!

I don't need to put up with the balancing act of the milk crates, and wire mesh now...which was only the floor and one shelf anyway.....OMG I can't believe I filled it...lol....but I do raise plants for the community garden as well as cuttings and seed for the free table at the garden course...along with my own garden needs of-course...Yep, I filled it easy!

*************************************

One day down the track, we will learn how to graft multiple varieties of fruit trees onto one tree...so I'm planning ahead and growing my own apple trees....They still have a way to go...and I still need to germinate a few more varieties...but this is a start.


With all the rain we have been having...the perennial beans have gone wildly crazy.....they are taking over everything...and to think....there are only 3 plants. They haven't begun to flower yet, but Richard says not to worry, because all perennial beans take longer to flower.

The front 
I just looked back on when I planted them....mid September Wow! Is it meant to be that long before I get flowers or should I pull them out? I wonder?  Richard....you out there? 
The back
Even the side is being taken over.
This trellis was meant for the passion-fruit vine on the left.

This cucumber is really determined to live...so I've treated it kindly, and propped it up....given it some old horse manure...and planted two Mini long Egg-Plant in the front.


The Jerusalem Artichoke are going strong and I can see some flower buds on them now. The same at the community garden are in full flower...but also in full sun...so I will plant them in the front yard next season.

****************************
The Water Garden
Every time it rains, the water garden (the neighbours old bath) overflows....which is because I haven't yet gotten around to drilling a over-flow hole in it yet.
I use the Azola to add nitrogen to the compost bin...but I haven't had the the need to add wet ingredients with all this rain. Azola is a fantastic compost generator...and it seems to be enjoying being in this position.
The long reeds are Chinese Water Chestnuts...the fern looking plant to the left is Water Celery and in front of that is the Vietnamese Mint....Scattered all over the Azola is Water Cress, and climbing up the Water Chestnuts is a crazy (PennyRoyal like) mint.

My Water Garden collects the first flush of rainwater from the downpipe.
There's lots of other exciting things happening here at the moment....but I will leave that for another post.

Friday, March 2, 2012

More food experiments........

And to think, I hated chemistry back in school....but with all this fermenting, preserving, growing and baking....I guess I'm into chemistry of sorts....Ahhh...the fun side of chemistry though.....and on my terms too. You have to be a little crazy to like chemistry experiments.....But I'll get back to that shortly.....

So anyway....I was busy in the kitchen again yesterday....with another batch of Tomato Base happening......this time I had tomato, eggplant, carrot, garlic, garlic chives, sage, rosemary, oregano, and leek......Which all got roasted for an hour or so...then put in the crock-pot on low for the rest of the day.

Today I will strain this mix through the moulix...then add chopped rainbow chard, capsicum, zucchini, and squash, and cook until the veg are tender. It will all get bottled up and put in a hot water bath. This will be another addition to the stock pile for the coming year.

(The bold veg is harvested from my own garden...but please don't think I have a huge garden...I've wiped it out again by picking them....and I'll need to wait for more to grow now)


Before adding it all to the crock-pot
For lunch, both Mum and myself enjoyed some fresh sweet potato that I dug up at the Barrack Heights Community Garden. If this is what I'm in for when my plants begin to mature....I'm excited!


LUNCH
Sweet Potato Chips with runny scrambled egg


Onto some experimenting in the kitchen........ While I knew they existed...I had never seen, nor tasted Spaghetti Squash....Until today! Richard donated two of them to the 'free table' at the gardening course last weekend. I quickly snatched one up and felt no guilt at all, jumping in first....lol

SPAGHETTI SQUASH
Yep! I harvested all the seed
and they are now drying for next season
As I have never tried this vegetable...it was a little like doing another experiment in the kitchen....A good one though, because we get to eat the end product....So this is what I did to the Spaghetti Squash....
Firstly, cut the squash in half, then scoop out the loose flesh and seeds......
Spray the tray you intend to bake them on....then select some herbs to place beneath the cut halves...I chose garlic, oregano and rosemary.....I thought this might add to the flavour...which couldn't hurt!......

Then bake in a low to medium oven until tender...which was about 45 minutes for this one on 160 degrees Celsius. Once baked...remove from the oven and scoop out the cooked flesh. Add a dob of butter and some salt & pepper to taste....stir through...and enjoy! We had this as an additional vegetable along with fresh beans again from the garden.....
I think I have found my new favourite vegetable...Now I just can't wait until next season, so I can experiment even more with them....I'm thinking it will be nice added to muffins too....What do you think?

Another experiment.........
this time with Campden tablets.......

Richard over at 'Going My Own Way' lives in South Devon...and he preserves his apples by peeling, chopping them up and simply bottling them with a solution made up of 1 crushed Campden Tablet to 568mls or 1 pint of boiled water.
Testing the apples monthly...after 3 months the apples were still crisp to the bite...and after rinsing well...they tasted perfect. He knows this method from memories of his grandmother doing it....So I guess there's something to be said about listening to our Nan's.
Since learning this method back in September I think...I had to give it a go. With fresh beans from my garden...and a better supply from the Community Garden...I figured now was the perfect time to experiment.

So......To one crushed Campden tablet.(which I sourced at my local home-brew supply shop)...I added 568mls of rain water (OR cooled boiled water) and stirred until dissolved.
I then tailed enough beans to fill one clean but not sterilised glass jar. I left the tops on, so there is something to grab when picking the beans out of the jar....and topped it up with the Campden Water. Make sure that you over fill the jar...as to remove any air lurking. You can also use the handle end of a spoon to move the beans around, helping expel any air bubbles. You will notice that the water level will drop if there was any air left in the jar....just top it up again to overflowing........
After the beans, I still had some Campden Water left over........
so I tried carrots too.....After over filling the jars...place the lids on tight....and wait.
It's apparently that easy!!

I will check on these monthly to see how they are going....If it works...after rinsing the vegetables....they will be as fresh as when they went in the jars.

What was your last experiment in the kitchen?

Have you ever used Campden Tablets to preserve fruit or vegetable? 
What do you think?....
Related Posts Plugin for WordPress, Blogger...