WELCOME to my BLOG

Hi there!

I’m slowly working towards some simplicity within the home, but hey! It’s a lot of hard work!

I love having a go at growing my own veges and always use herbs fresh from my garden. I try to plant from seed whenever I can and have learnt to save and share my own seed for the following year. I make Award Winning preserves and pickles; and my husband brews Award Winning boutique beers as well. I love to stockpile and try to limit quick trips to the shops. I dabble in bread making and enjoy making my own stocks too.

I enjoy feeding my family good hearty meals, nothing like those tiny restaurant stacks you have to look for on the plate. My husband maintains our vehicles and machinery and we both enjoy fabricating on a small scale mostly relying on metal & timber recyclers for any materials needed.


While I don’t always have time to reply to comments, I love reading them. I hope you enjoy your stay and I hope you learn something new because I love sharing what I learn, and I'm always looking for another new skill myself.

Cheers!

Showing posts with label community gardens. Show all posts

Friday, March 2, 2012

More food experiments........

And to think, I hated chemistry back in school....but with all this fermenting, preserving, growing and baking....I guess I'm into chemistry of sorts....Ahhh...the fun side of chemistry though.....and on my terms too. You have to be a little crazy to like chemistry experiments.....But I'll get back to that shortly.....

So anyway....I was busy in the kitchen again yesterday....with another batch of Tomato Base happening......this time I had tomato, eggplant, carrot, garlic, garlic chives, sage, rosemary, oregano, and leek......Which all got roasted for an hour or so...then put in the crock-pot on low for the rest of the day.

Today I will strain this mix through the moulix...then add chopped rainbow chard, capsicum, zucchini, and squash, and cook until the veg are tender. It will all get bottled up and put in a hot water bath. This will be another addition to the stock pile for the coming year.

(The bold veg is harvested from my own garden...but please don't think I have a huge garden...I've wiped it out again by picking them....and I'll need to wait for more to grow now)


Before adding it all to the crock-pot
For lunch, both Mum and myself enjoyed some fresh sweet potato that I dug up at the Barrack Heights Community Garden. If this is what I'm in for when my plants begin to mature....I'm excited!


LUNCH
Sweet Potato Chips with runny scrambled egg


Onto some experimenting in the kitchen........ While I knew they existed...I had never seen, nor tasted Spaghetti Squash....Until today! Richard donated two of them to the 'free table' at the gardening course last weekend. I quickly snatched one up and felt no guilt at all, jumping in first....lol

SPAGHETTI SQUASH
Yep! I harvested all the seed
and they are now drying for next season
As I have never tried this vegetable...it was a little like doing another experiment in the kitchen....A good one though, because we get to eat the end product....So this is what I did to the Spaghetti Squash....
Firstly, cut the squash in half, then scoop out the loose flesh and seeds......
Spray the tray you intend to bake them on....then select some herbs to place beneath the cut halves...I chose garlic, oregano and rosemary.....I thought this might add to the flavour...which couldn't hurt!......

Then bake in a low to medium oven until tender...which was about 45 minutes for this one on 160 degrees Celsius. Once baked...remove from the oven and scoop out the cooked flesh. Add a dob of butter and some salt & pepper to taste....stir through...and enjoy! We had this as an additional vegetable along with fresh beans again from the garden.....
I think I have found my new favourite vegetable...Now I just can't wait until next season, so I can experiment even more with them....I'm thinking it will be nice added to muffins too....What do you think?

Another experiment.........
this time with Campden tablets.......

Richard over at 'Going My Own Way' lives in South Devon...and he preserves his apples by peeling, chopping them up and simply bottling them with a solution made up of 1 crushed Campden Tablet to 568mls or 1 pint of boiled water.
Testing the apples monthly...after 3 months the apples were still crisp to the bite...and after rinsing well...they tasted perfect. He knows this method from memories of his grandmother doing it....So I guess there's something to be said about listening to our Nan's.
Since learning this method back in September I think...I had to give it a go. With fresh beans from my garden...and a better supply from the Community Garden...I figured now was the perfect time to experiment.

So......To one crushed Campden tablet.(which I sourced at my local home-brew supply shop)...I added 568mls of rain water (OR cooled boiled water) and stirred until dissolved.
I then tailed enough beans to fill one clean but not sterilised glass jar. I left the tops on, so there is something to grab when picking the beans out of the jar....and topped it up with the Campden Water. Make sure that you over fill the jar...as to remove any air lurking. You can also use the handle end of a spoon to move the beans around, helping expel any air bubbles. You will notice that the water level will drop if there was any air left in the jar....just top it up again to overflowing........
After the beans, I still had some Campden Water left over........
so I tried carrots too.....After over filling the jars...place the lids on tight....and wait.
It's apparently that easy!!

I will check on these monthly to see how they are going....If it works...after rinsing the vegetables....they will be as fresh as when they went in the jars.

What was your last experiment in the kitchen?

Have you ever used Campden Tablets to preserve fruit or vegetable? 
What do you think?....

Tuesday, February 28, 2012

Another Community Garden & other bits

Hey there....I often wonder how my readers are going? I share so much here with my blog...but often wonder what others are up to. Today both my husband and myself went along to the recently organised Albion Park Community Garden; to show our support while they build their very first compost pile. What a lovely bunch of people! While it's early days yet, and they don't have any garden beds built yet, they have reclaimed a garden that was already there. I took along a tray of seedlings and plants to add to their garden.


Barrack Heights Community Garden
Meet Up to build a Compost Bin


Me and Hubby


While lots of things are happening around here, I don't always have time to write about them. So here are a few chosen bits and pieces.
Rosella flowering

Pizza Scrolls

Huge Egg & bacon pie...oops....no bacon,  but lots of veg and herbs from the garden.

So, what have you been upto lately? 
Have you been gardening? Maybe you've been baking? I'd love to hear about it. 

Friday, January 27, 2012

Increasing your strawberry patch for FREE

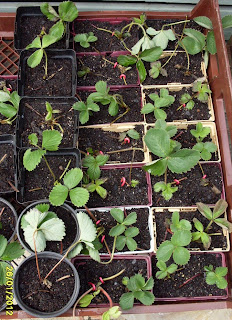
If you live in a similar climate as I do...and you have a few strawberry plants...Now is the time to gather your FREE plants...If you look amongst the leaves, you will notice runners that you can turn into new plants.

It's really simple to increase your strawberry plant numbers during this time.....all you have to do is plant the runners on. If your garden bed has the space, nature will most certainly do it for you...but seeing my strawberry bed is a bunch of self-watering pots.....I feel I need to guide nature a little and give my strawberry plants some extra help along the way....Of course, saving these extra plants pays off by rewarding you with lots more free strawberry plants.....Did you know you can get roughly 20 runners off an individual strawberry plant? (I'm not sure if that is the entire life of a single plant)

There are many ways to collect your strawberry runners, but this is the method I prefer to use....I was never told how to do this, but my theory is.....the longer time the runner can be attached to the mother plant, the better the survival of the baby plant, while it is vulnerable and growing. Remember, the mother plant is usually growing in a larger amount of soil AND mulched...which limits the possibility of the new plant drying out while it is setting roots.

Consider it the umbilical chord for the baby plant.


Below, you can see that I use little wire pegs to keep the plant attached to the soil, so the runner can set roots easier. The peg is just a loop of wire, sometimes I use one on each side of the plant, sometimes it just needs  one.....

Once they are well rooted, these will be planted out into a new garden bed.
There's plenty more FREE strawberry plants coming along.
Below: I'm also helping out the Barrack Heights Community Garden with their strawberry patch and I gathered these runners  last week, and bought them home to grow. Seeing they don't have the mother plant...I will be keeping an eye on them...and once they are well rooted, they will be returned to the Community Garden for a new strawberry bed in the making. 
Barrack Heights Community Garden
Strawberry runners
On Saturday at the garden course, Richard demonstrated that you can completely cut the leaves off the crown, along with most of the roots, and they will still grow.....but I had already done these this way.
I still prefer to keep them attached to the mother plant for the health of the new plant, but if/when you are gifted runners to take home....plant them however you feel works best.


In the garage we have/hoard/collect/recycle a draw of electrical wire of all different diameters and/or plastic coated, that is just another form of recycling that we do....Sometimes I strip the wire, depending on what I need it for....but for strawberry runners...no need. (see the red pegs in the picture above)


Here's some light humour for you....
If you think you have removed all the seed from your Pak Choy seed pods
and decide to use the dried pod shells for mulch.......


Be prepared for seeds to pop up anyway. (below)
don't worry; once these Pak Choy seedlings are a bit bigger
they will be moved on to another area in the garden.


Do you save your strawberry runners? 
Have you ever used your empty seed pods as mulch?

Tuesday, December 20, 2011

Growing Sweet Potatoes


Until recently, I had never grown Sweet Potato....some also know this root vegetable as Kumera. There are three main varieties or colours of the Sweet Potato, but generally, there is not much difference in flavour.

I am yet to harvest my first tuber, but my plant so far is looking rather healthy. Sweet potato is an excellent source of mulch....it's also brilliant as a clay breaker....and either way; you get to eat the end result.....and if you bandicoot them while they are still growing, you get to have your crop and eat it too. How much better can that be?
This photo was taken almost a month ago, and the tub is fully covered over now with leaves and runners.

Even though I had already planted this lot earlier with beginners luck........After learning how to propagate a Sweet Potato Plant correctly at my garden course last Saturday, I had to have another go.  I visited the Barrack Heights Community Garden midweek, and came home with cuttings and plants, along with which was a few runners of Sweet Potato.

You can grow them too if you know someone who is already growing them. You can also plant a young tuber and hope for the best....I have had tubers in a brown paper bag for easy 6 months....and they are just beginning to form eyes on them....so I figure getting some cuttings or a runner off someone is the easier way to go.

Firstly, dig and turn over the soil where you are going to plant the runner.....dig in some compost and make sure there is good drainage in the area you have chosen. You can plant them in raised beds, which is what I am doing, or you can plant them on mounds about 15 to 20 cm high. You can see in the following photo all the tiny new growth, just waiting to prosper.


Use cuttings which are about 30cm long, and remove the side leaves.
Run a slot in the soil, and press the soil over the cutting. Don't forget to leave tip of the cutting exposed above ground.....You should have roughly 5cm of soil covering the cutting.
Water the area well, and often until roots have formed....the rest is just as easy.............

Before covering with soil.
Look at the difference in colour, of the vines.
The green foliage is my original vine, 
and the purple is the one I was given the other day.


Hmmm...I wonder if that means they are two different varieties?

Oh, and check out the two hitch-hikers I picked up from the garden.....I found them in the bag along with the cuttings.......I couldn't help but capture their beauty.....
all the while thinking how nice and fat they were....and how very destructive they would be in my garden, had I not found them........I had never seen anything like them before.


Have you grown Sweet Potato before? If so, how did it go?....Would you have a go now, after seeing how easy it is? ........


Have you ever seen these little, but rather big creatures before? I had a look on Google, but couldn't find their exact eye (fake) markings...lots of other Horned caterpillars though.......

Thursday, September 29, 2011

Milo Biscuits & Wollongong Community Garden Work-shops!

As promised, here is my yummy recipe for Milo Biscuits, although we don't buy Milo, as I can't justify the speed at which it disappears in our house, not to mention the price.

My Mum goes to Bingo three times a week when she is up to it...and she always picks foods her grandchildren (My DS16 & 20) will enjoy. Usually it's Milo, or M&M Buckets. If we have no Milo in the house, she likes to select the Milo for the boys as she knows how much they love it. I like to keep some aside in a jar that they will never find....this way it lasts a little longer, and Mum keeps some over in her kitchen as well.

I think I found this recipe back in a That's Life magazine when DS20 was little..so I can't give thanks to the person who sent it in, but they sure taste good. Too good in fact.!!!

As usual, I make a double batch so they can last [a bit] longer.

Milo Biscuits....
When it gets too thick to mix, and your arm is falling off
What do you grab? A potato masher of-course. 

125 grams butter or margarine
1/2 cup sugar
1/2 cup brown sugar
1 egg
1 3/4 cups of Self Raising Flour (sifted)
1/2 cup Milo, plus a little extra for coating
1/2 teaspoon Vanilla Extract

Beat together the butter and sugars....until light and fluffy. Then beat egg and stir through the butter and sugar mix. Mix until well combined. I would add a little at a time of the egg, and mix each bit in before adding more. It tends to look like it will split.

Mix flour and Milo together in a separate bowl.
Use a tablespoon to measure out the dough.

Fold the flour mixture into the egg mixture....This is where you need your muscles...my Mum's old Sunbeam Electric Hand Beater just up and quit.....It was a Wedding Present of hers. (they got married in 1954).


If the dough is not too sticky, you could knead it a little on the bench....add a little extra flour to make it workable.

Roll into balls using a tablespoon as a measure. Then roll each ball in the Milo before putting them on a tray. Flatten with a fork and bake in a moderate oven for 12 to 15 minutes. They will be soft like an Anzac Biscuit when they come out of the oven, so allow them to cool slightly before transferring them on to a cake rack.


*********************************
Finding your local Community Gardens.

I encourage each and every one of you to locate a Community Garden in your area. I have recently joined my local Community Garden in Barrack Heights and have now attended a no-dig Veg garden workshop at the Wollongong Community Garden. 


Source There I am in the middle
Deep in thought!


Lucern 

Watering each layer is important

Watering in the Molasses
We used about 15 of these watering cans for this sized bed.

Adding Comfrey leaves harvested from
the garden a few days before.

Pocket planting uses your Compost wisely

Dig down until you reach the original soil layer
then add the compost in that pocket

Decide where each seedling will go.
Some seedlings will be smaller than others, the pocket will also provide shade and wind protection while it is growing into a stronger plant. The whole no dig bed concept is truly amazing. While you provide enough water through each layer to help with breaking them down, the water is also providing enough moisture to grow the seedling into a lovely mature plant. All that is needed for the life of the plant....has already been added to the garden bed. It can't get much better than that!


Over the course of the day, we split into two groups and each group built two 'no dig garden beds'.

 Check out some more amazingly healthy plant life here......


Here below, they have a huge long row of veg planted, and they are all very healthy. The volunteers are doing wonderful stuff with their composting and soil building....It shows in the health of their plants.

Directly behind the long row of veg is a Native hedge consisting of many different Australian Natives. These trees all produce a thick hedge and lots of lovely flowers to attract bees and birds. The bees pollinate the veg flowers and the birds eat the insects that like to hang around the veg. The hedge also acts as a huge wind barrier to protect the enormous food forest behind the hedge. If you didn't know the food forest was there....you might miss it. 

Entering the food forest, you will find many varieties of fruit trees as well as other edibles. 
Welcome


Sweet Potato on the Right
as a mulch to hold water in the soil
and also a great ground breaker if the soil is very clay like.

Recycled Eucalyptus mulch for the paths

These large Olive barrels hold the lovely smelly liquid fertilizer
and are scattered around the gardens.
You don't have to walk far to pop the weeds in the barrels.
Nothing leaves the garden.
Here are some of the books that the Volunteers recommend. Aaron suggests not looking in the big book stores, but scouting around at op-shops or book fairs. It's the older books that were written by people with much knowledge that you need to look out for, especially if you can find any written by local authors. What better knowledge can you gather, than from a local author? 


This is only a sample of the library that Aaron has gathered....Instead of writing down Book titles and Author's names...I just take a photo....it's much easier...much quicker....and if you want the ISBN number just take a photo of that too before you take a photo of the next book. A visual is always a good thing.

Here is the kitchen the team are working on. I think it is fantastic! 
As the council has construction rubble, they are dropping it off for them....using only donated building materials takes time, but boy! What a kitchen it will be once it is finished.


I hope you enjoyed 'walking' around the Wollongong Community Garden as much as I did...it shows the huge potential that our local community garden has to offer. 

Look around for your local community garden...If you don't have one, maybe you could consider starting one up!

Enjoy the Milo biscuits too!
Related Posts Plugin for WordPress, Blogger...