WELCOME to my BLOG

Hi there!

I’m slowly working towards some simplicity within the home, but hey! It’s a lot of hard work!

I love having a go at growing my own veges and always use herbs fresh from my garden. I try to plant from seed whenever I can and have learnt to save and share my own seed for the following year. I make Award Winning preserves and pickles; and my husband brews Award Winning boutique beers as well. I love to stockpile and try to limit quick trips to the shops. I dabble in bread making and enjoy making my own stocks too.

I enjoy feeding my family good hearty meals, nothing like those tiny restaurant stacks you have to look for on the plate. My husband maintains our vehicles and machinery and we both enjoy fabricating on a small scale mostly relying on metal & timber recyclers for any materials needed.


While I don’t always have time to reply to comments, I love reading them. I hope you enjoy your stay and I hope you learn something new because I love sharing what I learn, and I'm always looking for another new skill myself.

Cheers!

Showing posts with label strawberry plants. Show all posts

Friday, January 27, 2012

Increasing your strawberry patch for FREE

If you live in a similar climate as I do...and you have a few strawberry plants...Now is the time to gather your FREE plants...If you look amongst the leaves, you will notice runners that you can turn into new plants.

It's really simple to increase your strawberry plant numbers during this time.....all you have to do is plant the runners on. If your garden bed has the space, nature will most certainly do it for you...but seeing my strawberry bed is a bunch of self-watering pots.....I feel I need to guide nature a little and give my strawberry plants some extra help along the way....Of course, saving these extra plants pays off by rewarding you with lots more free strawberry plants.....Did you know you can get roughly 20 runners off an individual strawberry plant? (I'm not sure if that is the entire life of a single plant)

There are many ways to collect your strawberry runners, but this is the method I prefer to use....I was never told how to do this, but my theory is.....the longer time the runner can be attached to the mother plant, the better the survival of the baby plant, while it is vulnerable and growing. Remember, the mother plant is usually growing in a larger amount of soil AND mulched...which limits the possibility of the new plant drying out while it is setting roots.

Consider it the umbilical chord for the baby plant.


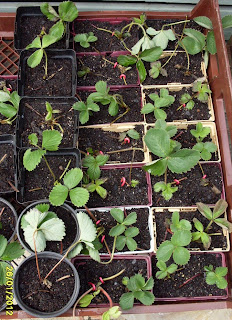
Below, you can see that I use little wire pegs to keep the plant attached to the soil, so the runner can set roots easier. The peg is just a loop of wire, sometimes I use one on each side of the plant, sometimes it just needs  one.....

Once they are well rooted, these will be planted out into a new garden bed.
There's plenty more FREE strawberry plants coming along.
Below: I'm also helping out the Barrack Heights Community Garden with their strawberry patch and I gathered these runners  last week, and bought them home to grow. Seeing they don't have the mother plant...I will be keeping an eye on them...and once they are well rooted, they will be returned to the Community Garden for a new strawberry bed in the making. 
Barrack Heights Community Garden
Strawberry runners
On Saturday at the garden course, Richard demonstrated that you can completely cut the leaves off the crown, along with most of the roots, and they will still grow.....but I had already done these this way.
I still prefer to keep them attached to the mother plant for the health of the new plant, but if/when you are gifted runners to take home....plant them however you feel works best.


In the garage we have/hoard/collect/recycle a draw of electrical wire of all different diameters and/or plastic coated, that is just another form of recycling that we do....Sometimes I strip the wire, depending on what I need it for....but for strawberry runners...no need. (see the red pegs in the picture above)


Here's some light humour for you....
If you think you have removed all the seed from your Pak Choy seed pods
and decide to use the dried pod shells for mulch.......


Be prepared for seeds to pop up anyway. (below)
don't worry; once these Pak Choy seedlings are a bit bigger
they will be moved on to another area in the garden.


Do you save your strawberry runners? 
Have you ever used your empty seed pods as mulch?

Wednesday, February 16, 2011

Seedlings planted for Feb 2011-Part 1

Yesterday, I planted lots of seeds for my winter garden

ALL IN A DAYS WORK!


More garden work tomorrow, if I am up to it. 
I am  in the middle of emptying a trailer of soil,
which is taking its toll on my aches and pain.

Saturday, February 12, 2011

THINGS FROM THE TIP for my garden

I love recycling. I got a huge bird cage for $5. It would hold a cockatoo quite nicely. I completely pulled it apart and flattened out the tin roof, drilling out the pop vivetts, I used the tin from the roof to make the tank pump cover, I had everything here from garage sales or the tip to make it, so I guess it was ALMOST FREE.


I just wish I had taken a photo of the cage before I dismantled it...

I cut the mesh sides into three strips with an angle grinder and used that for borders for my vege gardens.....not in these photos but if you look through the veges, you can still see the two doors from the cage....


***************
Here is an old steel bin that I couldn't resist for 50 cents, I got two that day and I have painted one of them green........all the frame work is from the tip as well.


****************
MY STRAWBERRY PLANTS
Here I have two pieces of galvanised guttering that I have attached to the beams on the fence...

I didn't buy that many strawberry plants, the nursery had punnets with three plants in each....

what I do is look closely at each punnet to see if any have more than the three plants....better value .....I did buy about $30 dollars worth of punnets that day, but I also got 29 FREE PLANTS by looking closer at the punnets.

The plants are now producing runners which I am also planting, eventually it will be full of strawberry plants.....
The cost for guttering $10 I also put down some old coconut fibre I had laying around, then I sprinkled lightly some of those water crystals, then planted the plants, I first used crushed egg shells as a mulch because they were tiny and I didn't want to feed the slugs my new plants..

Notice the organza bag on one of the strawberries, I get an extra chance at NOT feeding the birds my lovely strawberries...it seems if I can hide them, I might get to pick them...

Since building this for my strawberries, we have had some really hot days. Unfortunately many of the strawberry plants on the top row have gotten quite burnt. If I was to do another one of these I would think about putting something else in the top row, or just mounting the guttering on the middle support on the fence. I just hope my strawberry plants survive.

********************
MY SEEDLING AREA
Here is my set up for growing veges from seeds...I can get bread trays for $1 at the tip.....The flyscreens are also from the tip for $1.00 each....they help to stop the birds eating the nice young shoots.....the furnace bricks are leftover that I got from freecycle...we actually hired a brick saw and cut them into thirds to use as pavers for the back yard....
It is all easily dismantled if I wish as I only used cable ties as hinges and screws.....All my punnets and trays are also from freecycle.....my name tags are made from ice-cream containers cut up, we don't buy icecream, but I put a call out to freecycle whenever I am running low......


*******************************
SOME FENCING TO KEEP RUSTY AND CINDY OUT OF THE GARDEN.

Ok, now here in the front of the garden is some fencing, which is actually about 4 meters long....very straight and neat for $5 at the tip.....it was a dog impound for when people take dogs to a show....I think they would be rather expensive for dog owners.....there was no preparation or dismantling with this one, I just bought it home and nailed it onto the front of the garden beds. I now have no more dogs on that garden either...all for $5.


That is just some of the things I have done to recycle in my garden, hope you enjoy.......

Related Posts Plugin for WordPress, Blogger...